
Локальная разработка HTTPS с использованием самоподписанных SSL-сертификатов
В процессе локальной веб-разработки и тестирования крайне важно моделировать подключение по HTTPS, аналогичное боевому окружению. Хотя самоподписанные SSL-сертификаты не доверяются публичными центрами сертификации (CA), они являются удобным способом реализовать HTTPS в локальной среде. В этом материале подробно разобрано, как с помощью интегрированного инструмента OpenSSL в ServBay сгенерировать эффективный и безопасный самоподписанный SSL-сертификат на основе эллиптических кривых (ECC), а также настроить его для вашего локального сайта через ServBay. В качестве примера используется доменное имя servbay.demo.
Понимание конфигурации HTTPS поможет полноценно тестировать поведение сайта в защищённых соединениях, например, отрабатывать сообщения о смешанном контенте, настройки безопасности куки и т.д.
Обзор
Самоподписанный сертификат — это SSL-сертификат, который вы создаёте и подписываете самостоятельно, а не получаете от доверенного стороннего центра сертификации. Они применяются в случаях, когда нет необходимости в публичном доверии:
- локальная среда разработки
- внутренние тестовые серверы
- внутренние приложения для работы с некритичными данными
ServBay интегрирует инструмент OpenSSL, позволяя вам прямо из терминала создавать необходимые файлы сертификатов.
Предварительные условия
- ServBay установлен и запущен.
- Вы знакомы с базовыми операциями в командной строке.
Шаг 1: Генерация самоподписанного ECC SSL-сертификата
Рекомендуется использовать ECC-сертификаты, так как при сопоставимом уровне безопасности они позволяют использовать более короткие ключи, быстрее выполняется подпись и проверка, а нагрузка на вычислительные ресурсы ниже по сравнению с традиционными RSA-сертификатами.
Пошаговая инструкция по созданию самоподписанного ECC SSL-сертификата:
Создайте ECC-приватный ключ (Private Key)
Откройте терминал. Выполните следующую команду для генерации ECC-приватного ключа с использованием кривой
prime256v1и сохранением ключа в файлservbay.demo.key.shopenssl ecparam -genkey -name prime256v1 -out servbay.demo.keyopenssl: запуск инструмента OpenSSL.ecparam: работа с параметрами ECC.-genkey: генерация ключа.-name prime256v1: выбор кривой ECC,prime256v1(NIST P-256) — популярная и безопасная кривая.-out servbay.demo.key: имя выходного файла приватного ключа.
Создайте запрос на подпись сертификата (CSR)
Используйте созданный на предыдущем шаге приватный ключ
servbay.demo.keyдля формирования файла запроса на подпись сертификатаservbay.demo.csr. В CSR содержится вся информация, которую вы хотите видеть в самом сертификате (например, домен, организацию и др.), а также подпись вашего приватного ключа.shopenssl req -new -key servbay.demo.key -out servbay.demo.csrПосле выполнения команды OpenSSL поочерёдно предложит ввести данные для заполнения CSR. Следуйте подсказкам. Самое важное — поле
Common Name (e.g. server FQDN or YOUR name)— здесь укажите домен локального сайта, например,servbay.demo. Остальные поля можете заполнить по своему усмотрению или как в примере ниже.Пример процесса ввода:
Country Name (2 letter code) [AU]:CN # Код страны, например CN (Китай) State or Province Name (full name) [Some-State]:Hong Kong # Регион/область Locality Name (eg, city) []:Kowloon # Город Organization Name (eg, company) [Internet Widgits Pty Ltd]:ServBay # Название организации Organizational Unit Name (eg, section) []:Development # Подразделение Common Name (e.g. server FQDN or YOUR name) []:servbay.demo # **Внимание: здесь указывается ваш локальный домен** Email Address []:admin@servbay.demo # Контактный e-mail Please enter the following 'extra' attributes to be sent on in your certificate request A challenge password []: # Необязательно, можно оставить пустым An optional company name []: # Необязательно, можно оставить пустымСоздайте самоподписанный сертификат
Теперь используем ваш CSR (
servbay.demo.csr) и приватный ключ (servbay.demo.key) для генерации самоподписанного SSL-сертификатаservbay.demo.crtсо сроком действия 365 дней.shopenssl x509 -req -days 365 -in servbay.demo.csr -signkey servbay.demo.key -out servbay.demo.crtopenssl x509: работа с сертификатами формата X.509.-req: на вход подаётся CSR.-days 365: устанавливает срок действия сертификата в 365 дней.-in servbay.demo.csr: имя входного файла CSR.-signkey servbay.demo.key: подпись сертификата приватным ключом (для самоподписанного — тем же ключом).-out servbay.demo.crt: имя итогового файла сертификата.
После этих операций в текущей директории появятся три файла:
servbay.demo.key(приватный ключ),servbay.demo.csr(запрос на подпись сертификата), иservbay.demo.crt(самоподписанный сертификат).
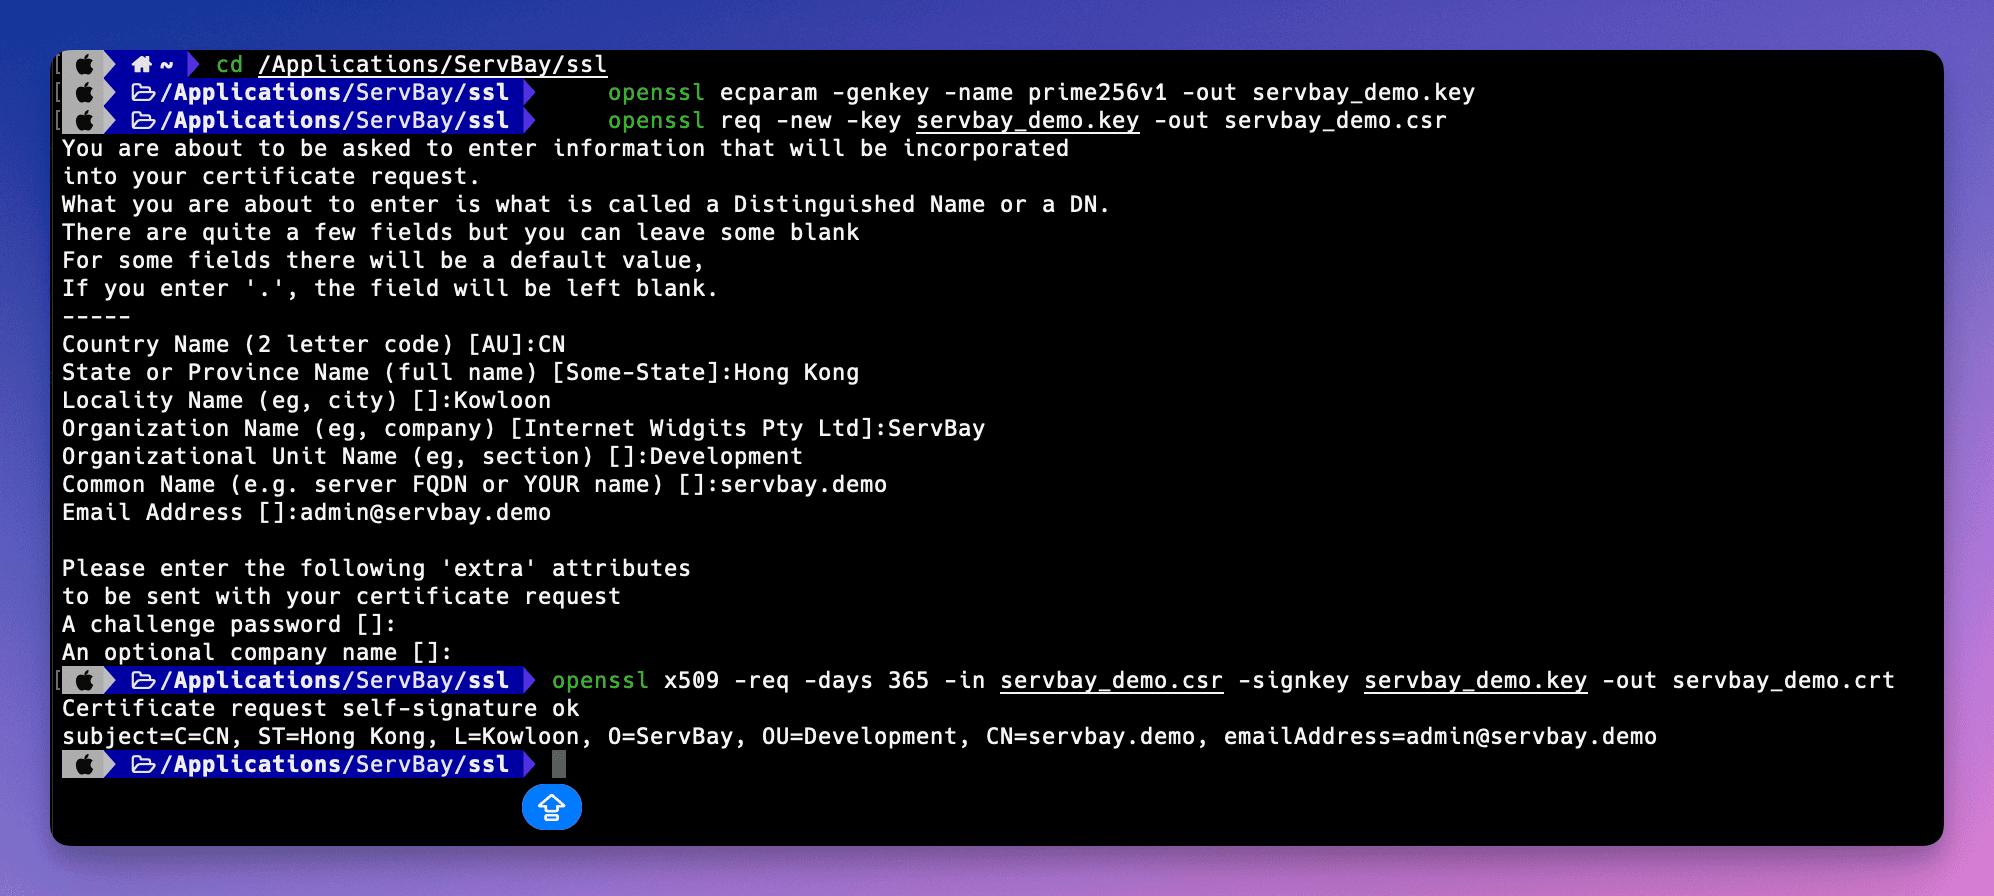 (Иллюстрация: процесс генерации файлов сертификата с помощью команды OpenSSL в терминале)
Шаг 2: Настройка самоподписанного SSL-сертификата в ServBay
После генерации сертификата эти файлы необходимо разместить в доступном для ServBay месте и указать их пути в конфигурации сайта. Рекомендуется хранить SSL-файлы в папке /Applications/ServBay/ssl с отдельной подпапкой для каждого домена — это упростит администрирование.
Переместите файлы сертификата в нужную директорию
В соответствии с рекомендациями ServBay, переместите полученные файлы в папку
/Applications/ServBay/ssl/private/tls-certs/servbay.demo/. Если такой директории ещё нет, создайте её.sh# Создать директорию, если не существует mkdir -p /Applications/ServBay/ssl/private/tls-certs/servbay.demo/ # Переместить файлы mv servbay.demo.key /Applications/ServBay/ssl/private/tls-certs/servbay.demo/ mv servbay.demo.crt /Applications/ServBay/ssl/private/tls-certs/servbay.demo/ # CSR нужен не всегда, но можно сохранить для архива или безопасности mv servbay.demo.csr /Applications/ServBay/ssl/private/tls-certs/servbay.demo//Applications/ServBay/ssl/: основной каталог для хранения SSL-файлов в ServBay.private/tls-certs/: рекомендуемая иерархия подпапок для приватных TLS/SSL-сертификатов.servbay.demo/: отдельная папка для каждого доменного имени для удобства управления.
Откройте административный интерфейс ServBay
Запустите приложение ServBay и откройте его панель управления.
Добавьте или отредактируйте конфигурацию сайта
Перейдите во вкладку Websites (Сайты). Если для
servbay.demoещё не создан конфиг, нажмите Добавить сайт (Add Website). Если он уже существует, выберите нужный и откройте для редактирования.Настройте SSL/HTTPS
В настройках сайта найдите секцию SSL/HTTPS или аналогичный раздел.
Выберите источник сертификата: Custom (Пользовательский)
В опциях выдачи или типа сертификата выберите Custom (пользовательский сертификат).
Укажите пути к файлам сертификата
В появившихся полях укажите абсолютные пути к нужным файлам в директории SSL ServBay:
- Certificate Key File (приватный ключ):
/Applications/ServBay/ssl/private/tls-certs/servbay.demo/servbay.demo.key - Certificate File (сертификат):
/Applications/ServBay/ssl/private/tls-certs/servbay.demo/servbay.demo.crt
- Certificate Key File (приватный ключ):
Установите доменное имя
Проверьте, что в поле Domain (Домен) вписано
servbay.demo.Сохраните и примените конфигурацию
Сохраните изменения. ServBay предложит применить конфигурацию (обычно предполагается перезапуск соответствующего веб-сервера, например, Caddy или Nginx). Подтвердите применение изменений.
 (Иллюстрация: настройка пользовательского пути к SSL-сертификату для сайта в административном интерфейсе ServBay)
Проверка конфигурации HTTPS
После настроек откройте в браузере https://servbay.demo/, чтобы убедиться, что HTTPS работает корректно.
Так как используется самоподписанный сертификат, а не выданный публичным CA, большинство браузеров покажет предупреждение о недоверенном сертификате или возможной угрозе безопасности — это нормальное поведение.
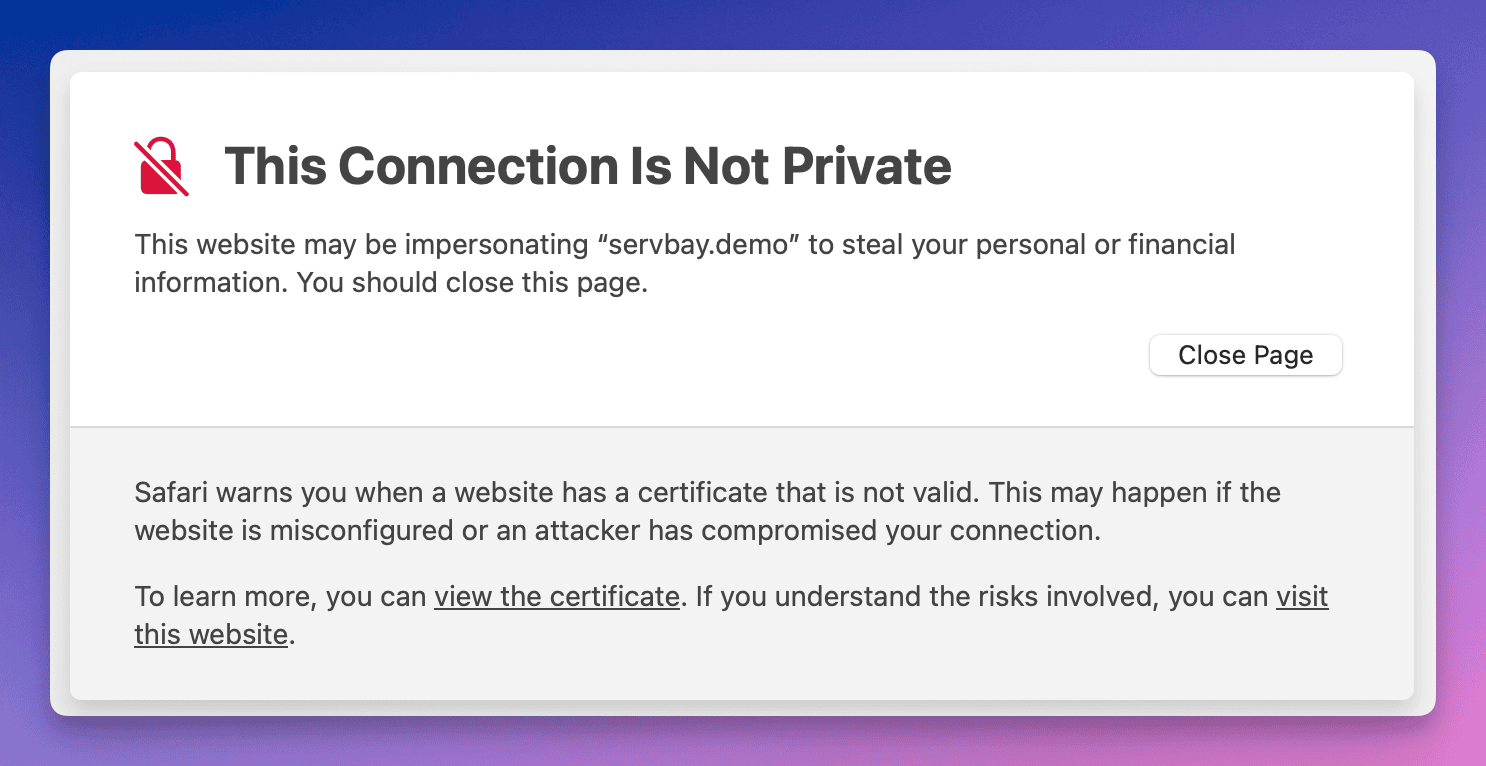 (Иллюстрация: предупреждение браузера при доступе к сайту с самоподписанным сертификатом)
Вы можете проигнорировать предупреждение и продолжить (обычно есть кнопка "Дополнительно" или "Перейти на сайт"), либо для полного устранения сообщений добавить свой сертификат в доверенное хранилище вашей ОС.
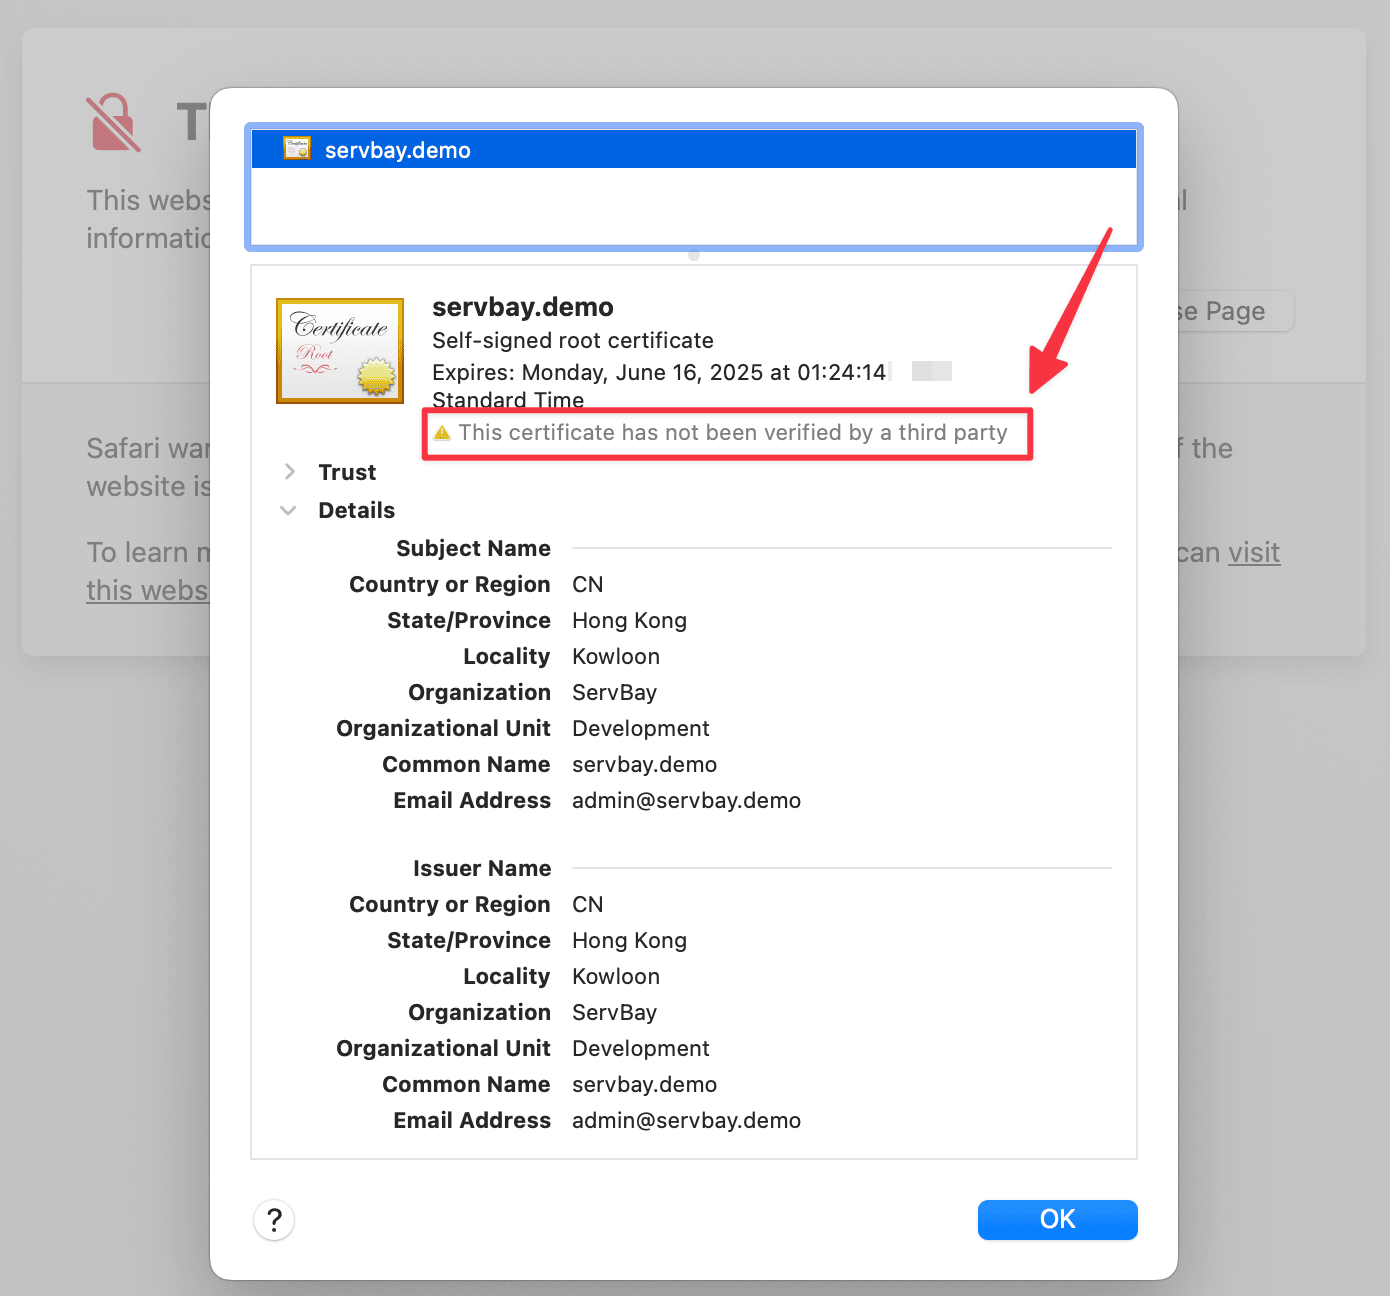 (Иллюстрация: детальная информация о самоподписанном сертификате в браузере)
Посмотрев детали сертификата, убедитесь, что он действительно соответствует servbay.demo.
Важные замечания
- Безопасность приватного ключа: ваш приватный ключ (
.key) — крайне важный и чувствительный файл. Обеспечьте надёжное хранение: не допускайте его утечки и убедитесь, что доступ есть только у пользователя ServBay. - Пути к файлам: в конфигурации ServBay пути ко всем SSL-файлам должны быть указаны полностью и без ошибок.
- Совпадение домена: в поле Common Name (CN) сертификата должен быть точно тот же домен, который прописан в конфиге сайта ServBay, иначе браузер покажет ошибку несоответствия имен.
- Срок действия сертификата: срок действия самоподписанного сертификата — тот, который вы укажете при генерации (
-days). По окончании срока потребуется создать новый сертификат и сконфигурировать заново.
Связанные темы и альтернативные решения
Хотя самоподписанные сертификаты подходят для базового локального тестирования HTTPS, при необходимости приближенного опыта, аналогичного доверию публичного CA, можно воспользоваться дополнительными возможностями ServBay:
- ServBay User CA: в ServBay встроен инструмент для создания пользовательского центра сертификации. Добавьте этот CA в доверенное хранилище вашей системы, а затем подписывайте сертификаты ваших локальных сайтов с помощью него. Эти сертификаты будут распознаваться как доверенные и в браузере, и в операционной системе, что особенно важно для работы с OAuth, Webhooks и вообще в тех случаях, когда требуется доверие к сертификату.
- ServBay Public CA: ServBay также может предоставить публичную функцию CA для выдачи сертификатов локальным доменам и автоматической настройки их доверия в системе.
Такие альтернативы проще и надёжнее, особенно если вы работаете с несколькими сайтами. Ознакомьтесь с документацией ServBay, чтобы узнать подробности.
Часто задаваемые вопросы (FAQ)
- В: Почему мой сайт всё равно отмечен как небезопасный после установки сертификата?
- О: Самоподписанные сертификаты не доверяются публичными CA, поэтому браузеры всегда будут показывать предупреждение. Для устранения предупреждения нужно добавить сертификат или свой CA (например, созданный через ServBay User CA) в доверенное хранилище системы.
- В: Могу ли я использовать сертификат RSA?
- О: Да, OpenSSL поддерживает генерацию RSA-сертификатов. Используйте команду
openssl genrsa -out servbay.demo.key 2048для создания приватного RSA-ключа, далее — стандартные шаги по CSR и выпуску сертификата. Однако ECC предпочтительнее с точки зрения производительности.
- О: Да, OpenSSL поддерживает генерацию RSA-сертификатов. Используйте команду
- В: Как добавить самоподписанный сертификат в доверенное хранилище macOS?
- О: Откройте приложение "Доступ к связке ключей" (Keychain Access), выберите хранилище "Система" или "Вход". Перетащите файл
.crtна панель. Двойным щелчком откройте импортированный сертификат, разверните раздел "Доверие" и установите "Всегда доверять" для SSL. Закройте окно, при необходимости введите пароль. Перезапустите браузер.
- О: Откройте приложение "Доступ к связке ключей" (Keychain Access), выберите хранилище "Система" или "Вход". Перетащите файл
Итоги
Теперь вы знаете, как с помощью OpenSSL, интегрированного в ServBay, генерировать самоподписанные ECC SSL-сертификаты и подключать их к локальным сайтам. Несмотря на то, что самоподписанные сертификаты предназначены исключительно для локального развития и тестирования, этот процесс помогает понять принципы работы HTTPS и повысить защищенность проекта даже на этапе разработки. Для ещё более удобного управления доверием на локальной машине рекомендуется изучить функции User CA и Public CA в ServBay — это значительно упростит доверие к сертификатам для всех ваших локальных сайтов. Удачной разработки!
