
Lokales HTTPS-Development mit selbstsignierten SSL-Zertifikaten
Beim lokalen Web-Development und Testen ist es entscheidend, eine HTTPS-Verbindung wie in der Produktionsumgebung zu simulieren. Selbst wenn selbstsignierte SSL-Zertifikate nicht von öffentlichen Zertifizierungsstellen (CA) anerkannt werden, sind sie eine praktische Lösung, um HTTPS im lokalen Entwicklungsumfeld einzusetzen. In dieser Anleitung erfahren Sie Schritt für Schritt, wie Sie mit den in ServBay integrierten OpenSSL-Tools ein effizientes und sicheres ECC (Elliptic Curve Cryptography) selbstsigniertes SSL-Zertifikat generieren und es in ServBay für Ihre lokale Website einrichten. Als Beispiel wird die Domain servbay.demo verwendet.
Die korrekte HTTPS-Konfiguration hilft Ihnen, das Verhalten Ihrer Website unter sicheren Verbindungen umfassend zu testen – beispielsweise im Hinblick auf Mixed Content-Warnungen, sichere Cookies und weitere Aspekte.
Überblick
Selbstsignierte Zertifikate sind SSL-Zertifikate, die Sie selbst erstellen und signieren, anstatt sie von einer vertrauenswürdigen CA ausstellen zu lassen. Sie eignen sich für Szenarien, in denen keine öffentliche Vertrauenskette notwendig ist, zum Beispiel:
- Lokale Entwicklungsumgebungen
- Interne Testserver
- Interne Anwendungen ohne sensible Daten
ServBay integriert das OpenSSL-Tool, sodass Sie unkompliziert Zertifikatsdateien direkt im Terminal erstellen können.
Voraussetzungen
- ServBay ist installiert und läuft.
- Grundkenntnisse im Umgang mit der Kommandozeile sind vorhanden.
Schritt 1: Selbstsigniertes ECC-SSL-Zertifikat erstellen
Wir empfehlen ein ECC-Zertifikat, da es im Vergleich zu klassischen RSA-Zertifikaten bei gleicher Sicherheitsstufe oft einen kleineren Schlüssel, schnellere Signatur- und Verifizierungszeiten sowie eine geringere Systemlast bietet.
So erstellen Sie Ihr selbstsigniertes ECC-SSL-Zertifikat:
ECC-Privatschlüssel generieren
Öffnen Sie Ihr Terminal. Mit folgendem Befehl wird ein ECC-Privatschlüssel (
servbay.demo.key) mit der Kurveprime256v1erzeugt.shopenssl ecparam -genkey -name prime256v1 -out servbay.demo.keyopenssl: Startet das OpenSSL-Tool.ecparam: Arbeitet mit Parametern für ECC.-genkey: Erstellt einen Schlüssel.-name prime256v1: Gibt den Namen der genutzten ECC-Kurve an;prime256v1(NIST P-256) ist eine gängige und sichere Wahl.-out servbay.demo.key: Bestimmt den Dateinamen für den Privatschlüssel.
Certificate Signing Request (CSR) erstellen
Nutzen Sie den eben erzeugten Private Key (
servbay.demo.key), um eine sogenannte CSR-Datei (servbay.demo.csr) zu erstellen. Die CSR enthält gewünschten Zertifikatsinformationen (wie Domainname, Organisation etc.) und wird mit Ihrem Private Key signiert.shopenssl req -new -key servbay.demo.key -out servbay.demo.csrNach dem Ausführen werden Sie von OpenSSL gebeten, verschiedene Angaben zu machen, die in die CSR aufgenommen werden. Wichtig ist vor allem das Feld
Common Name (e.g. server FQDN or YOUR name), in das der Domainname Ihrer lokalen Website gehört, z. B.servbay.demo. Die übrigen Felder können nach Ihren Wünschen oder nach dem Vorbild unten ausgefüllt werden.Beispiel für die Eingabe:
Country Name (2 letter code) [AU]:CN # Ländercode, zum Beispiel CN (China) State or Province Name (full name) [Some-State]:Hong Kong # Bundesland oder Provinz Locality Name (eg, city) []:Kowloon # Stadt Organization Name (eg, company) [Internet Widgits Pty Ltd]:ServBay # Name der Organisation Organizational Unit Name (eg, section) []:Development # Name der Organisationseinheit Common Name (e.g. server FQDN or YOUR name) []:servbay.demo # **Wichtig: Ihre lokale Domain!** Email Address []:admin@servbay.demo # Kontakt-E-Mail-Adresse Please enter the following 'extra' attributes to be sent on in your certificate request A challenge password []: # Optional, kann leer bleiben An optional company name []: # Optional, kann leer bleibenSelbstsigniertes Zertifikat ausstellen
Verwenden Sie Ihre CSR (
servbay.demo.csr) und den Private Key (servbay.demo.key), um abschließend ein selbstsigniertes SSL-Zertifikat mit einer Gültigkeit von 365 Tagen zu erstellen (servbay.demo.crt).shopenssl x509 -req -days 365 -in servbay.demo.csr -signkey servbay.demo.key -out servbay.demo.crtopenssl x509: Zum Arbeiten mit X.509-Zertifikaten.-req: Gibt an, dass die Eingabe eine CSR ist.-days 365: Setzt die Gültigkeitsdauer auf 365 Tage.-in servbay.demo.csr: Gibt das CSR als Input an.-signkey servbay.demo.key: Signiert das Zertifikat mit Ihrem Private Key (self-signed).-out servbay.demo.crt: Legt den Dateinamen des Zertifikats fest.
Nach diesen Schritten befinden sich drei Dateien im aktuellen Verzeichnis:
servbay.demo.key(Privatschlüssel),servbay.demo.csr(Zertifikatsanfrage) undservbay.demo.crt(selbstsigniertes Zertifikat).
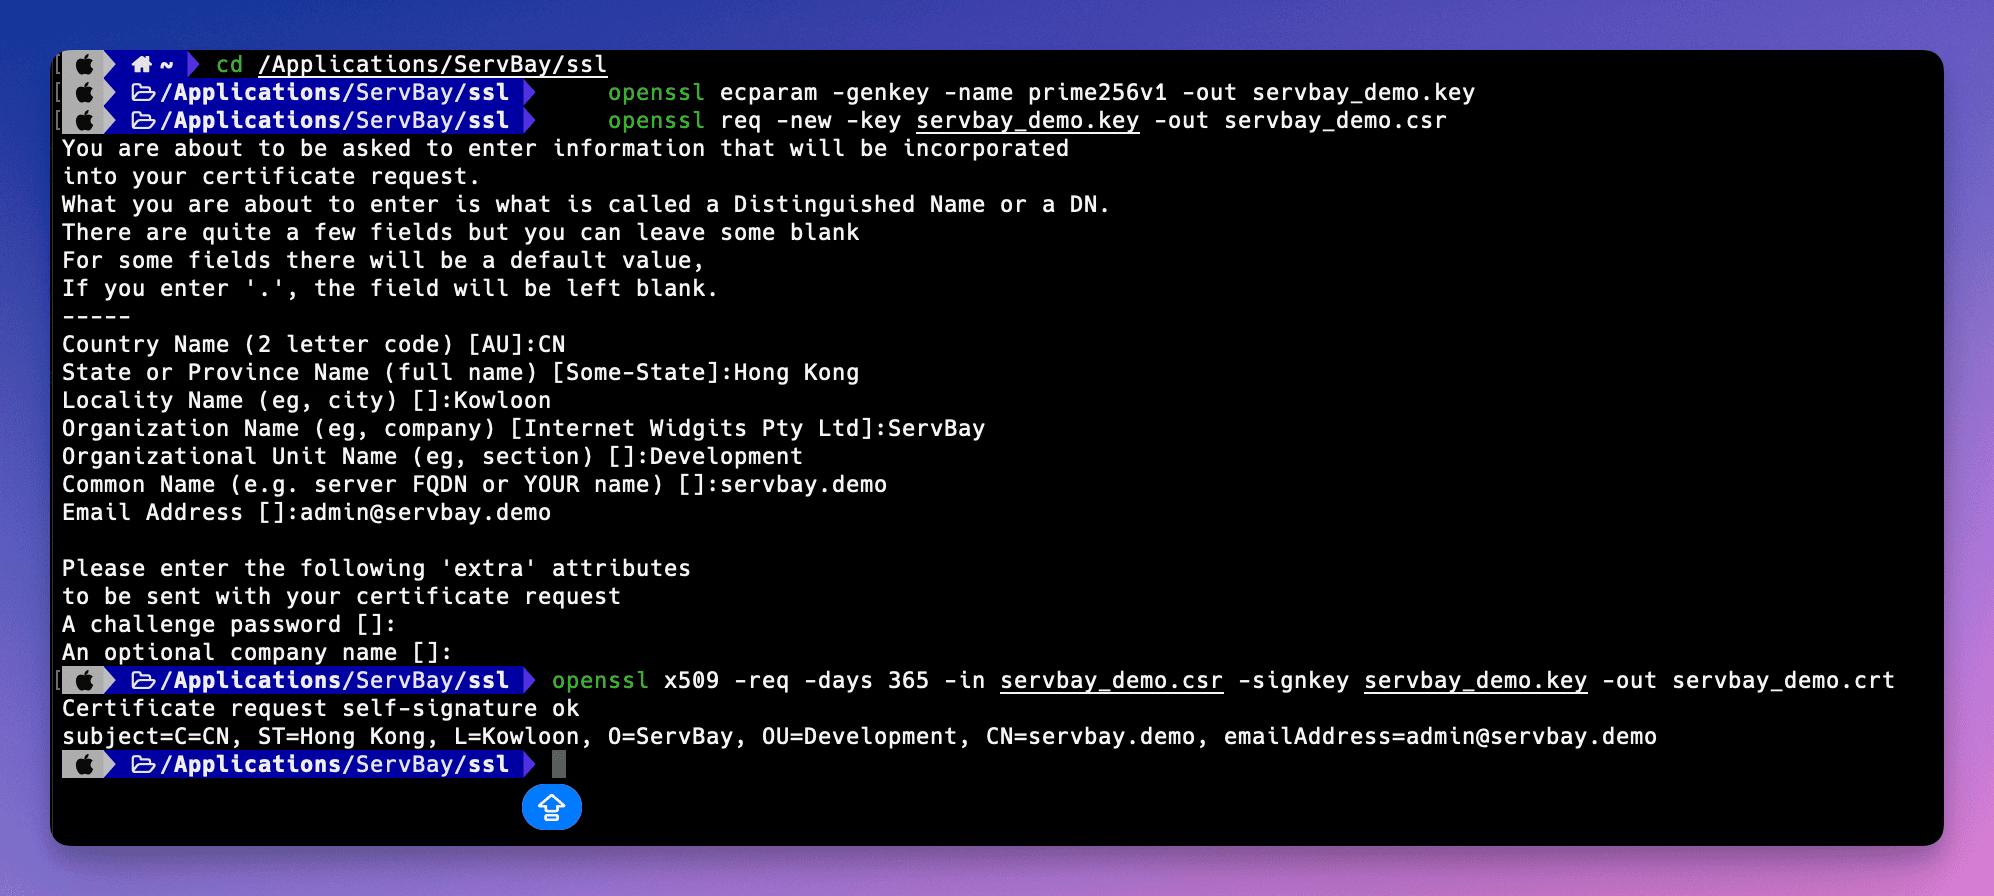 (Abbildung: Vorgang zur Erstellung der Zertifikatsdateien im Terminal mit OpenSSL)
Schritt 2: Selbstsigniertes SSL-Zertifikat in ServBay einbinden
Nachdem Sie die Zertifikatsdateien erstellt haben, müssen Sie diese an einen Ort verschieben, der für ServBay zugänglich ist, und in der Website-Konfiguration von ServBay die Dateipfade angeben. ServBay empfiehlt, alle SSL-Zertifikate zentral im Verzeichnis /Applications/ServBay/ssl zu verwalten und für jede Domain einen eigenen Unterordner anzulegen.
Zertifikatsdateien in das Zielverzeichnis verschieben
Gemäß der empfohlenen Struktur von ServBay verschieben Sie die erstellten Dateien in das Verzeichnis
/Applications/ServBay/ssl/private/tls-certs/servbay.demo/. Existiert dieses Verzeichnis noch nicht, erstellen Sie es wie folgt:sh# Falls das Verzeichnis nicht existiert, erst anlegen mkdir -p /Applications/ServBay/ssl/private/tls-certs/servbay.demo/ # Dateien verschieben mv servbay.demo.key /Applications/ServBay/ssl/private/tls-certs/servbay.demo/ mv servbay.demo.crt /Applications/ServBay/ssl/private/tls-certs/servbay.demo/ # Die CSR wird meist nicht mehr benötigt, Sie können sie aber zur Dokumentation ebenfalls ablegen mv servbay.demo.csr /Applications/ServBay/ssl/private/tls-certs/servbay.demo//Applications/ServBay/ssl/: Das Standardverzeichnis, in dem SSL-bezogene Daten in ServBay gespeichert werden.private/tls-certs/: Empfohlenes Unterverzeichnis für private TLS/SSL-Zertifikate.servbay.demo/: Legen Sie für jede Domain einen eigenen Unterordner an – besonders nützlich bei vielen lokalen Websites.
ServBay-Administrationsoberfläche öffnen
Starten Sie die ServBay-Applikation und öffnen Sie das Verwaltungs-Interface.
Website-Konfiguration hinzufügen/bearbeiten
Navigieren Sie in der ServBay-Oberfläche zur Registerkarte Websites. Falls noch kein Konfigurationseintrag für
servbay.demobesteht, wählen Sie Add Website. Andernfalls klicken Sie auf die entsprechende Konfiguration, um sie zu bearbeiten.SSL/HTTPS-Konfiguration öffnen
Suchen Sie in den Website-Details den Abschnitt SSL/HTTPS oder eine ähnliche Option.
Zertifikatsquelle auf „Custom“ stellen
Wählen Sie im Bereich für die SSL-Zertifikatswahl die Option Custom (benutzerdefiniertes Zertifikat).
Zertifikatspfad angeben
Tragen Sie die vollständigen Pfade zu den eben verschobenen Zertifikatsdateien in die vorgesehenen Felder ein:
- Certificate Key File (Privatschlüssel): Pfad:
/Applications/ServBay/ssl/private/tls-certs/servbay.demo/servbay.demo.key - Certificate File (Zertifikat): Pfad:
/Applications/ServBay/ssl/private/tls-certs/servbay.demo/servbay.demo.crt
- Certificate Key File (Privatschlüssel): Pfad:
Domain eintragen
Stellen Sie sicher, dass das Feld Domain exakt auf
servbay.demogesetzt ist.Einstellungen speichern und anwenden
Speichern Sie die Änderungen. ServBay wird Sie auffordern, die Konfiguration zu übernehmen, was meistens einen Neustart des zugehörigen Webservers (beispielsweise Caddy oder Nginx) beinhaltet. Bestätigen Sie die Übernahme.
 (Abbildung: Festlegen der benutzerdefinierten SSL-Zertifikatspfade in der ServBay-Oberfläche)
Überprüfung der HTTPS-Konfiguration
Nach Abschluss der Konfiguration können Sie im Browser prüfen, ob alles funktioniert, indem Sie https://servbay.demo/ aufrufen.
Da Sie ein selbstsigniertes Zertifikat verwenden, das nicht von einer öffentlichen und vom System/browser anerkannten Vertrauensstelle stammt, wird der Browser eine Sicherheitswarnung anzeigen und auf mögliche Risiken oder fehlendes Vertrauen hinweisen. Dies ist zu erwarten.
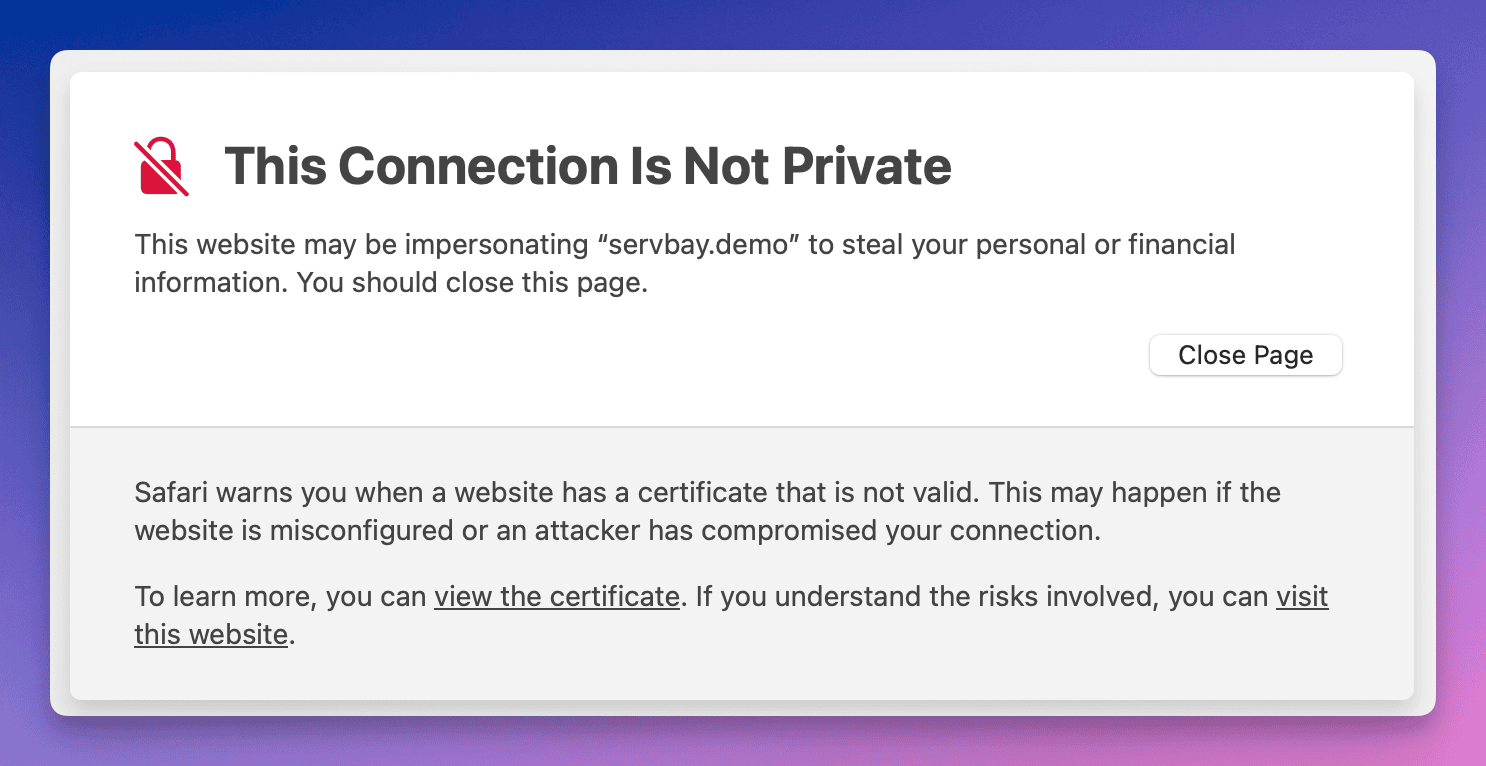 (Abbildung: Sicherheitswarnung beim Besuch einer Website mit selbstsigniertem SSL-Zertifikat)
Sie können die Warnung ignorieren und fortfahren (oft über einen Button "Erweitert" oder "Weiter zu dieser Website"), oder das Zertifikat in den vertrauenswürdigen Speicher Ihres Betriebssystems aufnehmen, um die Warnung künftig zu umgehen.
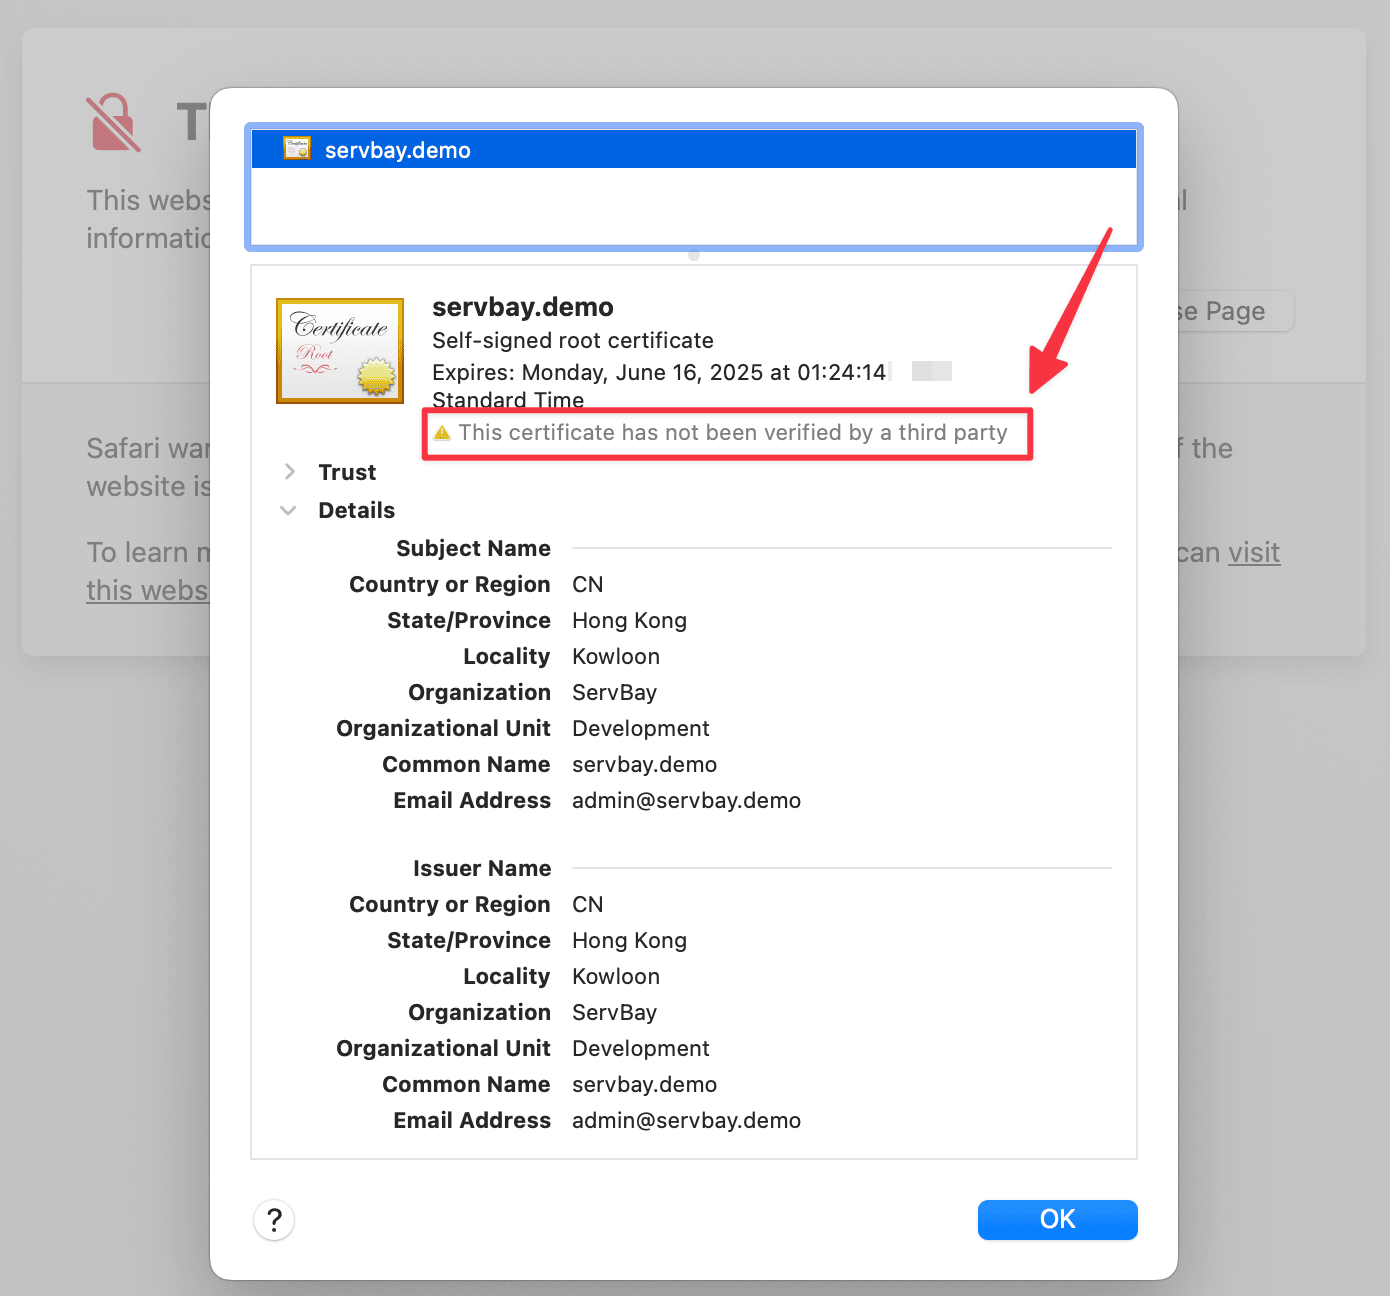 (Abbildung: Anzeige der Details eines selbstsignierten Zertifikats im Browser)
Durch einen Blick in die Zertifikatsdetails können Sie bestätigen, dass tatsächlich Ihr servbay.demo-Zertifikat geladen wurde.
Wichtige Hinweise
- Sicherheit des Privatschlüssels: Ihr privater Schlüssel (
.key) ist hochsensibel und muss sicher aufbewahrt werden. Im lokalen Development sollte der Zugriff ausschließlich autorisierten Nutzern möglich sein. - Korrekte Pfade: Achten Sie in der ServBay-Konfiguration auf vollständige und richtige Dateipfade zu den Zertifikaten.
- Domainabgleich: Die beim Zertifikat angegebene Domain (Common Name/CN) muss exakt mit der bei ServBay konfigurierten Domain übereinstimmen, da der Browser andernfalls eine Fehlermeldung zum Domainnamen ausgibt.
- Ablaufdatum: Die Gültigkeit des selbstsignierten Zertifikats definieren Sie beim Erstellen (Parameter
-days). Nach Ablauf muss das Zertifikat neu generiert und eingebunden werden.
Verwandte Themen & Alternativen
Obwohl selbstsignierte Zertifikate für einfache lokale HTTPS-Tests ausreichen, bietet ServBay noch komfortablere Wege, um eine möglichst realitätsnahe Zertifikatsumgebung zu simulieren:
- ServBay User CA: ServBay enthält ein Tool für eine benutzerdefinierte CA. Nach dem Hinzufügen der ServBay User CA in den vertrauenswürdigen Speicher Ihres OS können Sie Zertifikate für Ihre lokalen Seiten ausstellen und erhalten browser- und systemseitig Vertrauen – Warnungen entfallen. Besonders nützlich bei Szenarien wie OAuth-Callback-, Webhook- oder anderen vertrauensabhängigen Tests.
- ServBay Public CA: Es existiert zudem eine Public-CA-Funktion, die Zertifikate für lokale Domains ausstellt und diese automatisch in das System einbindet.
Gerade beim parallelen Betrieb vieler Test-Websites sind diese Lösungen meist komfortabler als die manuelle Bearbeitung und Einbindung selbstsignierter Zertifikate. Details finden Sie in der ServBay-Dokumentation.
Häufig gestellte Fragen (FAQ)
- Frage: Warum meldet der Browser trotz Zertifikat weiterhin „nicht sicher“?
- Antwort: Selbstsignierte Zertifikate werden nicht von öffentlichen CAs anerkannt, daher warnt der Browser aus Sicherheitsgründen immer. Um die Warnung dauerhaft zu beseitigen, müssen Sie das Zertifikat oder die CA (z. B. ServBay User CA) Ihrem Betriebssystem als vertrauenswürdig hinzufügen.
- Frage: Kann ich auch ein RSA-Zertifikat nutzen?
- Antwort: Ja, OpenSSL erstellt auch RSA-Zertifikate. Beispielsweise mit
openssl genrsa -out servbay.demo.key 2048. Danach fahren Sie wie bei ECC mit der CSR-Erstellung und Zertifikatsausstellung fort. Dennoch empfehlen wir ECC-Zertifikate für die beste Performance.
- Antwort: Ja, OpenSSL erstellt auch RSA-Zertifikate. Beispielsweise mit
- Frage: Wie importiere ich ein selbstsigniertes Zertifikat in den macOS-Schlüsselbund?
- Antwort: Öffnen Sie die App „Schlüsselbundverwaltung“ (Keychain Access), wählen Sie den Schlüsselbund „System“ oder „Anmeldung“. Ziehen Sie die
.crt-Datei dorthin. Doppelklicken Sie auf das importierte Zertifikat, öffnen Sie „Vertrauen“ und setzen Sie „Secure Socket Layer (SSL)“ auf „Immer vertrauen“. Schließen Sie das Fenster (ggf. Passwort erforderlich) und starten Sie den Browser neu.
- Antwort: Öffnen Sie die App „Schlüsselbundverwaltung“ (Keychain Access), wählen Sie den Schlüsselbund „System“ oder „Anmeldung“. Ziehen Sie die
Fazit
Sie haben nun gelernt, wie Sie mit den in ServBay integrierten OpenSSL-Tools ein selbstsigniertes ECC-SSL-Zertifikat generieren und es für eine lokale Website in ServBay aktivieren. Selbstsignierte Zertifikate sind insbesondere für lokale Entwicklung und Tests gedacht, bieten Ihnen aber einen guten Einblick in die Arbeitsweise von HTTPS und ermöglichen sichere Verbindungen in Ihrer lokalen Umgebung. Für die komfortablere Verwaltung von Zertifikatsvertrauen lohnt sich ein Blick auf die User CA- und Public CA-Funktionen von ServBay. Wir hoffen, diese Schritt-für-Schritt-Anleitung hilft Ihnen beim effizienten lokalen Webdevelopment.
