
Local HTTPS Development with Self-Signed SSL Certificates
Simulating a production-like HTTPS connection is essential during local web development and testing. While self-signed SSL certificates are not trusted by public Certificate Authorities (CAs), they offer a convenient way to implement HTTPS in your local environment. This article details how to use ServBay’s built-in OpenSSL tool to generate highly secure Elliptic Curve Cryptography (ECC) self-signed SSL certificates and configure them for your local sites in ServBay. We'll use servbay.demo as an example domain.
Understanding how to configure HTTPS helps you thoroughly test your website’s behavior under secure connections in local settings, such as handling mixed content warnings or cookie security flags.
Overview
A self-signed certificate is an SSL certificate that you create and sign yourself, rather than obtaining it from a trusted third-party CA. These are suitable for scenarios where public trust is unnecessary, such as:
- Local development environments
- Internal testing servers
- Internal applications handling non-sensitive data
ServBay integrates OpenSSL, making it easy to generate certificate files directly from your terminal.
Prerequisites
- ServBay is installed and running.
- You’re comfortable with basic command-line operations.
Step 1: Generate a Self-Signed ECC SSL Certificate
We recommend using ECC certificates as they provide the same level of security as traditional RSA certificates, but with smaller keys, faster signing and verification, and lower computational resource usage.
Here’s how to generate a self-signed ECC SSL certificate:
Generate the ECC Private Key
Open your terminal app. Run the following command to generate an ECC private key file named
servbay.demo.keyusing theprime256v1curve.shopenssl ecparam -genkey -name prime256v1 -out servbay.demo.keyopenssl: Invokes the OpenSSL tool.ecparam: Manages ECC parameters.-genkey: Generates a key.-name prime256v1: Specifies the ECC curve to use, withprime256v1(NIST P-256) being a popular and secure choice.-out servbay.demo.key: Names the output private key file.
Generate a Certificate Signing Request (CSR)
Use the private key file
servbay.demo.keyfrom the previous step to create a certificate signing requestservbay.demo.csr. The CSR contains information you want to include in your certificate (such as domain name, organization, etc.) and is signed by your private key.shopenssl req -new -key servbay.demo.key -out servbay.demo.csrAfter running this command, OpenSSL will prompt you for a series of inputs to populate the CSR. Complete the prompts accordingly. The most important field is
Common Name (e.g. server FQDN or YOUR name), where you should enter the domain your local site uses (e.g.,servbay.demo). Fill other fields based on your situation or the given example.Example input:
Country Name (2 letter code) [AU]:CN # Country code, e.g., CN (China) State or Province Name (full name) [Some-State]:Hong Kong # Province or state Locality Name (eg, city) []:Kowloon # City Organization Name (eg, company) [Internet Widgits Pty Ltd]:ServBay # Organization name Organizational Unit Name (eg, section) []:Development # Organizational unit Common Name (e.g. server FQDN or YOUR name) []:servbay.demo # **Important: your local domain name** Email Address []:admin@servbay.demo # Contact email Please enter the following 'extra' attributes to be sent on in your certificate request A challenge password []: # Optional, leave blank An optional company name []: # Optional, leave blankGenerate the Self-Signed Certificate
Finally, use the generated CSR (
servbay.demo.csr) and private key (servbay.demo.key) to create a self-signed SSL certificate namedservbay.demo.crt, valid for 365 days.shopenssl x509 -req -days 365 -in servbay.demo.csr -signkey servbay.demo.key -out servbay.demo.crtopenssl x509: Handles X.509 format certificates.-req: Indicates the input is a CSR.-days 365: Sets the certificate’s validity to 365 days.-in servbay.demo.csr: Input the CSR file.-signkey servbay.demo.key: Sign the certificate with this private key (self-signed).-out servbay.demo.crt: Specifies the output certificate filename.
After completing these steps, you’ll have three files in your current directory:
servbay.demo.key(private key),servbay.demo.csr(certificate signing request), andservbay.demo.crt(self-signed certificate).
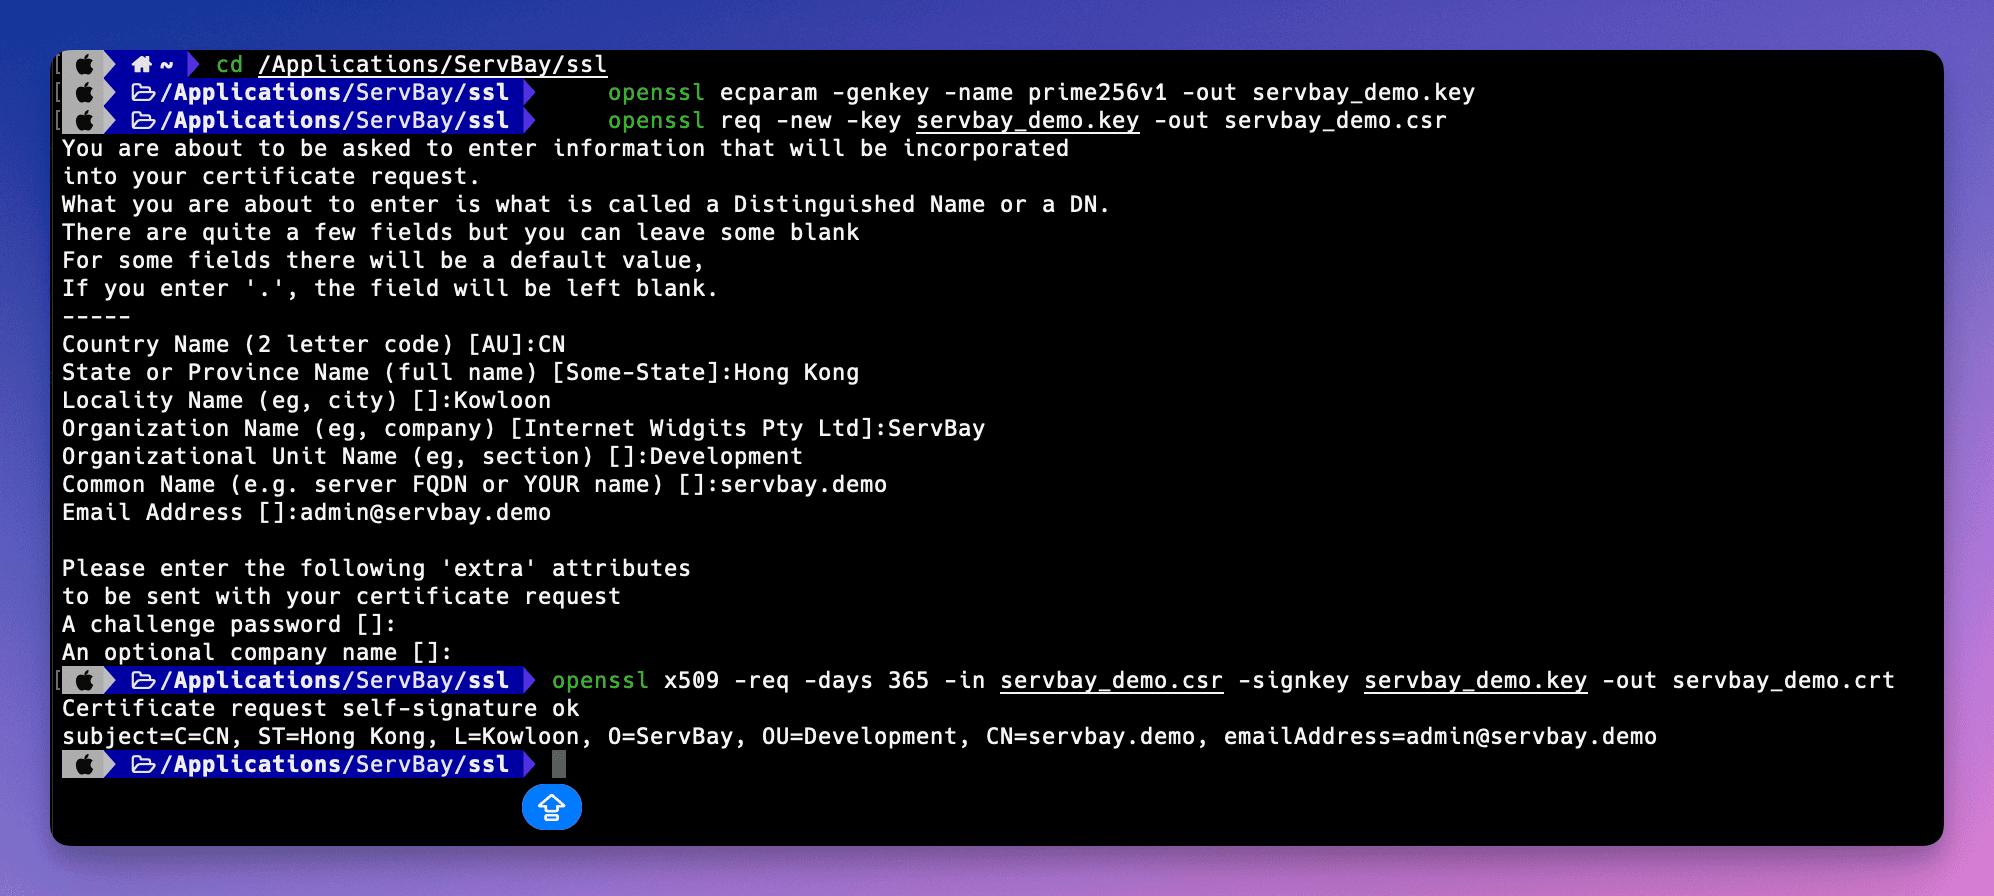 (Illustration: Running OpenSSL commands in the terminal to generate certificate files)
Step 2: Configure the Self-Signed SSL Certificate in ServBay
Once your certificates are generated, they need to be placed where ServBay can access them and referenced in your ServBay site configuration. ServBay recommends storing SSL certificates under the /Applications/ServBay/ssl directory, with a separate subdirectory for each domain for easy management.
Move the Certificate Files to the Designated Directory
Following ServBay’s recommended structure, move the generated certificate files to
/Applications/ServBay/ssl/private/tls-certs/servbay.demo/. If theservbay.demodirectory doesn’t exist, create it first.sh# Create the directory if it doesn't exist mkdir -p /Applications/ServBay/ssl/private/tls-certs/servbay.demo/ # Move files mv servbay.demo.key /Applications/ServBay/ssl/private/tls-certs/servbay.demo/ mv servbay.demo.crt /Applications/ServBay/ssl/private/tls-certs/servbay.demo/ # While the CSR file isn't usually needed, you may want to move it for backup or record-keeping mv servbay.demo.csr /Applications/ServBay/ssl/private/tls-certs/servbay.demo//Applications/ServBay/ssl/: ServBay’s default root directory for SSL-related files.private/tls-certs/: Recommended subdirectory for private TLS/SSL certificates.servbay.demo/: Create a separate subdirectory for each domain—this helps manage multiple sites and certificates.
Open the ServBay Admin Panel
Launch the ServBay app and open its administration interface.
Add or Edit a Site Configuration
In the ServBay admin panel, navigate to the Websites tab. If you haven’t created a site configuration for
servbay.demo, click Add Website. If it already exists, select the relevant site configuration to edit.Configure SSL/HTTPS
Find the SSL/HTTPS or similar section in the site configuration details.
Select Custom as the Certificate Source
In the SSL certificate method or type option, choose Custom.
Specify the Certificate File Paths
Enter or browse to the certificate files you just moved to the ServBay SSL directory:
- Certificate Key File: Enter or select
/Applications/ServBay/ssl/private/tls-certs/servbay.demo/servbay.demo.key - Certificate File: Enter or select
/Applications/ServBay/ssl/private/tls-certs/servbay.demo/servbay.demo.crt
- Certificate Key File: Enter or select
Set the Domain Name
Ensure that the Domain field in the site configuration is set to
servbay.demo.Save and Apply the Configuration
Save your site configuration changes. ServBay will prompt you to apply the changes, which usually involves restarting the associated web server (such as Caddy or Nginx). Confirm and proceed.
 (Illustration: Setting custom SSL certificate paths for a site in the ServBay admin interface)
Verify the HTTPS Configuration
After configuring ServBay, visit https://servbay.demo/ in your browser to check if things are set up correctly.
Because you're using a self-signed certificate—which is not signed by a trusted public CA on your system or browser—the browser will show a security warning stating the certificate is untrusted or poses a privacy risk. This is the expected behavior.
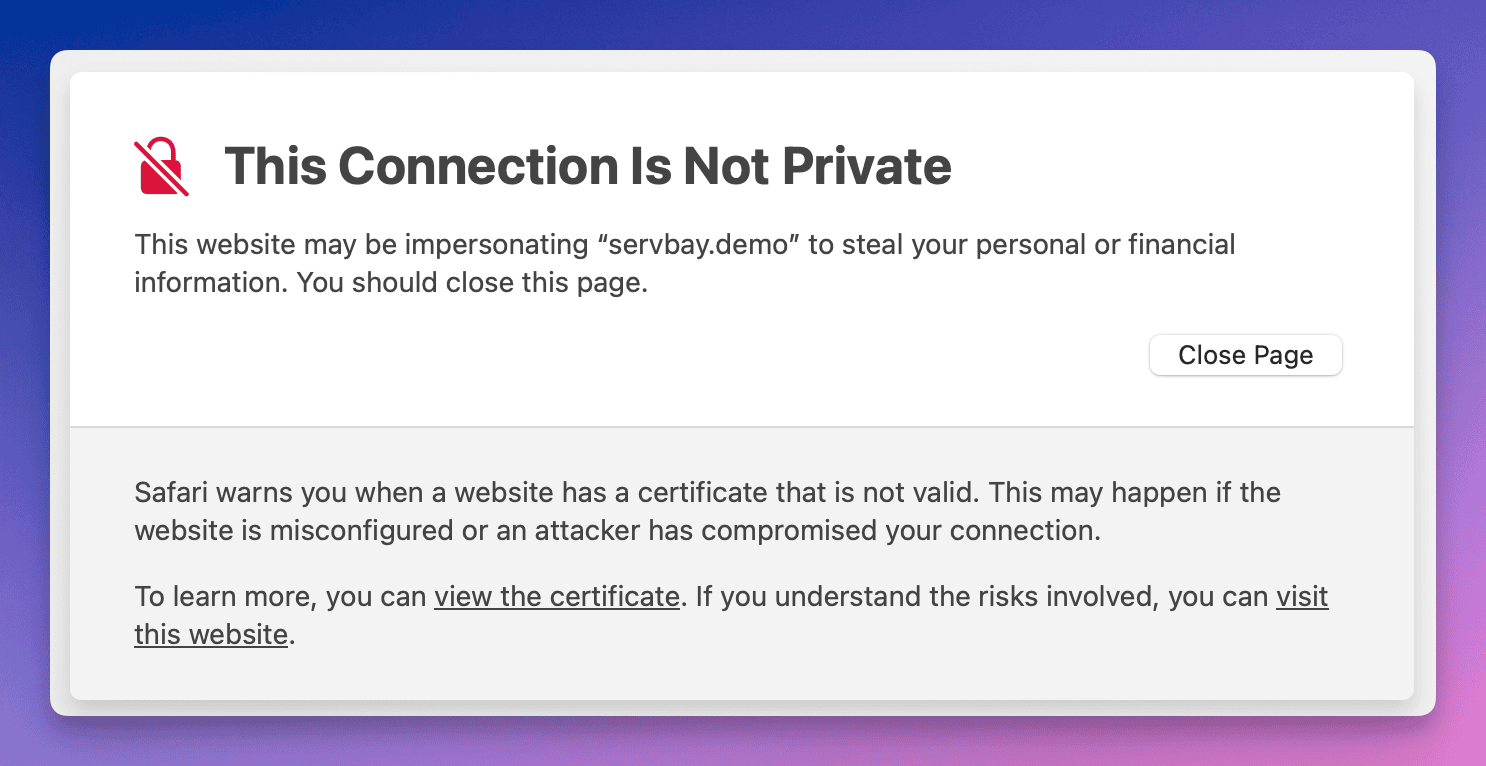 (Illustration: Browser displaying a warning for a site using a self-signed certificate)
You can choose to bypass the warning and proceed (usually via an “Advanced” or “Continue” option), or to prevent seeing this every time, you can add your self-signed certificate to your operating system’s trust store.
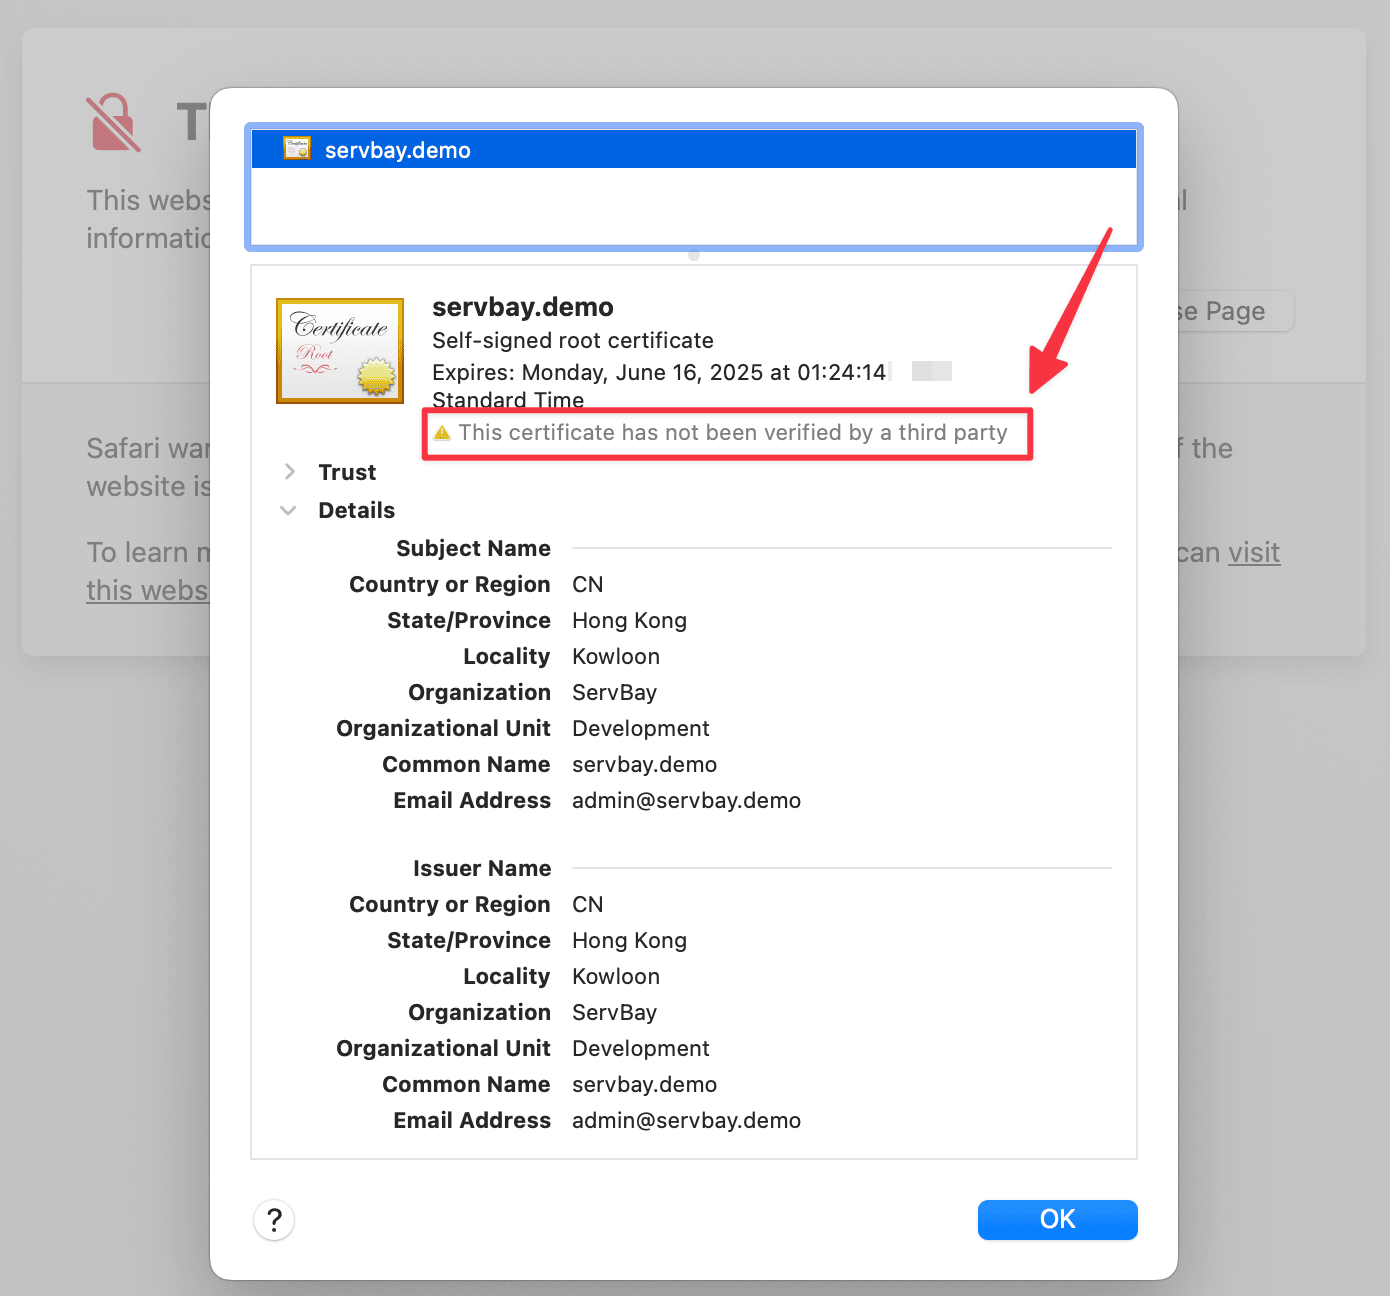 (Illustration: Viewing self-signed certificate details in the browser)
By checking the certificate details, you can confirm the browser is indeed loading your servbay.demo certificate configuration.
Notes
- Private Key Security: Your private key file (
.key) is highly sensitive—keep it safe and never share it. In the local environment, ensure the file’s permissions restrict access to only the ServBay user. - File Paths: Double-check that the certificate file paths set in your ServBay configuration are complete and correct.
- Domain Matching: The domain entered in the Common Name (CN) field when generating your certificate must exactly match your site’s domain in ServBay—otherwise, the browser will report a domain mismatch error.
- Certificate Validity: The certificate’s validity is set during generation (the
-daysparameter). Once expired, you'll need to generate and reconfigure a new certificate.
Related Topics & Alternatives
While self-signed certificates are ideal for basic local HTTPS testing, if you need a more public-CA-like trust experience in your local dev environment, consider other ServBay options:
- ServBay User CA: ServBay offers a user-level CA tool. Add the ServBay User CA to your OS’s trust store, then use it to issue certificates for your local sites. These certificates will be trusted in your system and browsers, minimizing certificate warnings—great for scenarios like OAuth callbacks, webhooks, or any workflow requiring a trusted certificate.
- ServBay Public CA: ServBay also provides a public CA feature to issue certificates for local domains and automatically configure system trust.
These alternatives are often more convenient—especially if managing multiple local sites—than manually generating and trusting self-signed certificates. Check ServBay's documentation to learn how to use these features.
Frequently Asked Questions (FAQ)
- Q: Why does my browser still show “Not Secure” after generating a certificate?
- A: Self-signed certificates are not trusted by public CAs, so browsers display a security warning by default. To avoid the warning, add your certificate—or the CA used to sign it (such as ServBay User CA)—to your OS’s trust store.
- Q: Can I use an RSA certificate instead?
- A: Yes. OpenSSL supports RSA certificates. Use
openssl genrsa -out servbay.demo.key 2048to generate an RSA private key, then proceed with the CSR and certificate generation steps. We recommend ECC certificates for better performance.
- A: Yes. OpenSSL supports RSA certificates. Use
- Q: How do I add a self-signed certificate to macOS’s trust store?
- A: Open the “Keychain Access” app, choose either the “System” or “Login” keychain, and drag your
.crtfile in. Double-click the imported certificate, expand the “Trust” section, and set “Secure Sockets Layer (SSL)” to “Always Trust.” Close the window (you may be prompted for your password). Then restart your browser.
- A: Open the “Keychain Access” app, choose either the “System” or “Login” keychain, and drag your
Summary
This guide walked you through generating a self-signed ECC SSL certificate using ServBay’s integrated OpenSSL tool and configuring it for your local site in ServBay. While self-signed certificates are mainly for local development and testing, they’re a key step in understanding how HTTPS works and how to enable secure local connections. For more convenient trust management, we recommend exploring ServBay’s User CA and Public CA features. We hope these steps help you with your local web development process!
