
Yerel HTTPS Geliştirme için Kendi İmzalı SSL Sertifikası Kullanımı
Yerel web geliştirme ve test süreçlerinde, üretim ortamının HTTPS bağlantısını taklit etmek oldukça önemlidir. Kendi imzaladığınız SSL sertifikaları, genel sertifika yetkilileri (CA) tarafından güvenilmeseler de, yerel geliştirme ortamında HTTPS’i hızlıca etkinleştirmenin pratik bir yoludur. Bu makalede, ServBay’in sunduğu OpenSSL aracıyla yüksek güvenlikli ve verimli Eliptik Eğri Kriptografisi (ECC) tabanlı kendi imzalı SSL sertifikalarını nasıl oluşturacağınızı, ardından bu sertifikaları ServBay’de yerel sitenize nasıl uygulayacağınızı adım adım anlatıyoruz. Örnek alan adı olarak servbay.demo kullanılacaktır.
HTTPS yapılandırmasını anlamak ve aktive etmek, sitenizin karışık içerik uyarıları, çerez güvenlik işareti gibi HTTPS altındaki davranışlarını yerel olarak eksiksiz test etmenizi sağlar.
Genel Bakış
Kendi imzalı sertifikalar, bizzat sizin oluşturup imzaladığınız SSL sertifikalardır ve güvenilir bir üçüncü parti CA tarafından verilmemişlerdir. Aşağıdaki senaryolar için idealdirler:
- Yerel geliştirme ortamı
- Dahili test sunucuları
- Hassas olmayan veriler için iç uygulamalar
ServBay, terminalde kolayca sertifika üretmeniz için entegre OpenSSL aracı ile gelir.
Ön Koşullar
- ServBay’in kurulu ve çalışıyor olması gerekir.
- Temel komut satırı bilgisine sahip olmalısınız.
Adım 1: Kendi İmzalı ECC SSL Sertifikası Oluşturmak
ECC tabanlı sertifikalar, klasik RSA sertifikalarına göre aynı güvenlik düzeyinde daha küçük anahtar boyutuna, daha hızlı imzalama/doğrulama hızına ve genel olarak daha düşük işlemci yüküne sahiptir, bu nedenle önerilir.
Kendi imzalı ECC SSL sertifikası oluşturmanın adımları şunlardır:
ECC Özel Anahtarını (Private Key) Oluşturun
Terminalinizi açın ve aşağıdaki komut ile
prime256v1eğrisini kullananservbay.demo.keyisimli bir ECC özel anahtar dosyası üretin.shopenssl ecparam -genkey -name prime256v1 -out servbay.demo.keyopenssl: OpenSSL aracının çağrılmasıdır.ecparam: ECC parametre işlemlerinde kullanılır.-genkey: Anahtar oluşturur.-name prime256v1: Kullanılacak ECC eğrisinin adını belirtir,prime256v1(NIST P-256) yaygın ve güvenli bir eğridir.-out servbay.demo.key: Anahtar dosyasının adını belirtir.
Sertifika İmzalama İsteği (CSR) Oluşturun
Bir önceki adımda ürettiğiniz özel anahtar dosyası ile
servbay.demo.csrisimli bir sertifika imzalama isteği dosyası oluşturun. CSR; alan adınız, kuruluş adınız gibi sertifikanızda yer almasını istediğiniz bilgileri içerir ve özel anahtarınız ile imzalanır.shopenssl req -new -key servbay.demo.key -out servbay.demo.csrBu komut çalışınca, OpenSSL sizden birkaç bilgi girmenizi ister. Bunlar CSR içeriğini oluşturur. En önemli alan ise
Common Name (e.g. server FQDN or YOUR name)kısmıdır; buraya yerel web sitenizin alan adını, örneğinservbay.demoyazmalısınız. Diğer alanları mevcut durumunuza veya örneğe göre doldurabilirsiniz.Örnek bir giriş aşağıda verilmiştir:
Country Name (2 letter code) [AU]:CN # Ülke kodu, örn: CN (Çin) State or Province Name (full name) [Some-State]:Hong Kong # Eyalet ya da il Locality Name (eg, city) []:Kowloon # Şehir Organization Name (eg, company) [Internet Widgits Pty Ltd]:ServBay # Kuruluş adı Organizational Unit Name (eg, section) []:Development # Birim adı Common Name (e.g. server FQDN or YOUR name) []:servbay.demo # **Önemli: Alan adına tam olarak servbay.demo girilmeli** Email Address []:admin@servbay.demo # İletişim e-posta Please enter the following 'extra' attributes to be sent on in your certificate request A challenge password []: # İsteğe bağlı, boş bırakılabilir An optional company name []: # İsteğe bağlı, boş bırakılabilirKendi İmzalı Sertifikayı Oluşturun
Son olarak, ürettiğiniz CSR (
servbay.demo.csr) ve özel anahtarı (servbay.demo.key) kullanarak kendi imzaladığınız SSL sertifikasıservbay.demo.crtdosyasını oluşturun. Sertifikanın geçerliliğini 365 gün olarak ayarladık.shopenssl x509 -req -days 365 -in servbay.demo.csr -signkey servbay.demo.key -out servbay.demo.crtopenssl x509: X.509 formatlı sertifikalarla işlem yapar.-req: Girdinin CSR olduğunu gösterir.-days 365: Sertifika 365 gün geçerli olacak.-in servbay.demo.csr: Giriş olarak kullanılacak CSR dosyasını belirtir.-signkey servbay.demo.key: İmza için kullanılacak özel anahtar (kendi kendine imza olduğu için kendi anahtarınız).-out servbay.demo.crt: Çıkışta oluşacak sertifika dosyasının adı.
Bu işlemler tamamlandığında, mevcut dizininizde üç dosya oluşur:
servbay.demo.key(özel anahtar),servbay.demo.csr(sertifika imzalama isteği), veservbay.demo.crt(kendi imzalı sertifika).
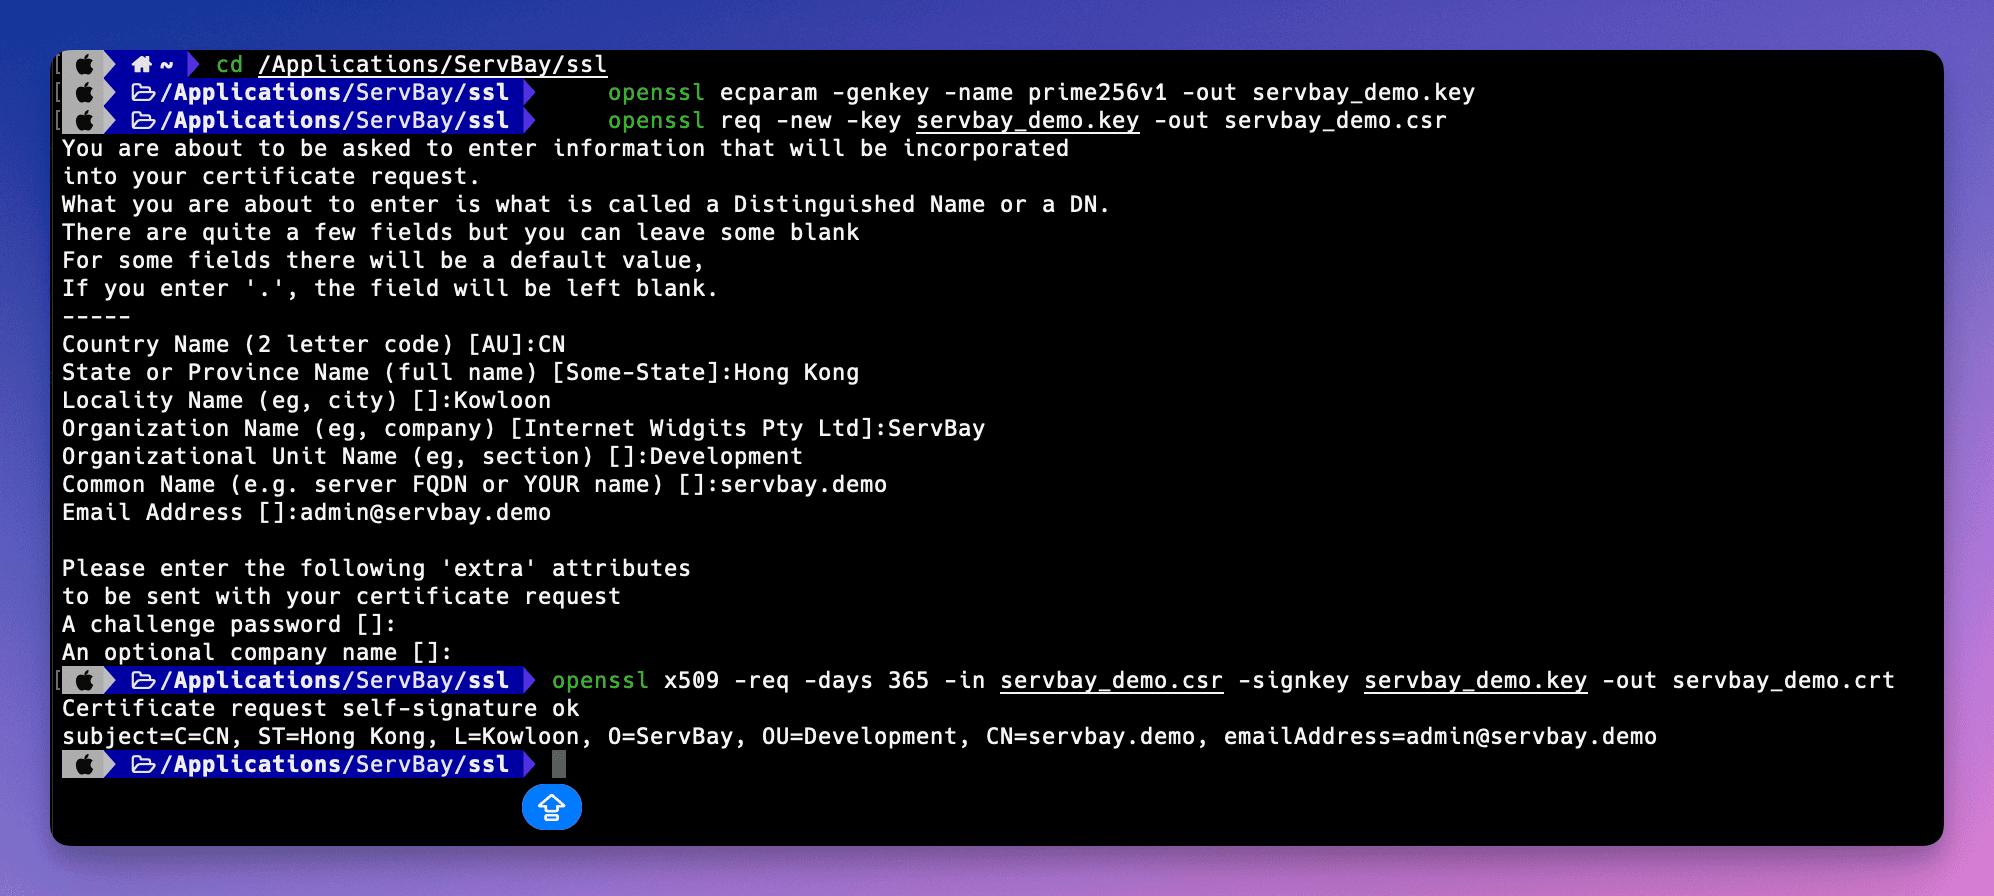 (Görsel açıklaması: OpenSSL komutları ile terminalde sertifika dosyası oluşturulması)
Adım 2: ServBay’de Kendi İmzalı SSL Sertifikasını Yapılandırmak
Sertifika dosyalarını oluşturduktan sonra, bunları ServBay’in erişebileceği bir konuma yerleştirmeniz ve ServBay’in site ayarlarında bu dosyaları tanımlamanız gereklidir. ServBay, SSL sertifika dosyalarını /Applications/ServBay/ssl dizininde saklamanızı ve her alan adı için ayrı bir alt klasör oluşturmanızı önerir.
Sertifika Dosyalarını Belirtilen Dizine Taşıyın
Sertifika dosyalarını, ServBay’in önerdiği yapı olan
/Applications/ServBay/ssl/private/tls-certs/servbay.demo/alt dizinine taşıyın. Eğerservbay.demodizini yoksa önce oluşturun.sh# Dizin yoksa oluşturun mkdir -p /Applications/ServBay/ssl/private/tls-certs/servbay.demo/ # Dosyaları taşıyın mv servbay.demo.key /Applications/ServBay/ssl/private/tls-certs/servbay.demo/ mv servbay.demo.crt /Applications/ServBay/ssl/private/tls-certs/servbay.demo/ # CSR dosyasını da kayıt veya yedek amaçlı taşıyabilirsiniz mv servbay.demo.csr /Applications/ServBay/ssl/private/tls-certs/servbay.demo//Applications/ServBay/ssl/: ServBay’in SSL ile ilgili dosyaları için ana dizini.private/tls-certs/: SSL/TLS özel sertifika dosyaları için önerilen alt dizin.servbay.demo/: Her alan adı için ayrı alt dizin oluşturmak, çoklu alan adlarını yönetmek için faydalıdır.
ServBay Yönetim Arayüzünü Açın
ServBay uygulamasını başlatıp yönetim panelini açın.
Site Ayarı Ekleyin veya Düzenleyin
Yönetim panelinde Web Siteleri (Websites) sekmesine gidin.
servbay.demoiçin henüz ayar eklemediyseniz Web Sitesi Ekle (Add Website) butonuyla oluşturun. Veya mevcut siteyi düzenleyin.SSL/HTTPS Yapılandırmasını Ayarlayın
Site ayarları detayında SSL/HTTPS veya buna benzer bir ayar alanını bulun.
Sertifika Kaynağı Olarak Custom'ı Seçin
SSL sertifika türü veya düzenleme yönteminde Custom (özel sertifika) seçeneğini seçin.
Sertifika Dosya Yollarını Belirtin
Açılan alanlara, biraz önce ServBay SSL dizinine taşıdığınız dosyaların tam yolunu girin:
- Certificate Key File (Sertifika Özel Anahtar Dosyası):
/Applications/ServBay/ssl/private/tls-certs/servbay.demo/servbay.demo.key - Certificate File (Sertifika Dosyası):
/Applications/ServBay/ssl/private/tls-certs/servbay.demo/servbay.demo.crt
- Certificate Key File (Sertifika Özel Anahtar Dosyası):
Alan Adını Ayarlayın
Web site ayarlarında Domain (Alan adı) kısmının
servbay.demoolduğundan emin olun.Kaydedin ve Yapılandırmayı Uygulayın
Değişiklikleri kaydedin. ServBay değişikliği uygulamanız gerektiğini belirtecek; bu tipik olarak ilgili web sunucularını (Caddy veya Nginx gibi) yeniden başlatmayı içerir. Onaylayıp devam edin.
 (Görsel açıklaması: ServBay yönetim panelinde özel SSL sertifika yolu ayarlanması)
HTTPS Yapılandırmasını Doğrulama
ServBay’inizde gerekli ayarları yaptıktan sonra, tarayıcınızda https://servbay.demo/ adresine giderek yapılandırmanızın çalışıp çalışmadığını test edebilirsiniz.
Kendi imzalı sertifika kullandığınız için, bu sertifika işletim sisteminiz veya tarayıcınız tarafından genel bir CA üzerinden onaylanmadığından tarayıcı bir güvenlik uyarısı verir ve sertifikanın güvenilir olmadığını belirtir. Bu beklenen bir davranıştır.
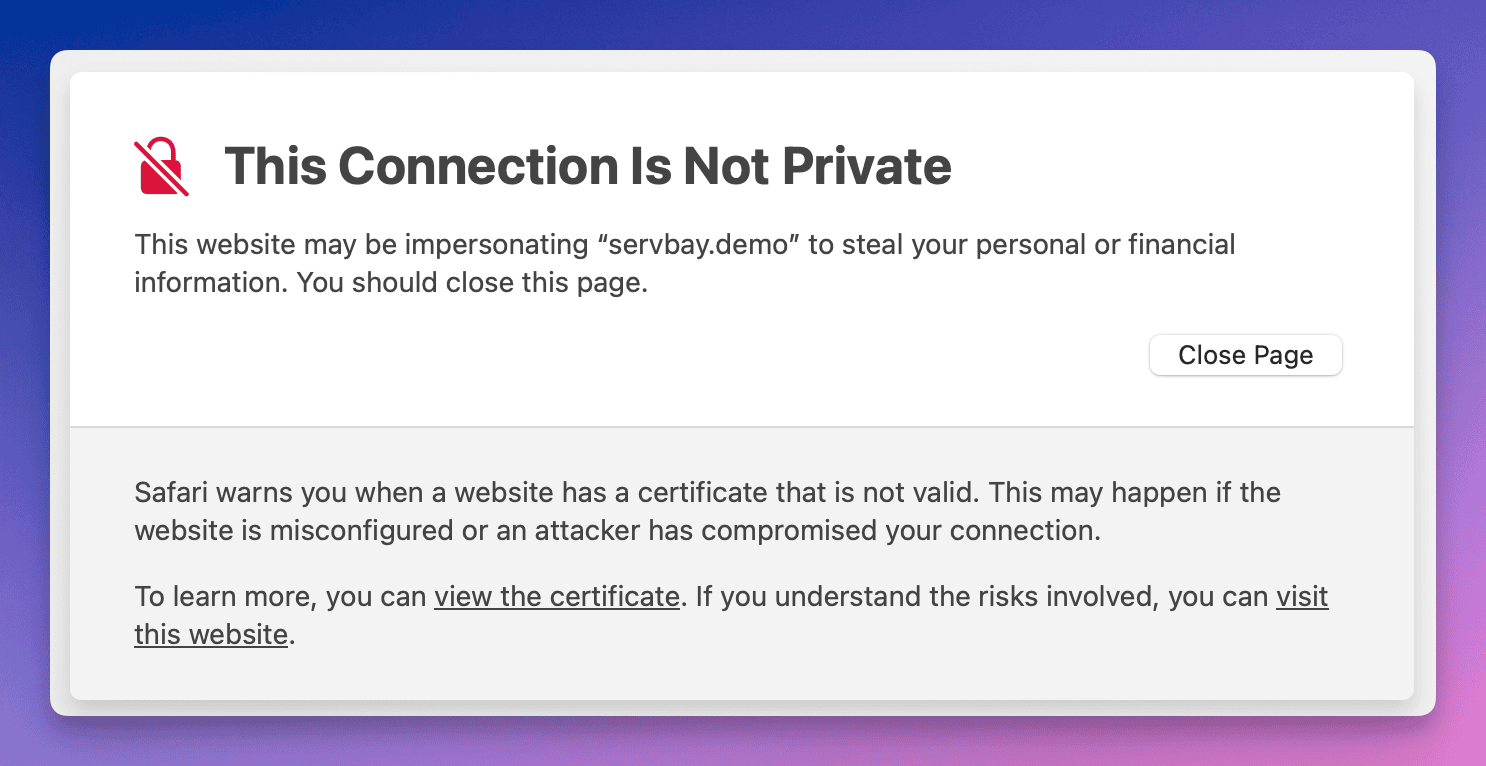 (Görsel açıklaması: Kendi imzalı sertifikayla ziyaret edilen bir sitede tarayıcıda çıkan uyarı ekranı)
Dilerseniz uyarıyı görmezden gelip devam edebilirsiniz (genellikle “Gelişmiş” veya “Devam Et” şeklinde bir seçenek bulunur). Ya da uyarıyı her seferinde görmemek için, bu kendi imzalı sertifikayı işletim sisteminizin güvenilir sertifikalar listesine ekleyebilirsiniz.
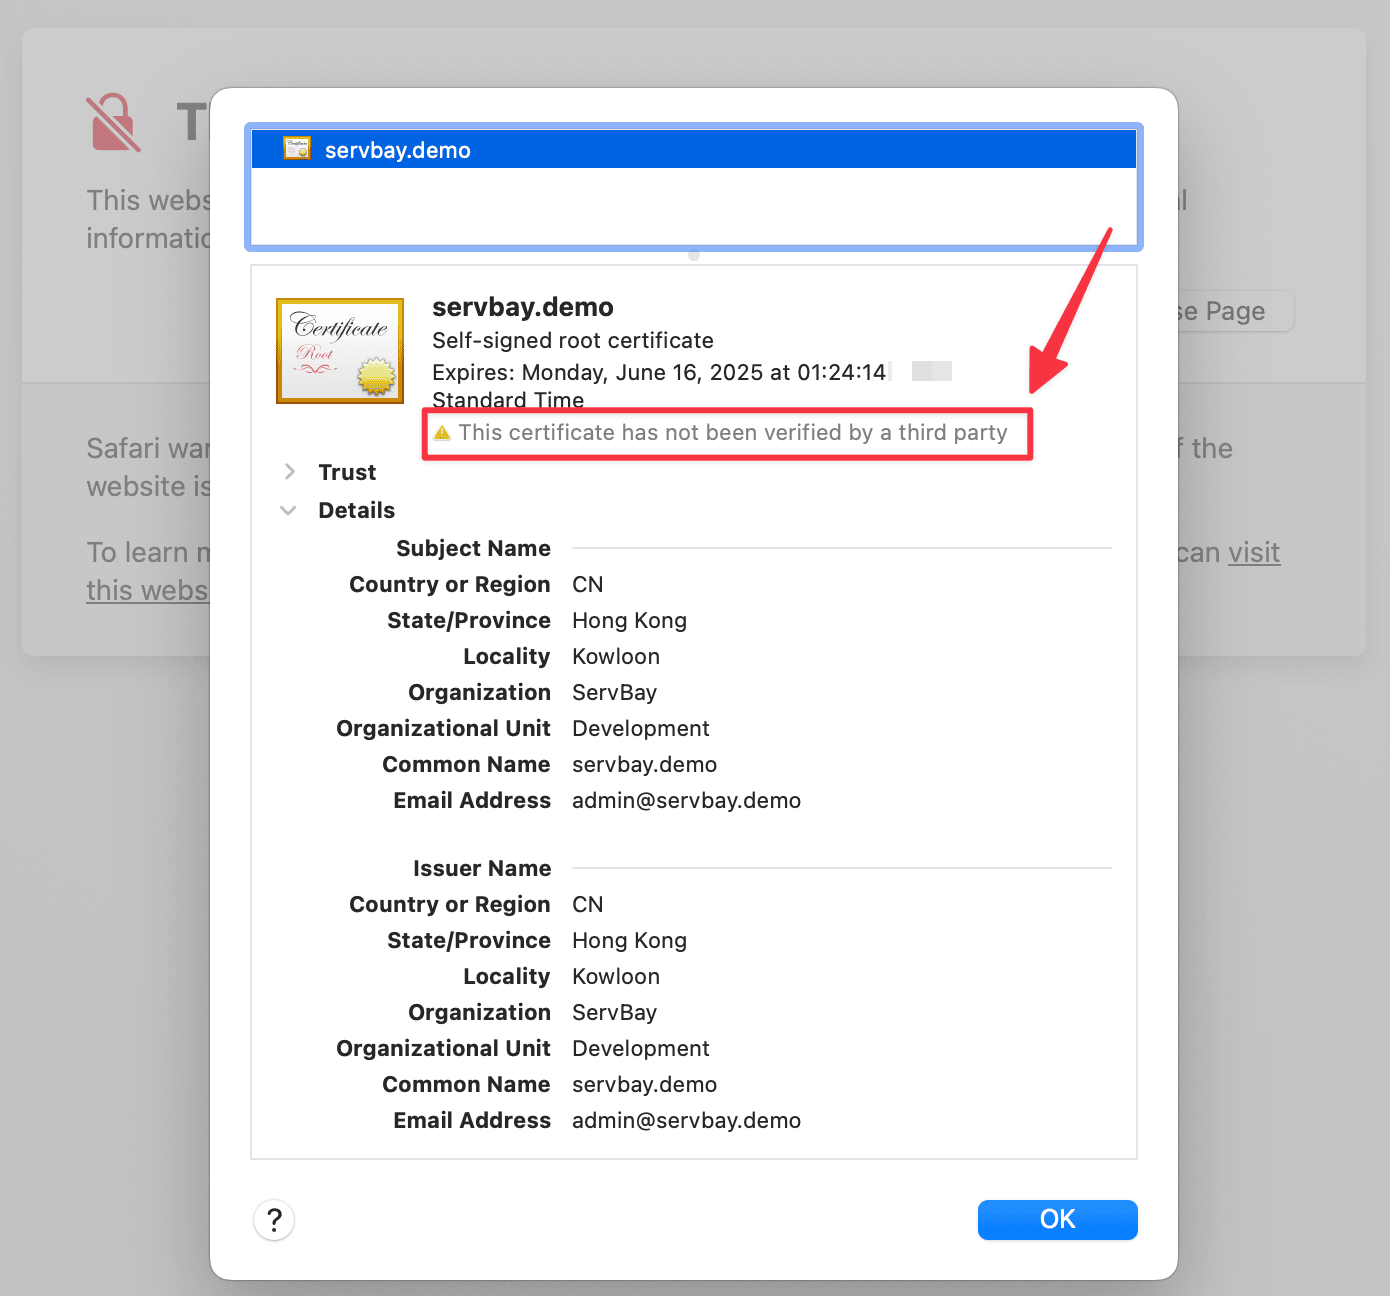 (Görsel açıklaması: Tarayıcıda kendi imzalı sertifikanın ayrıntılarını görüntüleme paneli)
Sertifika detaylarını görüntüleyerek, tarayıcının gerçekten sizin ayarladığınız servbay.demo sertifikasını yüklediğini doğrulayabilirsiniz.
Dikkat Edilmesi Gereken Noktalar
- Özel Anahtarın Güvenliği:
.keyuzantılı özel anahtar dosyanız çok hassastır; gizli tutmalısınız. Yerel geliştirme ortamınızda yalnızca ServBay kullanıcısının erişebileceğinden emin olun. - Dosya Yolları: ServBay ayarlarında girdiğiniz sertifika dosya yollarının eksiksiz ve doğru olduğundan emin olun.
- Alan Adı Eşleşmesi: Sertifika üretirken Common Name (CN) alanında yazdığınız alan adı ile, ServBay’de site için belirttiğiniz alan adı kesinlikle birebir aynı olmalıdır. Aksi halde tarayıcı, alan adı eşleşmiyor hatası verir.
- Sertifika Geçerlilik Süresi: Kendi imzalı sertifikanın geçerlilik süresi üretim sırasında belirlenir (
-daysparametresi). Süre dolunca yeniden oluşturup yapılandırmanız gerekir.
İlgili Konular ve Alternatifler
Kendi imzalı sertifikalar temel yerel HTTPS testleri için yeterlidir, fakat yerel geliştirme ortamınızda genel CA güvenine yaklaşan bir deneyim istiyorsanız, ServBay’in sunduğu diğer seçenekleri de değerlendirebilirsin:
- ServBay User CA: ServBay, kullanıcı seviyesinde bir CA aracı sunar. ServBay User CA’yı işletim sisteminizin güvenilir sertifika deposuna ekledikten sonra, bu CA ile kendi alan adlarınıza imzalı sertifikalar verebilirsiniz. Bu sertifikalar, hem işletim sisteminizde hem de tarayıcınızda güvenilir olacaktır; dolayısıyla tarayıcı uyarısı almadan OAuth callback, Webhooks gibi sertifika güveni gerektiren senaryoları test edebilirsiniz.
- ServBay Public CA: ServBay ayrıca yerel alan adınız için otomatik olarak sertifika üretip sistem güven trust’u sağlayabilen bir genel CA özelliği de sunar.
Bu alternatif çözümler, çok sayıda yerel siteyle uğraşırken kendi imzalı sertifika sürecini ve güveni yönetmeyi oldukça kolaylaştırır. Daha fazla bilgi için ServBay’in ilgili belgelerine başvurabilirsiniz.
Sık Sorulan Sorular (SSS)
- Soru: Neden sertifika ürettikten sonra tarayıcı hâlâ güvenli uyarısı veriyor?
- Cevap: Kendi imzalı sertifikalar genel CA’lar tarafından kabul edilmediği için, tarayıcı güvenlik gereği uyarı gösterir. Bunu önlemek için, bu sertifikayı veya imzalayan CA’yı (örneğin ServBay User CA) işletim sisteminizin güven deposuna eklemeniz gerekir.
- Soru: RSA sertifikası kullanabilir miyim?
- Cevap: Evet, OpenSSL ile RSA sertifikası da oluşturabilirsiniz.
openssl genrsa -out servbay.demo.key 2048komutuyla RSA anahtarı ürettikten sonra, CSR ve sertifika üretim adımlarını uygulayabilirsiniz. Ancak ECC sertifikalar genellikle daha iyi performans sağlar, bu nedenle önerilir.
- Cevap: Evet, OpenSSL ile RSA sertifikası da oluşturabilirsiniz.
- Soru: Kendi imzalı sertifikayı macOS güven deposuna nasıl eklerim?
- Cevap: “Anahtar Zinciri Erişimi” (Keychain Access) uygulamasını açın, “Sistem” veya “Giriş” anahtar zincirini seçin.
.crtdosyanızı sürükleyip bırakın. Eklenen sertifikayı çift tıklayın, “Güven” bölümünü açın ve “Güvenlik Katmanı (SSL)” ayarını “Her Zaman Güven” olarak değiştirin. Pencereyi kapatıp gerekirse şifre girin. Sonra tarayıcıyı yeniden başlatın.
- Cevap: “Anahtar Zinciri Erişimi” (Keychain Access) uygulamasını açın, “Sistem” veya “Giriş” anahtar zincirini seçin.
Özet
Bu rehberde, ServBay’e entegre OpenSSL aracı ile kendi imzaladığınız ECC SSL sertifikasını nasıl oluşturup, bunu ServBay’deki yerel sitenize nasıl uygulayacağınızı öğrendiniz. Kendi imzalı sertifikalar ağırlıklı olarak yerel geliştirme ve testlerde kullanılır; ancak HTTPS ile güvenli bağlantı mantığını anlamak ve yerel ortamda uygulamak için önemli bir adımdır. Daha kolay bir güven yönetimi için, ServBay’in User CA ve Public CA özelliklerine de göz atmanızı öneririz. Umarız bu adımlar, yerel web geliştirme çalışmalarınızda size faydalı olur.
