
ServBay ドキュメント:Adminerによるデータベース管理
概要
ServBayは、macOSとWindowsに対応した強力なローカルWeb開発環境で、各種Webサーバー、プログラミング言語ランタイム、データベースシステムを統合しています。開発者の内蔵データベース管理を容易にするため、ServBayにはAdminerという高機能かつ軽量なデータベース管理ツールが標準搭載されています。本書では、ServBayに含まれるデータベースへの接続と管理をAdminerで行う手順を解説します。
Adminerとは
AdminerはPHPで開発された単一ファイルのデータベース管理ツールで、MySQL、MariaDB、PostgreSQL、SQLite、MongoDBなど多様なデータベースシステムをサポートしています。 大規模なデータベース管理クライアントと比較してAdminerには以下の明確なメリットがあります:
- 軽量かつ単一ファイルデプロイ: AdminerはPHPファイル1つだけで構成され、複雑なインストール不要で導入も簡単です。ServBayに組み込まれているので、すぐに利用できます。
- マルチデータベース対応: ひとつのインターフェースから複数のデータベースタイプを管理できるため、複数ツールのインストールや習得の手間を省けます。
- シンプルで分かりやすいUI: ナビゲートしやすい直感的な画面設計で、初心者でもすぐに操作を学べます。
- 充実した機能: データベース・テーブル・インデックス・ユーザーの作成・編集・削除、SQLクエリの実行、データのインポート/エクスポートなど一般的なデータベース操作を網羅。
ServBayを使用したローカル開発では、Adminerが迅速かつ便利なデータベース管理環境を提供します。
Adminerへのアクセス
ServBayを起動すると、Adminerは自動的に内蔵Webサーバー上で稼働します。下記URLでAdminerにアクセスできます:
https://servbay.host/adminer.php
ServBayアプリケーションが起動していて、Webサーバー(CaddyやNginx)、および接続したいデータベースサービスも稼働中であることをご確認ください。
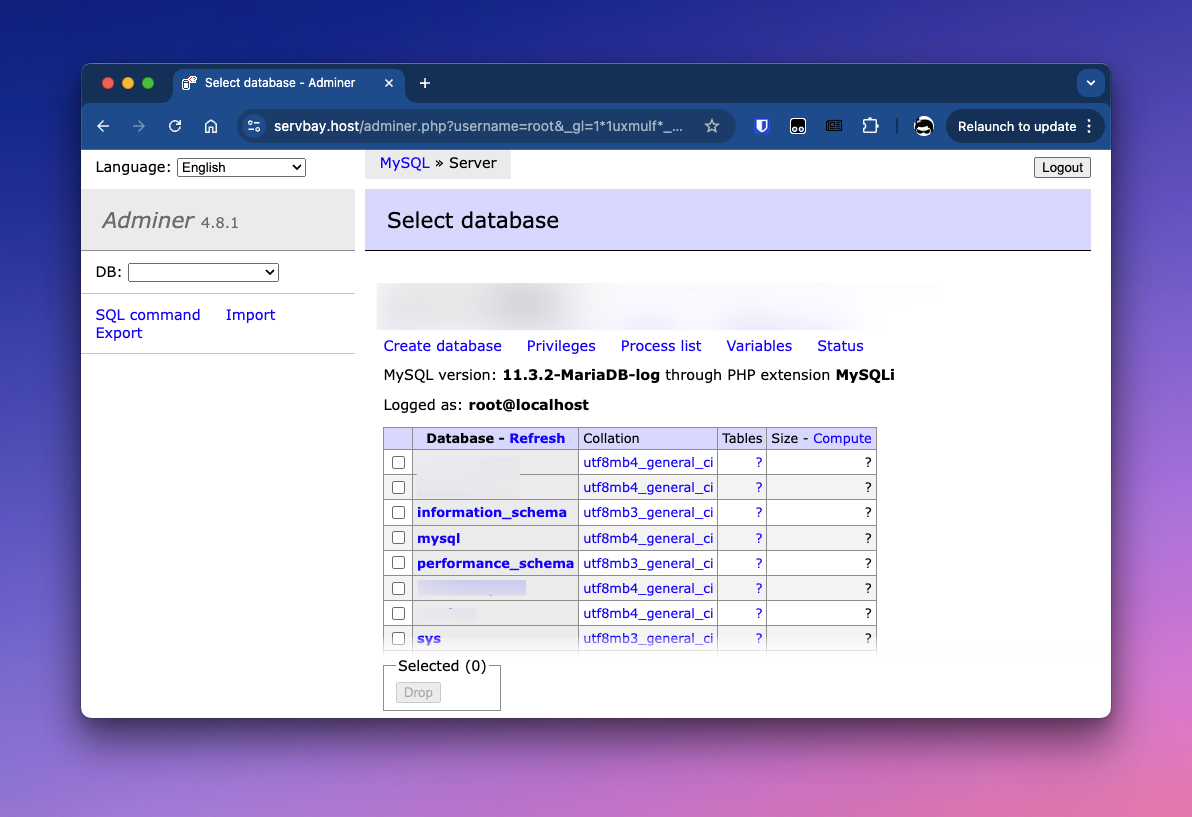
ServBay内のデータベースに接続する
Adminerのログイン画面は分かりやすい設計です。データベース種別の選択、サーバーアドレス、ユーザー名、パスワード、(一部データベースの場合は)データベース名の入力が必要です。内蔵データベース向けのデフォルトユーザー名とパスワードはServBayアプリの「データベース」タブで確認できます。
MariaDB / MySQLへの接続
ServBayには一般的にMariaDBまたはMySQLがデフォルトで組み込まれています。Adminer側では「MySQL」タイプを選びます。
- ブラウザでAdminerのURL(
https://servbay.host/adminer.php)にアクセスします。 - ログイン画面のシステムプルダウンで
MySQLを選びます。 - サーバー接続情報を入力します:
- サーバー:
localhost、またはServBayから提供されるUnixソケットパス/Applications/ServBay/tmp/mysql.sockを入力してください(ソケット接続は通常より高速です)。 - ユーザー名: ServBayアプリ「データベース」よりMariaDB/MySQLのユーザー名を確認して入力します。
- パスワード: 同じく「データベース」よりパスワードを入力します。
- データベース: (任意)指定のデータベースに直接接続したい場合は、ここに名前を入力してください。空欄の場合はサーバー全体に接続し、ログイン後に任意のデータベース管理が可能です。
- サーバー:
ログインボタンをクリックします。
PostgreSQLへの接続
ServBayはPostgreSQLもサポートしています。Adminer上では「PostgreSQL」タイプを選択します。
- ブラウザでAdminerのURL(
https://servbay.host/adminer.php)にアクセスします。 - ログイン画面のシステムプルダウンで
PostgreSQLを選びます。 - サーバー接続情報を入力します:
- サーバー:
/Applications/ServBay/tmpを入力します。 - ユーザー名: ServBayアプリ「データベース」よりPostgreSQLのユーザー名を確認して入力します。
- パスワード: 同じく「データベース」よりパスワードを入力します。
- データベース: 接続するデータベース名(例:デフォルトの
postgres、または自身で作成したデータベース)を入力します。
- サーバー:
ログインボタンをクリックします。
SQLite 3への接続
ServBayはSQLite 3もサポートしています。SQLiteはファイルベースのデータベースなので、接続時にファイルパスの指定が必要です。
- ブラウザでAdminerのURL(
https://servbay.host/adminer.php)にアクセスします。 - ログイン画面のシステムプルダウンで
SQLite 3を選びます。 - データベースファイルのパスを入力します:
- データベースファイル: SQLiteのデータベースファイルのフルパスを記入します。おすすめはServBayのデータディレクトリ(例:
/Applications/ServBay/db/sqlite/your_database_name.sqlite)内に保存することです。 - 指定のファイルが存在しない場合、Adminerが新規作成するか確認してきます。
- データベースファイル: SQLiteのデータベースファイルのフルパスを記入します。おすすめはServBayのデータディレクトリ(例:
ログインボタンをクリックします。
一般的なデータベース操作
データベースサーバーまたは特定データベースへのログイン成功後、AdminerのUIから多様な管理タスクが実行できます。データベース種別によって画面や機能の細部は異なりますが、基本操作は概ね共通です。
データベースの新規作成
(MariaDB/MySQL、PostgreSQL向け)
- サーバーにログイン(特定データベース未指定で)。
- 左側ナビゲーションまたはメイン画面で
データベース作成等の項目を見つけます。 - 新しいデータベース名を入力します。
- 必要に応じて文字セットや照合順序を選択します。
保存または作成ボタンをクリック。
(SQLite 3は、未作成ファイルパスを指定してログイン時に新規データベース作成となります。)
テーブル・データの管理
- データベースを選択します(未指定の場合ログイン後に選択)。
- データベース概要画面で
テーブル作成を選びます。 - テーブル名を入力し、フィールド(カラム)の設定:フィールド名、データ型、長さ、NULL可否、デフォルト値、インデックス(主キー、一意インデックス、通常インデックス)などを定義します。
保存してテーブルを作成。- 作成後は左ナビや概要画面からそのテーブルを選択します。
- データ操作:
挿入: 新しいデータ行の追加選択: データの閲覧・検索・並び替え・フィルタ更新: 既存データ行の編集削除: データ行の削除SQLコマンドで更に高度なクエリや操作実行
SQLコマンドの実行
AdminerではSQLコマンド入力画面から直接SQLを入力・実行でき、柔軟なデータベース管理やデータ抽出が可能です。
- 実行したいデータベースを選択。
SQLコマンドオプションをクリック。- テキストエリアにSQL文を記入。
実行ボタンを押します。
データのインポート/エクスポート
Adminerはデータベース構造やデータをSQLファイルやCSV等でエクスポートでき、またこれらファイルからインポートも可能です。データ移行やバックアップ、共有等に便利です。
- インポート/エクスポートしたいデータベースやテーブルを選択します。
エクスポートまたはインポートオプションを見つけます。- 画面指示に従い形式やオプションを選択して実行します。
データベースの削除
(MariaDB/MySQL、PostgreSQL向け)
- サーバーにログイン(特定データベース未指定で)。
- データベースリストから削除したいデータベースを選択します。
削除オプションをクリックし、確認します。注意:この操作は元に戻せずデータベースとその全データが完全に削除されます。
(SQLite 3の場合、データベースファイル(.sqlite)をファイルシステム上で直接削除する必要があります。)
注意事項
- 認証情報の管理: ServBayで取得したデータベースのログイン情報(ユーザー名・パスワード)は、第三者に漏れることのないよう厳重に管理してください。
- ServBayの稼働状況: AdminerはServBay内蔵Webサーバーによるアクセスが前提です。データベースに接続できない場合は、ServBayと関連サービス(Caddy/Nginx、MariaDB/MySQL、PostgreSQL等)が起動しているかご確認ください。
- SQLiteファイルパス: SQLite接続時はServBayユーザーが読み書き可能なディレクトリ(例:
/Applications/ServBay/db/sqlite/)を指定してください。 - パフォーマンス: Adminerはシンプルかつ軽量ですが、大規模データベースや複雑な管理にはTablePlus、DBeaver、pgAdminなど専用デスクトップクライアントの利用もおすすめです。
よくある質問(FAQ)
Q: https://servbay.host/adminer.phpへアクセスできません。どうすればよいですか?
A: ServBayアプリおよびWebサーバー(通常CaddyやNginx)が起動していることを確認してください。また、利用中のブラウザでhttps://servbay.hostへのアクセスが許可されているかご確認ください。
Q: データベースのユーザー名/パスワードを忘れてしまった。どこで確認できますか?
A: ServBayアプリの「データベース」タブに、各データベースのデフォルトユーザー名とパスワードが表示されています。
Q: PostgreSQL接続時のサーバーアドレスとポートは何ですか?
A: 基本はサーバーアドレスlocalhost、デフォルトポートは5432です。ServBayの設定画面でPostgreSQLのアドレス・ポートをチェックしてください。Unix Domain Socket経由の場合は/Applications/ServBay/tmp(注意:PostgreSQLは.sock拡張子不要)を指定します。
Q: MariaDB/MySQL接続時のサーバーアドレスとソケットパスの違いは?
A: localhostはTCP/IP接続(デフォルトポート3306)、/Applications/ServBay/tmp/mysql.sockはUnix Domain Socket接続です。ローカル開発環境では、Socket接続の方が安全かつ高速です。用途に応じて使い分けてください。
Q: AdminerでServBay以外のデータベースも管理できますか?
A: Adminer自体は多様なデータベースタイプに対応しています。ServBay外部に別途インストールしたデータベース(例:独自のMongoDBやリモートデータベース等)も、ネットワーク経由で接続情報を入力すれば利用可能です(ただし、主にServBay内蔵データベース管理が推奨されます)。
まとめ
AdminerはServBayが搭載する非常に便利なデータベース管理ツールで、単一ファイル・軽量・マルチデータベース対応という特徴により、ローカル開発環境でのMariaDB/MySQL、PostgreSQL、SQLiteデータベース管理を大幅に簡略化します。本書の手順を元に、ServBay内のデータベースへ手軽に接続し、Adminerを使って日々のデータベース管理やデータ操作を行いましょう。
