
Setting Up CORS (Cross-Origin Resource Sharing) for Your Website in ServBay
In modern web development, frontend applications (usually running on one domain) often need to access backend APIs or other services (which may operate under different domains or ports). Due to security concerns, browsers’ same-origin policy blocks such cross-origin requests by default. Cross-Origin Resource Sharing (CORS) is a standardized mechanism that allows servers to declare which origins can access their resources, enabling secure cross-origin interaction.
This article will guide you through the rapid configuration and activation of CORS for your websites within the ServBay local web development environment, using the ServBay user interface.
What is CORS?
Cross-Origin Resource Sharing (CORS) is an HTTP-header-based mechanism that allows a server to indicate which origins (domains, schemes, or ports) are permitted to load resources from it. When a webpage tries to request resources from a different origin, the browser makes a “cross-origin HTTP request.” According to browser same-origin policy, such requests are blocked by default. CORS enables communication between the server and browser to determine whether a cross-origin request should be allowed.
Why Do Developers Need to Configure CORS?
If you’re building a decoupled application (for instance, with the frontend at app.servbay.demo and the backend API at api.servbay.demo), or if your frontend needs to call a third-party API, browsers will block these cross-origin requests due to the same-origin policy. Configuring CORS tells the browser that the server explicitly allows requests from your frontend’s origin, thereby solving failed requests caused by the policy.
Key HTTP Response Headers for CORS
When a server responds to a cross-origin request, it includes specific Access-Control-* HTTP response headers. Browsers evaluate these headers to determine whether a cross-origin request should be permitted. Below are the core CORS parameters that can be configured in ServBay (represented by these HTTP response headers):
Access-Control-Allow-Origin- Purpose: This is the most crucial CORS header and specifies the permitted origin(s) (one or more domains) that can access the resource.
- Values:
*: Allows requests from any origin. Important Note: Although convenient, using*is not recommended in production as it permits any website to access your resources, posing potential security risks.https://servbay.demo: Allows requests only from the specific originhttps://servbay.demo.https://servbay.demo https://api.servbay.demo: Allows requests from multiple specific origins (separated by a space).
- Note: If the cross-origin request needs to carry
Cookiesor HTTP authentication information (i.e., withAccess-Control-Allow-Credentials: true),Access-Control-Allow-Originmust not be set to*and should specify the explicit origin(s).
Access-Control-Allow-Methods- Purpose: Specifies which HTTP methods are allowed for cross-origin requests (such as
GET,POST,PUT,DELETE,OPTIONS, etc.). - Values: For example:
GET, POST, PUT, DELETE, OPTIONS(methods separated by commas). - Note: For “non-simple requests” (such as those using
PUTorDELETE, or with custom headers), browsers send a preflight “OPTIONS” request first. The server must respond to this preflight and includeAccess-Control-Allow-Methods, informing the browser which methods are permitted. IncludingOPTIONSin your config is generally required.
- Purpose: Specifies which HTTP methods are allowed for cross-origin requests (such as
Access-Control-Allow-Headers- Purpose: Specifies which custom HTTP request headers are allowed in cross-origin requests.
- Values: For example:
Content-Type, Authorization, X-Requested-With(headers separated by commas). - Note: If your frontend uses any headers beyond the default simple request headers (such as
Accept,Accept-Language,Content-Language,Content-Typewith a value ofapplication/x-www-form-urlencoded,multipart/form-data, ortext/plain), the browser issues a preflight, and you must list the allowed custom headers here.
Access-Control-Allow-Credentials- Purpose: Indicates whether cross-origin requests are permitted to include user credentials such as
Cookies, clientSSL certificates, or HTTP authentication. - Values:
trueorfalse. - Note: When set to
true, as mentioned,Access-Control-Allow-Origincannot be a wildcard (*). Also, your client code (JavaScript in the browser) must set the appropriate flag when making the request (such asxhr.withCredentials = trueorfetch(url, { credentials: 'include' })).
- Purpose: Indicates whether cross-origin requests are permitted to include user credentials such as
Enabling and Configuring CORS in ServBay
ServBay offers an intuitive GUI, allowing you to configure CORS individually for each website. Here are the detailed steps:
Open ServBay and Navigate to the Website List: Launch the ServBay application. In the sidebar on the left of the main interface, click on the “Websites” option. You will see a list of all local sites configured in ServBay.
Select the Site to Configure CORS: Find the specific website for which you want to enable and set up CORS in the list. Click on its name to enter the detailed configuration page.
Locate and Enable the CORS Setting: On the website configuration page, scroll down to the “CORS” section. By default, CORS is disabled in ServBay. Click the switch next to this section to toggle it from “off” to “on.” Once enabled, the configuration options below become editable.
Configure
Access-Control-Allow-Origin: In the "Access-Control-Allow-Origin" input field, specify one or more origins you wish to allow to access this site’s resources. If you need to allow multiple origins, use a space to separate them. Example:https://frontend.servbay.demo https://anotherapp.servbay.demo. Avoid using*in production.Configure
Access-Control-Allow-Methods: In the "Access-Control-Allow-Methods" input field, enter the list of HTTP request methods you want to permit. Use commas as separators for multiple methods, e.g.,GET, POST, PUT, DELETE, OPTIONS. Make sure to include all methods your application requires, and generally includeOPTIONSto support preflight requests.Configure
Access-Control-Allow-Headers: In the "Access-Control-Allow-Headers" input field, enter the list of custom HTTP request headers you want to allow. Use commas between headers, e.g.,Content-Type, Authorization, X-Custom-Header. Only include custom headers your app actually needs.Configure
Access-Control-Allow-Credentials(Optional): If you want cross-origin requests to carryCookiesor HTTP authentication, click the switch next to "Allow-Credentials" to enable it. Remember: When this option is enabled, you must not setAccess-Control-Allow-Originto*in step 4.Save Your Configuration: After completing all CORS settings, be sure to click the "Save" button in the lower right corner of the page to apply your changes. ServBay will automatically update the web server configuration (Caddy or Nginx) for you, with no need to manually restart any service.
Example Configuration
The following image shows a sample CORS configuration for a website named “ServBay Demo Website” in ServBay:
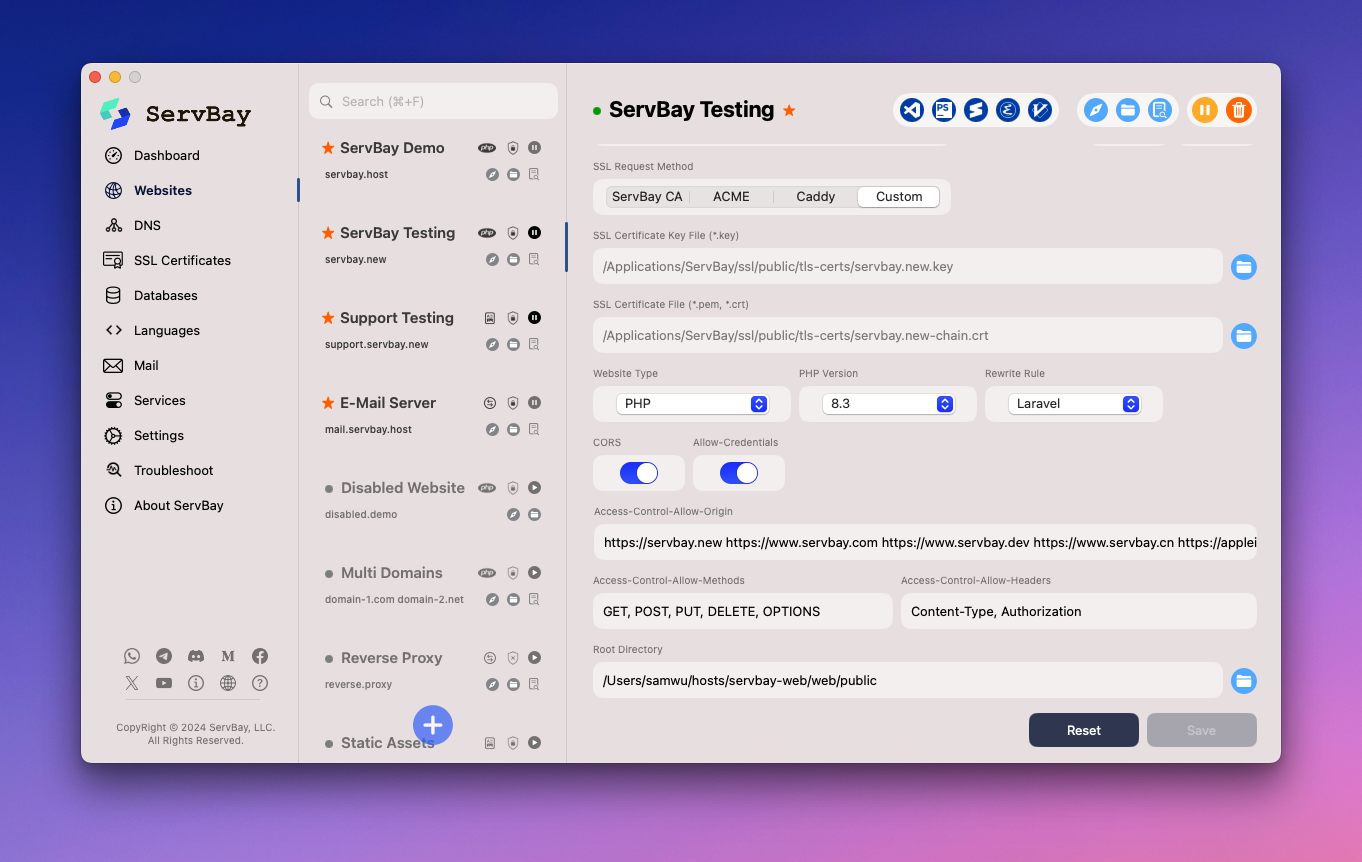
Based on the configuration shown above:
Access-Control-Allow-Origin:https://frontend.servbay.demo https://api.servbay.demoAccess-Control-Allow-Methods:GET, POST, PUT, DELETE, OPTIONSAccess-Control-Allow-Headers:Content-Type, AuthorizationAllow-Credentials: Enabled (true)
This means only requests from https://frontend.servbay.demo and https://api.servbay.demo will be permitted to access resources on the “ServBay Demo Website.” These requests may use the GET, POST, PUT, DELETE, and OPTIONS methods, may include the Content-Type and Authorization headers, and are allowed to carry Cookies and other credentials.
Notes and Best Practices
- Prioritize security: Using
Access-Control-Allow-Origin: *in development and testing can be convenient, but always restrict it to only the trusted origins your application actually interacts with when moving to production to enhance security. - Preflight requests: Understanding how preflight (OPTIONS) requests work is crucial for debugging CORS issues. Make sure your server (via ServBay config) correctly responds to preflight requests with the necessary headers.
- Browser cache: Browsers may cache CORS policies. If you encounter issues after changing CORS settings in ServBay, try clearing your browser cache or testing in incognito mode.
- App-level CORS: Some web frameworks or libraries (such as Laravel, Express.js, Spring Boot, etc.) also offer CORS configuration at the application code level. ServBay configures CORS at the web server level (Caddy/Nginx), which generally takes precedence. In more complex scenarios, you may need to check or coordinate CORS rules between the web server and your app code.
- Debugging tools: Use your browser’s developer tools (press F12 in most browsers) and check the Network tab to inspect HTTP headers for cross-origin requests and responses. This will help you verify your CORS configuration and diagnose the exact cause of failed requests.
Frequently Asked Questions (FAQ)
Q: I followed the steps to configure CORS, but cross-origin requests still fail. Why?
A: Troubleshoot by following these steps:
- Check your browser console and Network tab: Browsers usually log CORS-related errors in the console and show all request/response headers in the Network tab. Look for the correct
Access-Control-Allow-Origin,Access-Control-Allow-Methods,Access-Control-Allow-Headersheaders and ensure their values match your client request. - Verify the origin address: Ensure the origin(s) specified in
Access-Control-Allow-Origin(protocol, domain, and port) exactly match the frontend app's origin making the request. - Check methods and headers: Be certain that
Access-Control-Allow-Methodsincludes your HTTP methods, andAccess-Control-Allow-Headerslists all custom headers your request uses. - Credentials issues: If you need to send
Cookiesor other credentials, make sure "Allow-Credentials" is enabled in ServBay and thatAccess-Control-Allow-Originis not*. Also verify that your client code sets the proper credentials flag (likewithCredentials = true). - Preflight requests: For non-simple requests, check if the browser is sending an
OPTIONSpreflight request, and whether your server’s response contains the correct CORS headers. - ServBay saving: Confirm that you clicked the “Save” button after making changes in ServBay.
Q: Can I set a global CORS policy for all websites?
A: CORS configuration in ServBay is performed individually for each website to offer maximum flexibility and security. ServBay UI does not currently provide a global CORS setting. If you need similar policies across multiple sites, configure each of them separately.
Q: How does ServBay implement CORS settings?
A: ServBay uses Caddy or Nginx as its underlying web server. The CORS settings you configure in the ServBay UI are translated into the corresponding Caddyfile or Nginx configuration directives. ServBay manages these files and ensures the server reloads the configuration—no manual editing required.
Summary
ServBay’s user-friendly interface makes it easy to activate and configure CORS for websites in your local development environment, solving cross-origin access issues efficiently. Thoroughly understanding and configuring headers like Access-Control-Allow-Origin, Access-Control-Allow-Methods, Access-Control-Allow-Headers, and Access-Control-Allow-Credentials is crucial for secure, seamless cross-origin requests. By following the steps and best practices in this guide, you’ll streamline your local web development workflow.
