
How to Upgrade and Migrate MySQL/MariaDB in ServBay
Overview
During local development, you may need to switch the default version of MySQL or MariaDB in your ServBay environment to meet project requirements or leverage the latest features and security updates. This document provides a clear, detailed step-by-step guide to help you safely complete this process, including crucial data backup and restoration procedures.
Use Cases
- Upgrade to the latest version: Access new features, performance improvements, and security patches.
- Test project compatibility: Verify how your application behaves across different database versions.
- Meet specific project dependencies: Some projects may require a specific version of the database.
Prerequisites
- ServBay is installed and running.
- Basic familiarity with the command-line terminal.
- You know the
rootuser password for your database. - Sufficient disk space for the new version installation and storing database backups.
Step-by-Step Guide
The following example demonstrates migrating from MariaDB 10.11 to MariaDB 11.3. The steps for switching MySQL versions are essentially the same.
1. Back Up the Old Database Version
It is strongly recommended to back up all your current database data before performing any version switch. This effectively prevents data loss and provides a restore point in case of compatibility issues.
The standard way to back up your database is using the mysqldump tool. Open your terminal and execute the following command:
bash
mysqldump -uroot -p --all-databases --opt > mariadb_backup.sql-u root: Connect to the database as therootuser.-p: Prompts for therootuser's password.--all-databases: Backs up all databases.--opt: A convenient shortcut for options like--add-drop-table,--add-locks,--create-command,--disable-keys,--extended-insert,--lock-tables,--quick,--set-charset, ensuring an efficient and portable backup file.> mariadb_backup.sql: Redirects the backup output to amariadb_backup.sqlfile in your current working directory (typically your home directory~).
After running the command, enter the MariaDB root password when prompted. Wait for the command to complete; there will be little output until the prompt returns. The size of the backup file depends on your database's data volume. It's advisable to check the mariadb_backup.sql file to ensure it's not empty.
2. Install the New Database Version
Open the ServBay application. Navigate to the Packages tab. Under the database section, find MariaDB or MySQL, select the new version you wish to switch to (e.g., MariaDB 11.3), and click the install button.

Wait for ServBay to complete the download and installation of the new version.
3. Disable the Old Database Version
After the new version is installed, return to the Packages tab in ServBay. Find the currently running older version (e.g., MariaDB 10.11). Click its status indicator (usually a green circle) to disable it. The indicator should turn gray.

4. Enable the New Database Version
Once the old version is disabled, find the newly installed database version (e.g., MariaDB 11.3). Click its status indicator to enable it. The indicator should turn green, showing the new database version has successfully started.

5. Set the New Version as the Default
Simply enabling the new version and disabling the old one is not enough to make it the system default. You need to explicitly specify the default database version in ServBay's settings.
Go to the Settings panel in the ServBay app. Under database-related settings, locate the default version option for MySQL or MariaDB. Use the dropdown to select the new version you just enabled (e.g., MariaDB 11.3).
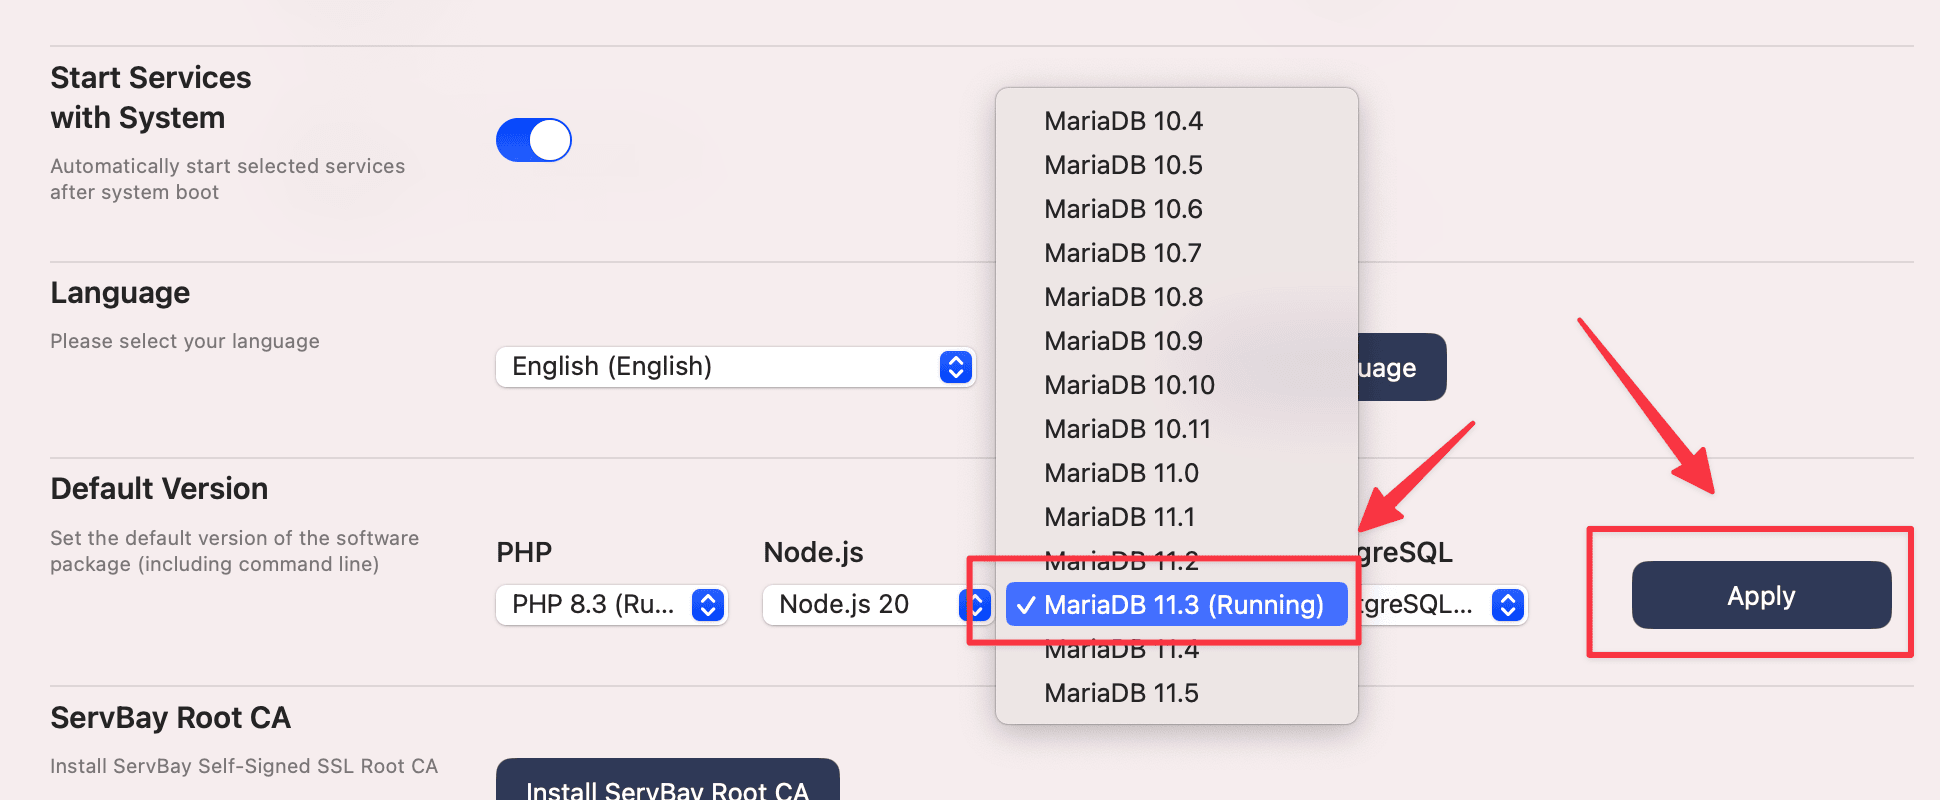
Click the Apply button at the bottom of the panel to save your changes.
6. Confirm the Default Version Is Set
Return to the Packages panel in ServBay. You should see that the new version (e.g., MariaDB 11.3) is clearly marked as the current default version.

7. Verify the Default Version in the Terminal
Open your terminal and run the following command to check if the default database version has been switched successfully:
bash
mysql -VThe output should display your newly set version, such as mysql Ver 11.3.2-MariaDB ....

8. Restore Your Database Backup
Now, restore your previously backed up data to the new database version. Run the following command in the terminal:
bash
mysql -uroot -p < mariadb_backup.sql-u root: Connect to the database as therootuser.-p: Prompts for therootuser's password.< mariadb_backup.sql: Redirects the contents ofmariadb_backup.sqlas input for themysqlclient, executing all SQL commands to restore your data.
After running the command, enter the root password for the new database version (usually the same as before unless you've changed it after the first start). The restore process might take some time depending on the backup file size.
Note: During recovery, you may see warnings or errors in the terminal—especially if there are major differences between the old and new versions, or if the backup includes features specific to the older version (such as storage engines, functions, or DEFINER clauses). For most common web development scenarios, these warnings can typically be ignored, but for production or complex apps, you should review and address any issues that arise.
9. Confirm Complete Database Restoration
After completion, log in to the database to verify everything has been restored:
bash
mysql -uroot -pEnter your password to access the MariaDB/MySQL command-line client. View the database list:
sql
SHOW DATABASES;You can further inspect specific databases and tables or run queries to ensure all data is correctly restored and your application can connect and access the database as expected.
Important Notes
- Data Compatibility: While MySQL/MariaDB aims for compatibility, major upgrades (e.g., from 5.7 to 8.0 or MariaDB 10.x to 11.x) can introduce breaking changes. Always consult the official documentation for compatibility notes between versions.
- Configuration Files: ServBay maintains separate configuration files for each database version (such as
my.cnformy.ini). If you customized the config for the old version, manually migrate or merge these changes into the new version's config file. These files are typically located in a specific subdirectory within your ServBay installation (e.g.,/Applications/ServBay/etc/mysql/<version>/my.cnf). - Performance: New database versions may come with different default settings or internal optimizations. After switching, test your app's performance and adjust the configuration if necessary.
- Ports: By default, all database versions in ServBay listen on the standard port (e.g., 3306). Switching the default version does not change the port. If you need to run multiple database versions on different ports, you will need to manually adjust the configuration file.
Frequently Asked Questions (FAQ)
- Q: What should I do if the newly installed database version fails to start?
- A: Check the status indicator and logs in the ServBay Packages panel. The database log files are usually found under
var/log/mysqlorvar/log/mariadbin your ServBay installation directory. Review the logs for configuration errors, port conflicts, or permission issues causing the problem.
- A: Check the status indicator and logs in the ServBay Packages panel. The database log files are usually found under
- Q: What if errors occur during database restoration?
- A: Read the error messages carefully. Common issues include charset problems (using
--default-character-set=utf8mb4withmysqldumpmay help),DEFINERpermission errors (which can be batch replaced in the backup file), or corrupted backup files. For large databases, consider tools likemydumper/myloaderfor parallel backup and restore.
- A: Read the error messages carefully. Common issues include charset problems (using
- Q: Can I switch versions without backup and restore?
- A: This is not recommended, especially for major version upgrades. Directly switching can lead to incompatibility, data corruption, or loss. Backup and restore are the safest, most reliable methods.
- Q: After switching, my website or application can’t connect to the database. What should I do?
- A: Ensure the new database version in ServBay is started and set as default. Double-check your app’s database connection settings—hostname (usually
127.0.0.1orlocalhost), port (default is 3306), username, and password.
- A: Ensure the new database version in ServBay is started and set as default. Double-check your app’s database connection settings—hostname (usually
Conclusion
By following the steps in this document, you can smoothly and safely switch the default version of MySQL or MariaDB in your ServBay environment. The core process involves backing up your data, installing and enabling the new version, specifying the default in ServBay's settings, and restoring your data. Always take data backups seriously, and verify data integrity and application functionality after switching.
