
PostgreSQL Database Management and Usage
PostgreSQL is a powerful, highly extensible, and standards-compliant open-source relational database management system that enjoys widespread popularity among developers. ServBay, a local web development environment supporting both macOS and Windows, features an integrated PostgreSQL package, greatly simplifying installation and management.
This guide provides developers with step-by-step instructions on efficiently managing and using PostgreSQL within the ServBay environment, covering installation, configuration, daily operations, backup and restore, performance optimization, and security.
Installing and Configuring PostgreSQL
ServBay offers an intuitive graphical interface for managing software packages, including PostgreSQL.
Installing PostgreSQL
- Open the ServBay application.
- Click
Packagesin the left navigation bar. - Locate
PostgreSQLin the package list. - Select your desired PostgreSQL version (ServBay supports multiple versions, e.g., PostgreSQL 10 through 17).
- Click the install button to begin installation.
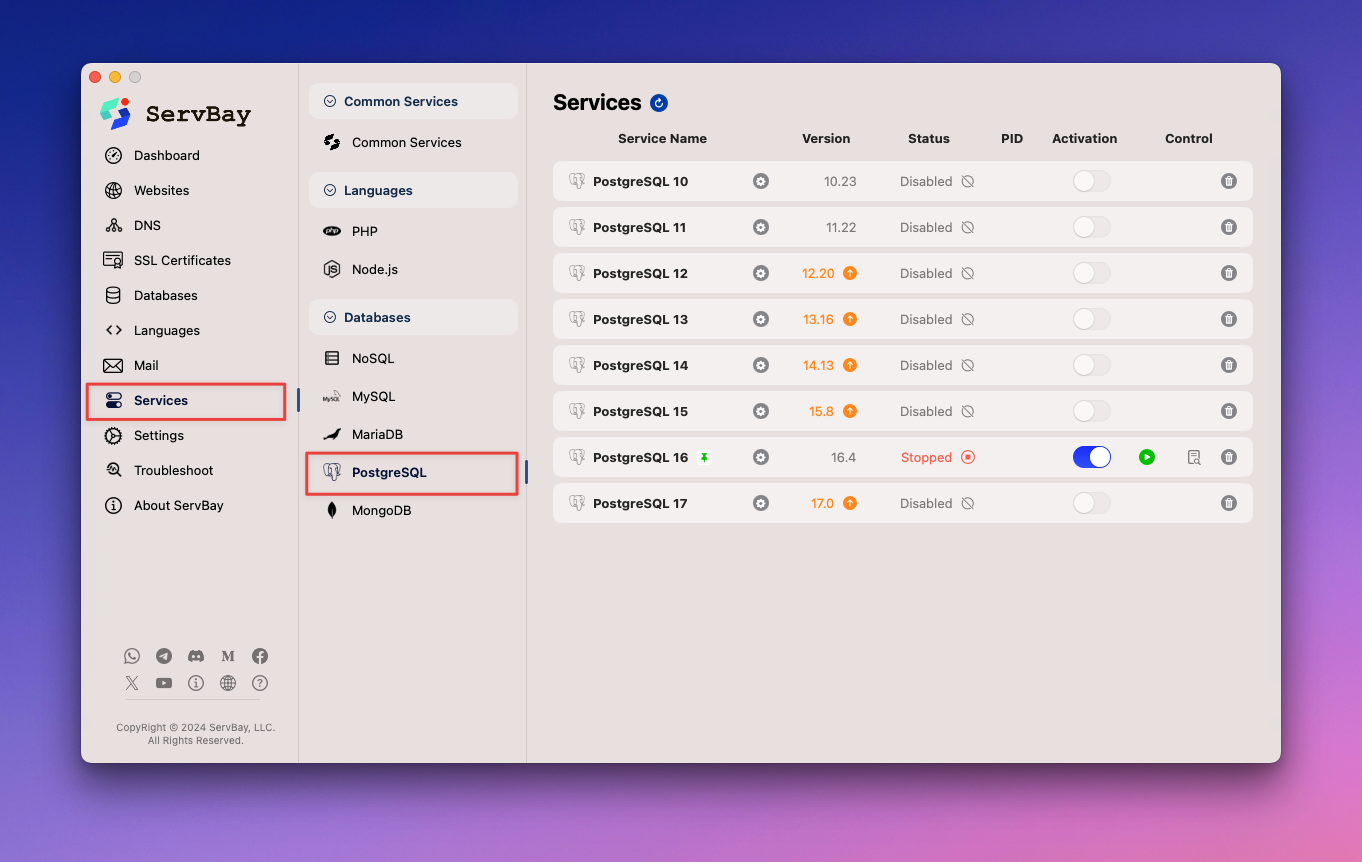 Image: Choosing and installing a PostgreSQL version in ServBay
Starting, Stopping, and Managing PostgreSQL Service
Once installation is complete, you can manage PostgreSQL’s running status through the ServBay management platform or the servbayctl command-line tool.
Using ServBay Management Platform
- Open the ServBay application.
- Click
Packagesin the left navigation bar. - Locate the installed version of PostgreSQL.
- Use the toggle switch next to the package to start, stop, or restart the service.
Using the servbayctl Command-Line Tool
servbayctl is a powerful CLI provided by ServBay for managing various components.
bash
# Start a specific version of PostgreSQL (e.g., PostgreSQL 16)
servbayctl start postgresql 16

# Stop a specific version of PostgreSQL (e.g., PostgreSQL 16)
servbayctl stop postgresql 16

# Restart a specific version of PostgreSQL (e.g., PostgreSQL 16)
servbayctl restart postgresql 16

# Check the status of a specific version of PostgreSQL (e.g., PostgreSQL 16)
servbayctl status postgresql 16Note: The version number (16 in these examples) should match the PostgreSQL version you have installed in ServBay.
Configuring PostgreSQL
ServBay makes it easy to modify PostgreSQL’s configuration. Effective configuration helps boost performance, ensure security, and optimize resource usage.
ServBay provides a powerful GUI for configuring PostgreSQL services, and you can also edit configuration files directly. Refer to the Modify PostgreSQL Configuration documentation to learn how to adjust and optimize PostgreSQL settings via ServBay’s interface or by manual config file edits.
Connecting to the PostgreSQL Database
Connecting to PostgreSQL is the first step towards database operations. You can use the psql command-line tool or graphical tools such as pgAdmin to connect to a PostgreSQL instance running in ServBay.
ServBay supports two main connection methods for PostgreSQL: TCP/IP connections (commonly used for external tools or cross-container/service access) and local socket connections (preferred for internal ServBay use, offering better performance and security).
Accessing Connection Credentials
Before connecting, obtain the PostgreSQL username and password. ServBay generally sets default credentials during database installation or initialization. These details, especially for the default user (postgres) or any other users you've created, can be found in the ServBay management interface.
Connecting Using psql Command-Line Tool
psql is PostgreSQL’s official interactive CLI client.
Using TCP/IP Connection: This method connects via network protocol, suitable for
localhostor other network addresses. The default PostgreSQL port in ServBay is5432.bashpsql -U your_username -h localhost -d your_database -p 5432Replace
your_usernamewith your database username andyour_databasewith the name of the database to connect to.Using Local Socket Connection (macOS Only): On macOS, ServBay configures PostgreSQL to use a Unix Domain Socket for connections, bypassing the networking stack for enhanced performance and security. The socket file is typically located in ServBay’s temporary directory.
macOS:
bashpsql -U your_username -h /Applications/ServBay/tmp -d your_databaseReplace
your_usernamewith your database username andyour_databasewith the name of the database to connect to./Applications/ServBay/tmpis the default path for the ServBay PostgreSQL socket.Windows: For Windows, utilize TCP/IP connections as detailed above.
Connecting with pgAdmin GUI
pgAdmin is a popular open-source graphical tool for managing PostgreSQL with a rich feature set.
- Install pgAdmin: If ServBay doesn’t include pgAdmin, download and install it from the pgAdmin official site.
- Launch pgAdmin.
- Create a new server connection: Click
Add New Server. - Enter connection details:
- General: Enter a connection name (e.g.,
ServBay PostgreSQL). - Connection:
- Hostname/address:
localhost - Port:
5432 - Maintenance database: Typically
postgres - Username: Fetch from ServBay management panel (e.g.,
postgres) - Password: Retrieve from ServBay management panel
- Hostname/address:
- SSL mode: Select as per requirements (
PreferorRequirefor better security;AlloworDisablemay also work with ServBay’s default setup—consult ServBay's SSL settings).
- General: Enter a connection name (e.g.,
- Click
Saveto connect to the database server.
Basic Database Management Operations
Once connected to PostgreSQL, you can perform various management tasks.
Listing Databases and Users
In the psql CLI, use meta-commands (those starting with \) to view existing databases and users:
- List all databases:sql
\l - List all users (roles):sql
\du
Creating Databases and Users
You can execute SQL commands to create new databases and users, and assign privileges.
Create a new database:
sqlCREATE DATABASE servbay_demo_db;It’s recommended to use descriptive names, such as your project name.
Create a new user (role) and set a password:
sqlCREATE USER servbay_user WITH PASSWORD 'a_strong_password';Replace
servbay_userwith your desired username, anda_strong_passwordwith a secure password.Grant privileges to the user:
sqlGRANT ALL PRIVILEGES ON DATABASE servbay_demo_db TO servbay_user;This gives
servbay_userfull access toservbay_demo_db. For security, grant only the minimum necessary privileges per best practices.
Resetting the PostgreSQL Root User Password
If you forget the root user password for PostgreSQL (typically postgres), ServBay offers an easy reset function. This is usually done via the ServBay management interface, without complex command-line operations or file edits. Please consult ServBay’s UI or documentation to locate password reset options for the PostgreSQL package.
Database Backup and Restoration
Regular backups are crucial for data safety. In ServBay, you can use PostgreSQL’s standard tools like pg_dump and pg_restore, or leverage ServBay’s built-in backup feature.
Manual Backup with pg_dump
pg_dump exports database contents.
It’s recommended to store backups in the ServBay backup directory:
macOS:
bash
/Applications/ServBay/backup/postgresqlWindows:
cmd
C:\ServBay\backup\postgresqlExample using pg_dump:
macOS:
bash
pg_dump -U your_username -d your_database -F c -b -v -f /Applications/ServBay/backup/postgresql/your_database_backup.dumpWindows:
cmd
pg_dump -U your_username -d your_database -F c -b -v -f C:\ServBay\backup\postgresql\your_database_backup.dump-U your_username: Specifies the database username.-d your_database: Specifies the name of the database to back up.-F c: Outputs in custom archive format (recommended for flexible restoration).-b: Includes large objects (Blobs).-v: Outputs verbose information.-f <filepath>: Specifies the backup file path and name.
Restoring with pg_restore
pg_restore is used to restore databases from pg_dump archive files.
macOS:
bash
pg_restore -U your_username -d target_database -v /Applications/ServBay/backup/postgresql/your_database_backup.dumpWindows:
cmd
pg_restore -U your_username -d target_database -v C:\ServBay\backup\postgresql\your_database_backup.dump-U your_username: Database username.-d target_database: Name of the target database (create it beforehand if it doesn't exist).-v: Verbose mode.<filepath>: Path to the backup file.
Using ServBay’s Built-in Backup Features
ServBay provides both graphical and automated options to back up your entire local development environment, including PostgreSQL databases.
ServBay’s built-in backup features include:
- Manual backups: One-click environment snapshots via the ServBay UI.
- Automatic backups: Configure a schedule for ServBay to run regular automated backups.
Backups include ServBay settings, website files, all databases (including PostgreSQL), SSL certificates, and more. It is strongly recommended to use this feature for simplified backup workflows and robust data security. Find backup options in ServBay’s main interface or settings for configuration and management.
Performance Optimization
For optimal PostgreSQL performance in ServBay, consider the following strategies.
Index Optimization
Database indexes dramatically accelerate data retrieval, especially for large tables and frequently queried columns.
Ensure indexes are created for columns commonly used in WHERE clauses, JOIN conditions, or sorting (ORDER BY clauses).
sql
CREATE INDEX idx_your_column_name ON your_table_name(your_column_name);Replace your_table_name and your_column_name accordingly, and customize idx_your_column_name for the index name.
Query Optimization
Use the EXPLAIN command to analyze SQL query execution plans. This reveals how the database executes your queries and helps identify bottlenecks.
sql
EXPLAIN SELECT * FROM your_table_name WHERE column_name = 'value';EXPLAIN shows whether indexes are used, join methods, row counts, and more—enabling further query or index optimization.
Configuration Tuning
Editing PostgreSQL’s configuration file (typically postgresql.conf) allows you to adjust parameters according to hardware resources and workload.
For example, shared_buffers controls the memory allocated for data caching. Increasing it reduces disk I/O and improves performance (within system memory limits).
ini
# Sample configuration in postgresql.conf
shared_buffers = 1GB # Tune according to system RAM and loadAfter changes, restart the PostgreSQL service for changes to take effect. Consult ServBay’s configuration documentation for detailed guidance.
Security Management
Securing your database is essential, especially when developing with sensitive data.
Setting Strong Passwords
Set complex, unique passwords for all database users, especially privileged ones (e.g., postgres). Update passwords regularly.
sql
ALTER USER your_username WITH PASSWORD 'your_new_strong_password';Regular Backups
As mentioned above, regular backups are vital to prevent data loss. Use both ServBay’s built-in backup feature and manual pg_dump strategies for a solid backup plan.
Restricting User Privileges
Follow the principle of least privilege—grant users only the minimum permissions needed for their tasks. Avoid granting ALL PRIVILEGES indiscriminately.
sql
-- Revoke all privileges from a user on a database
REVOKE ALL PRIVILEGES ON DATABASE mydatabase FROM your_username;

-- Grant CONNECT and TEMPORARY privileges (example)
GRANT CONNECT, TEMPORARY ON DATABASE mydatabase TO your_username;

-- Grant SELECT, INSERT, UPDATE, DELETE on specific tables
GRANT SELECT, INSERT, UPDATE, DELETE ON TABLE your_table_name TO your_username;Network Access Control
By default, ServBay binds its database service to local interfaces (localhost or 127.0.0.1), blocking outside network access and enhancing security. Only expose the database externally if you fully understand the risks and have special needs.
Frequently Asked Questions and Troubleshooting
Unable to Connect to PostgreSQL
- Check if the PostgreSQL service is running: Use the ServBay UI or
servbayctl status postgresql <version>to verify service status. Start it if necessary. - Verify connection parameters: Ensure username, password, database name, hostname, and port are correct. This information is available in the ServBay UI.
- macOS: Use
localhostor/Applications/ServBay/tmp, port5432 - Windows: Use
localhost, port5432
- macOS: Use
- Review ServBay logs: Inspect ServBay logs for PostgreSQL-related error messages; these often reveal connection issues.
- Check firewall settings: Although generally not an issue with ServBay's local config, ensure your system or third-party security software allows local connections to PostgreSQL processes in the ServBay directory.
Permission Issues
If you see “Permission Denied” errors during database operations, your current user likely lacks necessary privileges.
- Check current user permissions: In
psql, use\duto list users and attributes, and\dp <table_name>to check table-specific permissions. - Grant required permissions: Connect as a user with sufficient rights (e.g.,
postgres) and useGRANTto assign privileges as needed.sqlGRANT ALL PRIVILEGES ON DATABASE mydatabase TO your_username; -- Database-level privileges GRANT SELECT ON TABLE your_table_name TO your_username; -- Table-level privileges
Summary
PostgreSQL is a robust and versatile database management system. ServBay streamlines the process of deploying and managing PostgreSQL on macOS and Windows. With this guide, you are equipped to install, configure, connect, perform fundamental database management, use ServBay’s built-in backup and manual backup/restoration features, optimize performance, and strengthen security within ServBay. Mastering these skills will help you develop web applications locally with greater efficiency and safety.
