
Using Third-Party CA SSL Certificates in ServBay
When developing or testing locally in a simulated production environment, using an SSL certificate signed by a trusted third-party certificate authority (CA) ensures your website is securely accessible via HTTPS. This is crucial for testing HTTPS-dependent features or keeping your local environment as close to production as possible. This article provides a detailed guide on how to configure a third-party SSL certificate in the ServBay local web development environment.
WARNING
Please note that SSL certificates issued by third-party CAs typically only support standard domain suffixes (such as .com, .org, .net, .cn, etc.) and do not support custom, non-standard suffixes (like .local, .test, .demo, etc.), as these domains cannot be publicly validated. If your local development domain uses a non-standard suffix, consider using ServBay’s built-in ServBay User CA or ServBay Public CA to generate a trusted local SSL certificate.
Use Cases
- Simulate Production Environment: Accurately mimic production HTTPS configurations and test site behavior under HTTPS.
- Test HTTPS-Dependent Features: Test browser APIs or features requiring a secure context (e.g., Service Workers, Web Crypto API, Geolocation, etc.).
- Local API Development: Enable HTTPS for locally running backend APIs to allow frontend HTTPS calls.
Prerequisites
Before you begin, make sure you have:
- Installed and are running ServBay on macOS.
- A basic understanding of terminal and command-line operations.
- OpenSSL installed on your system (macOS usually comes with it pre-installed).
Step 1: Applying for a Third-Party SSL Certificate
First, you need to apply for an SSL certificate from a trusted third-party CA (such as Let's Encrypt, DigiCert, GlobalSign, Sectigo, etc.). This section explains the steps to generate a Certificate Signing Request (CSR), which is a key part of the certificate application process.
Generate a Private Key
The private key is a critical file used by your server to decrypt SSL-encrypted traffic. It must be kept secure and never disclosed. Run the following OpenSSL command in the terminal to generate an RSA private key:
shopenssl genpkey -algorithm RSA -out servbay.demo.key -pkeyopt rsa_keygen_bits:2048openssl genpkey: OpenSSL command to generate a private key.-algorithm RSA: Specifies the private key algorithm as RSA.-out servbay.demo.key: Output file namedservbay.demo.key.-pkeyopt rsa_keygen_bits:2048: Sets the RSA private key length to 2048 bits. This is the current recommended minimum for most use cases and provides sufficient security.
Generate a Certificate Signing Request (CSR)
The CSR contains your public key and information required by the CA to issue a certificate. Use the private key generated above to create a CSR:
shopenssl req -new -key servbay.demo.key -out servbay.demo.csropenssl req: OpenSSL command for handling certificate requests.-new: Indicates creation of a new CSR.-key servbay.demo.key: Specifies the private key file to sign the CSR.-out servbay.demo.csr: Sets the output CSR file name.
After running the command, you’ll be prompted to enter a series of details, which will be stored in the CSR. Fill these in according to your actual situation or the CA’s requirements. Here’s an example with explanations:
Country Name (2 letter code) [AU]:CN # Country code, e.g., CN (China), US (United States) State or Province Name (full name) [Some-State]:Hong Kong # State or province name Locality Name (eg, city) []:Kowloon # City name Organization Name (eg, company) [Internet Widgits Pty Ltd]:ServBay # Organization/Company Name Organizational Unit Name (eg, section) []:Development # Organizational unit (optional) Common Name (e.g. server FQDN or YOUR name) []:servbay.demo # **Most important: enter the full domain name (FQDN) for the certificate.** Email Address []:admin@servbay.demo # Contact email (optional) Please enter the following 'extra' attributes to be sent with your certificate request A challenge password []: # Challenge password (usually leave blank) An optional company name []: # Optional company name (usually leave blank)Make sure the
Common Namefield exactly matches the domain you plan to use in ServBay, such asservbay.demo. If you need a certificate for multiple domains (multi-domain or SAN certificate), the CA’s process will have additional steps for adding these domains, or may offer online tools to generate a CSR with SANs, but the basic CSR generation is similar.Submit CSR and Obtain the Certificate
Copy or upload the contents of your
servbay.demo.csrfile to your third-party CA’s website, then follow their process to verify domain ownership (typically via DNS record, HTTP file, or email verification). Once verified, the CA will issue the certificate files. You’ll typically receive:- Your primary certificate file (e.g.,
servbay.demo.crtorservbay.demo.pem). - One or more intermediate certificate files (to build the certificate chain, e.g.,
intermediate.crt,ca-bundle.crt). - The root certificate file (usually does not need to be installed separately, browsers/OSes already trust it).
- Your primary certificate file (e.g.,
Step 2: Configuring Third-Party SSL Certificates in ServBay
Once you’ve obtained the CA-signed certificate files, you'll need to import and configure them in ServBay so your site can use HTTPS.
ServBay recommends storing all custom certificate and private key files in the /Applications/ServBay/ssl/import/tls-certs/ directory for easier management.
Move Certificate and Private Key Files to the Designated Directory
Move the private key (
servbay.demo.key), main certificate (servbay.demo.crt), and any intermediate certificate files (e.g.,intermediate.crt) into ServBay’s import directory:shmv servbay.demo.key /Applications/ServBay/ssl/import/tls-certs/ mv servbay.demo.crt /Applications/ServBay/ssl/import/tls-certs/ # If you have an intermediate CA chain file, move it as well mv intermediate.crt /Applications/ServBay/ssl/import/tls-certs/ # If there are other intermediate certificates, move them too # mv another_intermediate.crt /Applications/ServBay/ssl/import/tls-certs/Append Intermediate Certificates to the Main Certificate File
To ensure browsers can fully verify the certificate chain, append all intermediate certificate contents to the end of your main certificate file, in the order specified by your CA. The usual order in the chain is: your server certificate first, then intermediates, ending with the root certificate (not usually needed, as systems trust it by default). CA documentation will indicate the correct order.
For example, if your intermediate certificate file is
intermediate.crt:shcat intermediate.crt >> /Applications/ServBay/ssl/import/tls-certs/servbay.demo.crtIf you have multiple intermediates, append them in the order provided by the CA. For example, if the order is
intermediate1.crt->intermediate2.crt:shcat intermediate1.crt >> /Applications/ServBay/ssl/import/tls-certs/servbay.demo.crt cat intermediate2.crt >> /Applications/ServBay/ssl/import/tls-certs/servbay.demo.crtAfter merging, your
servbay.demo.crtfile will contain both your server certificate and the full intermediate certificate chain.Open the ServBay Control Panel
Launch the ServBay app. Find the ServBay icon in your menu bar or Dock and click to open the control panel.
Add or Edit a Website
In the left navigation panel of the ServBay control panel, select
Websites.- To create a new website, click the
+button in the upper right. - To update an existing site, select it, then click the edit (pencil) icon.
- To create a new website, click the
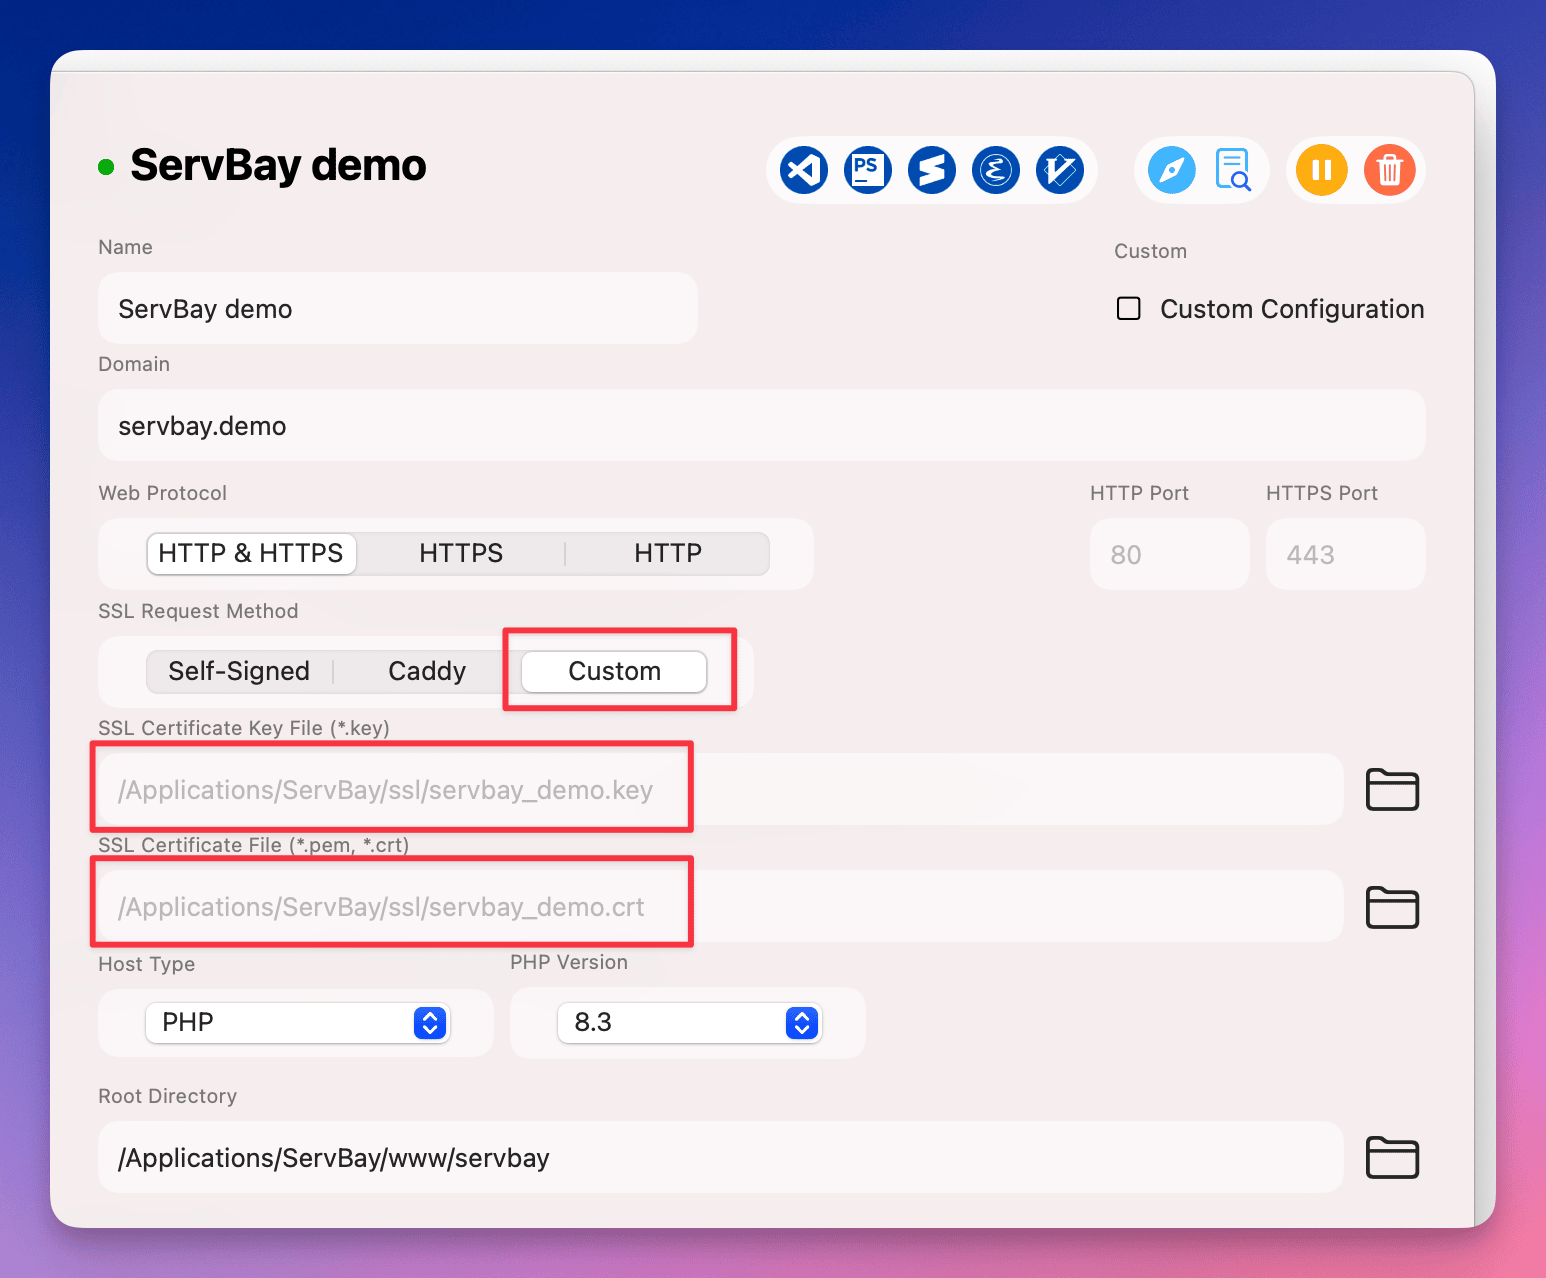
Configure the SSL Certificate
In the website configuration interface, go to the SSL section. Select
Customas your certificate issuance method.- Certificate Key File: Click the browse button, navigate to
/Applications/ServBay/ssl/import/tls-certs/, and select your imported private key file (e.g.,servbay.demo.key). - Certificate File: Click the browse button, navigate to
/Applications/ServBay/ssl/import/tls-certs/, and select your main certificate file that contains intermediate certificates (e.g.,servbay.demo.crt).
 (Note: image path is for example purposes; update it to match your ServBay documentation site as needed)
- Certificate Key File: Click the browse button, navigate to
Set Domain Name and Document Root
In the site configuration, ensure the
Domainfield matches the domain you used when requesting the certificate (e.g.,servbay.demo). Also, set the websiteDocument Rootappropriately (e.g.,/Applications/ServBay/www/servbay.demo).Save and Apply Configuration
After completing all settings, click Save. ServBay will prompt you to apply changes and restart the relevant web service (such as Caddy, Nginx, or Apache). Confirm to apply.
Verifying Your Configuration
Once configured, visit your site in the browser (e.g., https://servbay.demo). If everything is set up correctly, you’ll see a padlock icon in the browser address bar. Clicking it allows you to view certificate details and confirm you’re using the imported, third-party CA-signed certificate with a complete certificate chain.
If you encounter issues, check the following:
- Does the domain match the certificate's Common Name or SAN?
- Are the private key and certificate file paths correct?
- Does the certificate file include the full intermediate certificate chain, in the proper order?
- Has the website configuration in ServBay been saved and applied?
- Does your OS trust the certificate’s root CA? (Third-party CA root certificates are usually trusted by major operating systems and browsers.)
Notes
- Domain Matching: The certificate you import must exactly match the domain configured in ServBay (including subdomains, if using a wildcard certificate).
- Certificate Expiry: Third-party certificates have expiration dates. Before expiry, you’ll need to renew and update your ServBay certificates accordingly.
- Private Key Security: The
.keyprivate key file is extremely important. Keep it safe to prevent leaks. - Other SSL Options Provided by ServBay: ServBay also offers convenient built-in SSL configuration methods, such as:
- ServBay User CA / Public CA: For generating trusted local development certificates, supporting any domain suffix.
- ACME (Let’s Encrypt): For standard domains, ServBay can integrate with ACME clients to automatically obtain and renew Let’s Encrypt certificates. The custom import method described here is for scenarios where you already have a third-party certificate obtained elsewhere.
FAQ
Q1: I received a .pfx or .p12 certificate file. How can I use it in ServBay?
A1: .pfx or .p12 files usually bundle the private key and certificate chain. Use OpenSSL to export them as separate key (.key) and certificate (.crt) files. For example:
sh
openssl pkcs12 -in your_certificate.pfx -nocerts -out your_private_key.key -nodes
openssl pkcs12 -in your_certificate.pfx -clcerts -nokeys -out your_certificate.crtAfter export, you may still need to obtain the intermediate certificate chain files separately (usually provided by the CA) and append them to the .crt file as described in Step 2.
Q2: I followed the steps, but the browser still shows a “Not Secure Connection” warning?
A2: Please check:
- Domain Matching: Does the domain you’re visiting match what’s in the certificate?
- Certificate Chain: Does your
.crtfile include all intermediate certificates, in the correct order? Use online SSL checker tools to validate the chain. - ServBay Restarted: Did you apply configuration changes and restart the web server in ServBay?
- Browser Cache: Clear your browser cache or try incognito/private mode.
- System Trust: Is the certificate’s root CA trusted by your operating system?
Conclusion
By following this guide, you can successfully configure and use third-party CA-signed SSL certificates in your ServBay local development environment. This allows you to more accurately simulate production HTTPS setups for more effective local development and testing. While ServBay does offer easier SSL configuration options (such as ACME and ServBay CAs), mastering manual import of third-party certificates is valuable for users with special certificate requirements or those migrating existing certificates.
