
Guide to Configuring Pinggy Reverse Proxy Service in ServBay
Pinggy is a lightweight and easy-to-use NAT traversal tool that lets you quickly and securely expose locally running web services to the public internet. By integrating Pinggy, ServBay provides macOS developers with a convenient way to create public access tunnels, perfect for code demos, API testing, or sharing local projects with external collaborators. This guide will walk you through the entire process of configuring and using the Pinggy service within ServBay.
Overview
ServBay comes with built-in Pinggy support, making installation and management exceptionally simple. You can control Pinggy tunnels right from ServBay’s graphical interface, mapping locally hosted websites to publicly accessible URLs for external access.
Use Cases
- Quick Demos: Instantly showcase websites or applications under development on your local macOS environment to clients or colleagues.
- API & Webhook Testing: Provide a temporary public endpoint for third-party services that require external callbacks, like social logins or message queues.
- Remote Debugging: Allow remote team members to access and debug your local development environment easily.
- Mobile Testing: Enable mobile devices to access your locally running backend services via a public URL.
Prerequisites
- ServBay Installed: Ensure the latest version of ServBay is installed and running on your macOS system.
- Pinggy Account: You need a Pinggy account. Register at the Pinggy official site. Both free and paid plans are available from Pinggy.
- Local Website: At least one local website must be configured and running in ServBay, such as
servbay.demoorkirby.test.
Step-by-Step Instructions
1. Install the Pinggy Package in ServBay
If this is your first time using Pinggy in ServBay, you’ll need to install its package:
Launch the ServBay application.
In the left sidebar, click Packages.
Find or search for
Pinggyfrom the list of available packages.Click the install button next to
Pinggy.After installation, you can try toggling the start switch on the right side of
Pinggy. If the service fails to start or shows an abnormal state, this is normal at this stage since Pinggy is not yet configured. We’ll complete the setup in the following steps.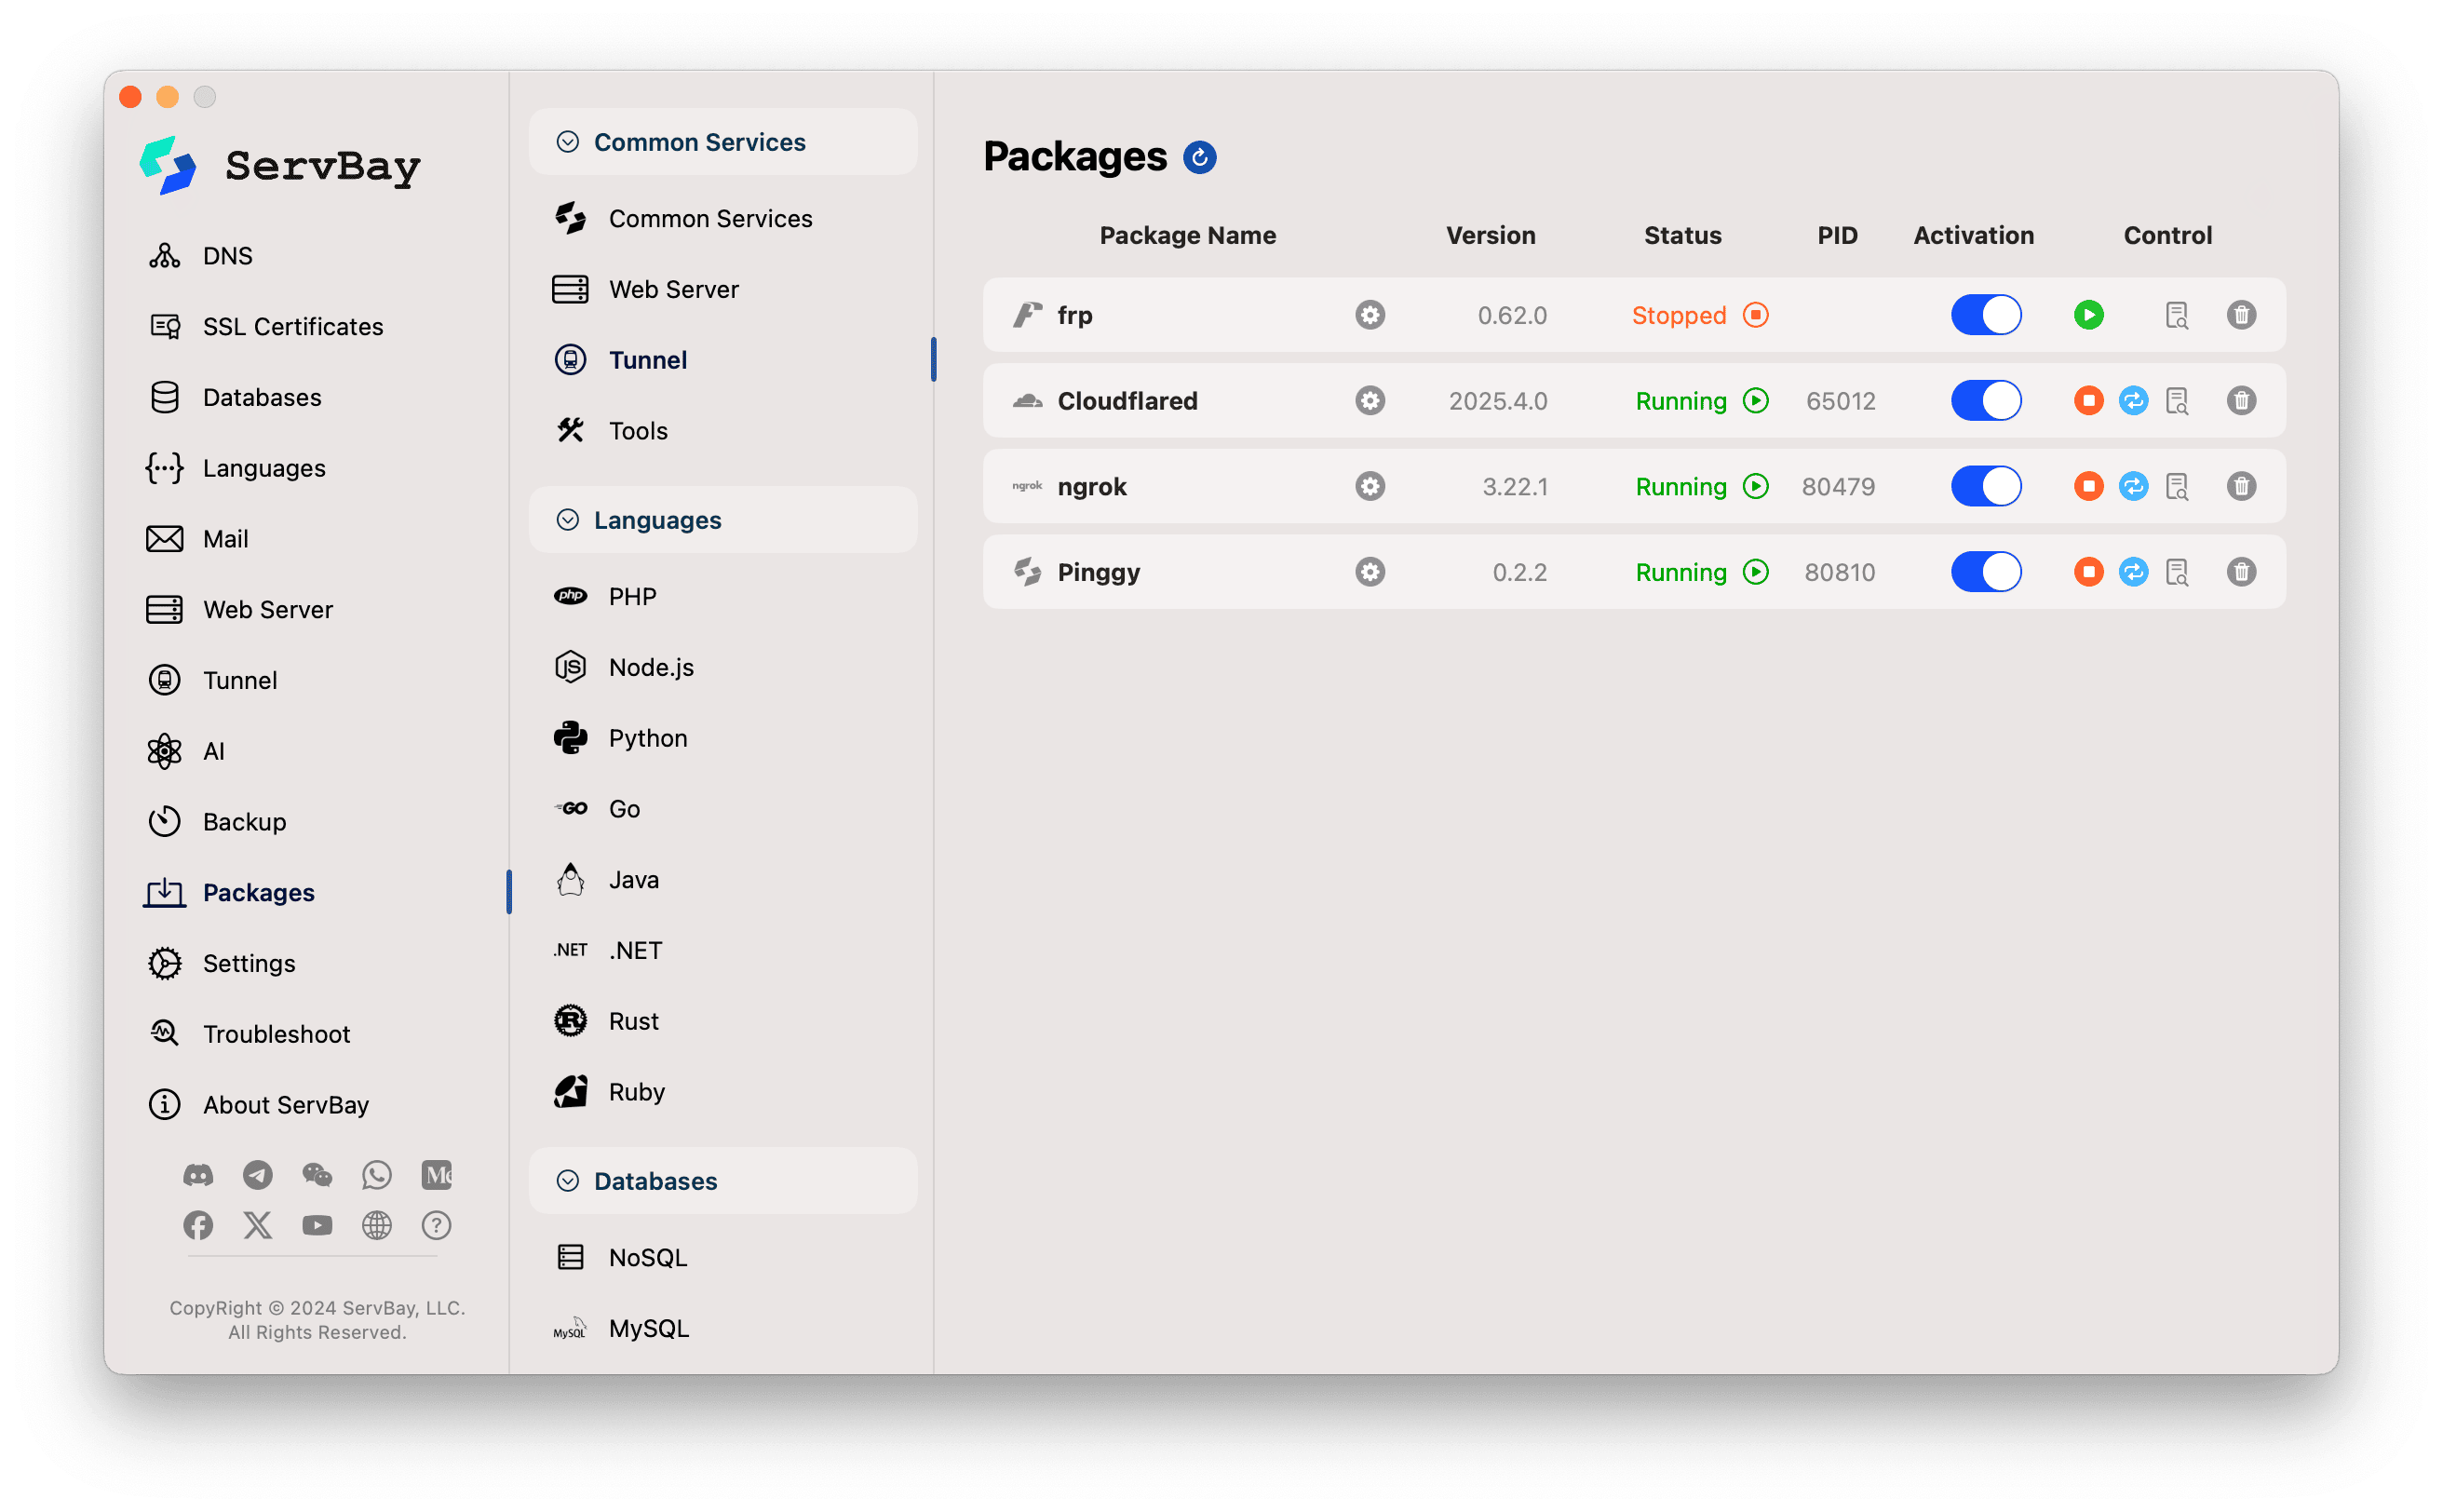
2. Obtain Your Pinggy Access Token
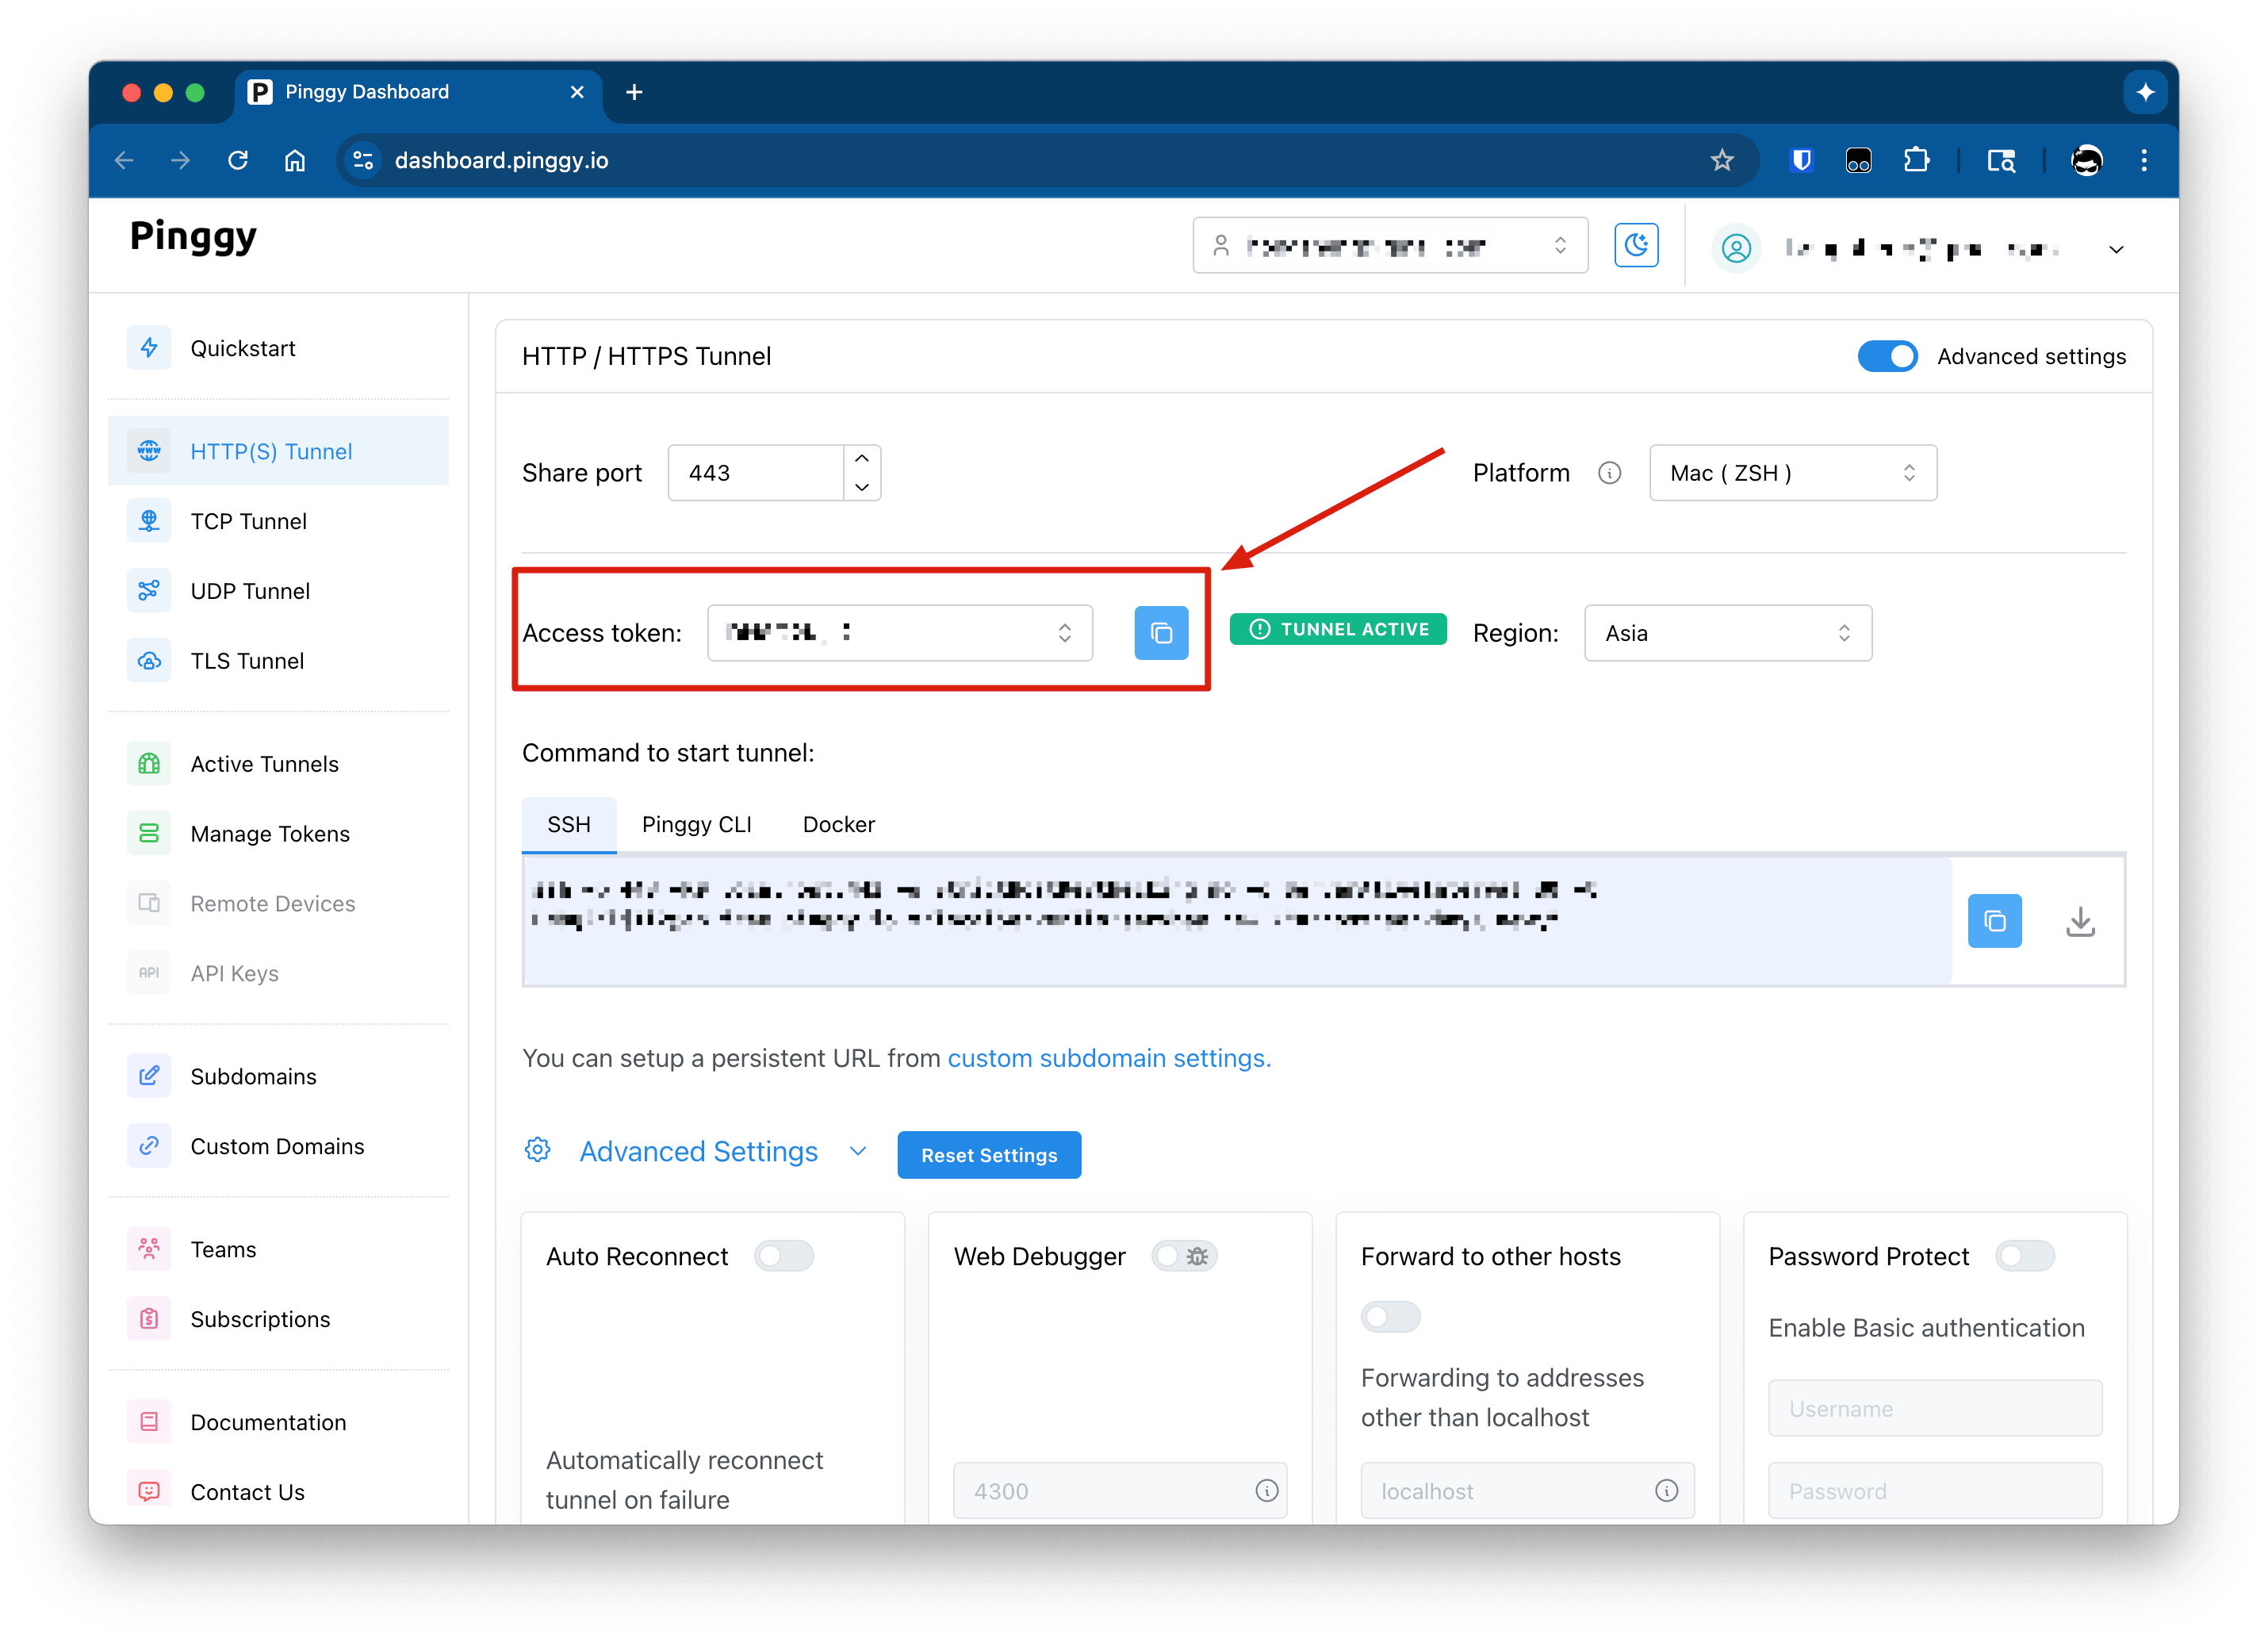
Pinggy uses an Access token to authenticate your account and enable tunneling services.
Go to the Pinggy Dashboard and log in with your credentials.
Once logged in, you’ll usually find your Access token in the "Access token" section of the dashboard home page.
Copy the Access token, which is a string of characters—make sure to keep it secure.
3. Configure Pinggy in ServBay
After obtaining your Access token, return to the ServBay app for configuration:
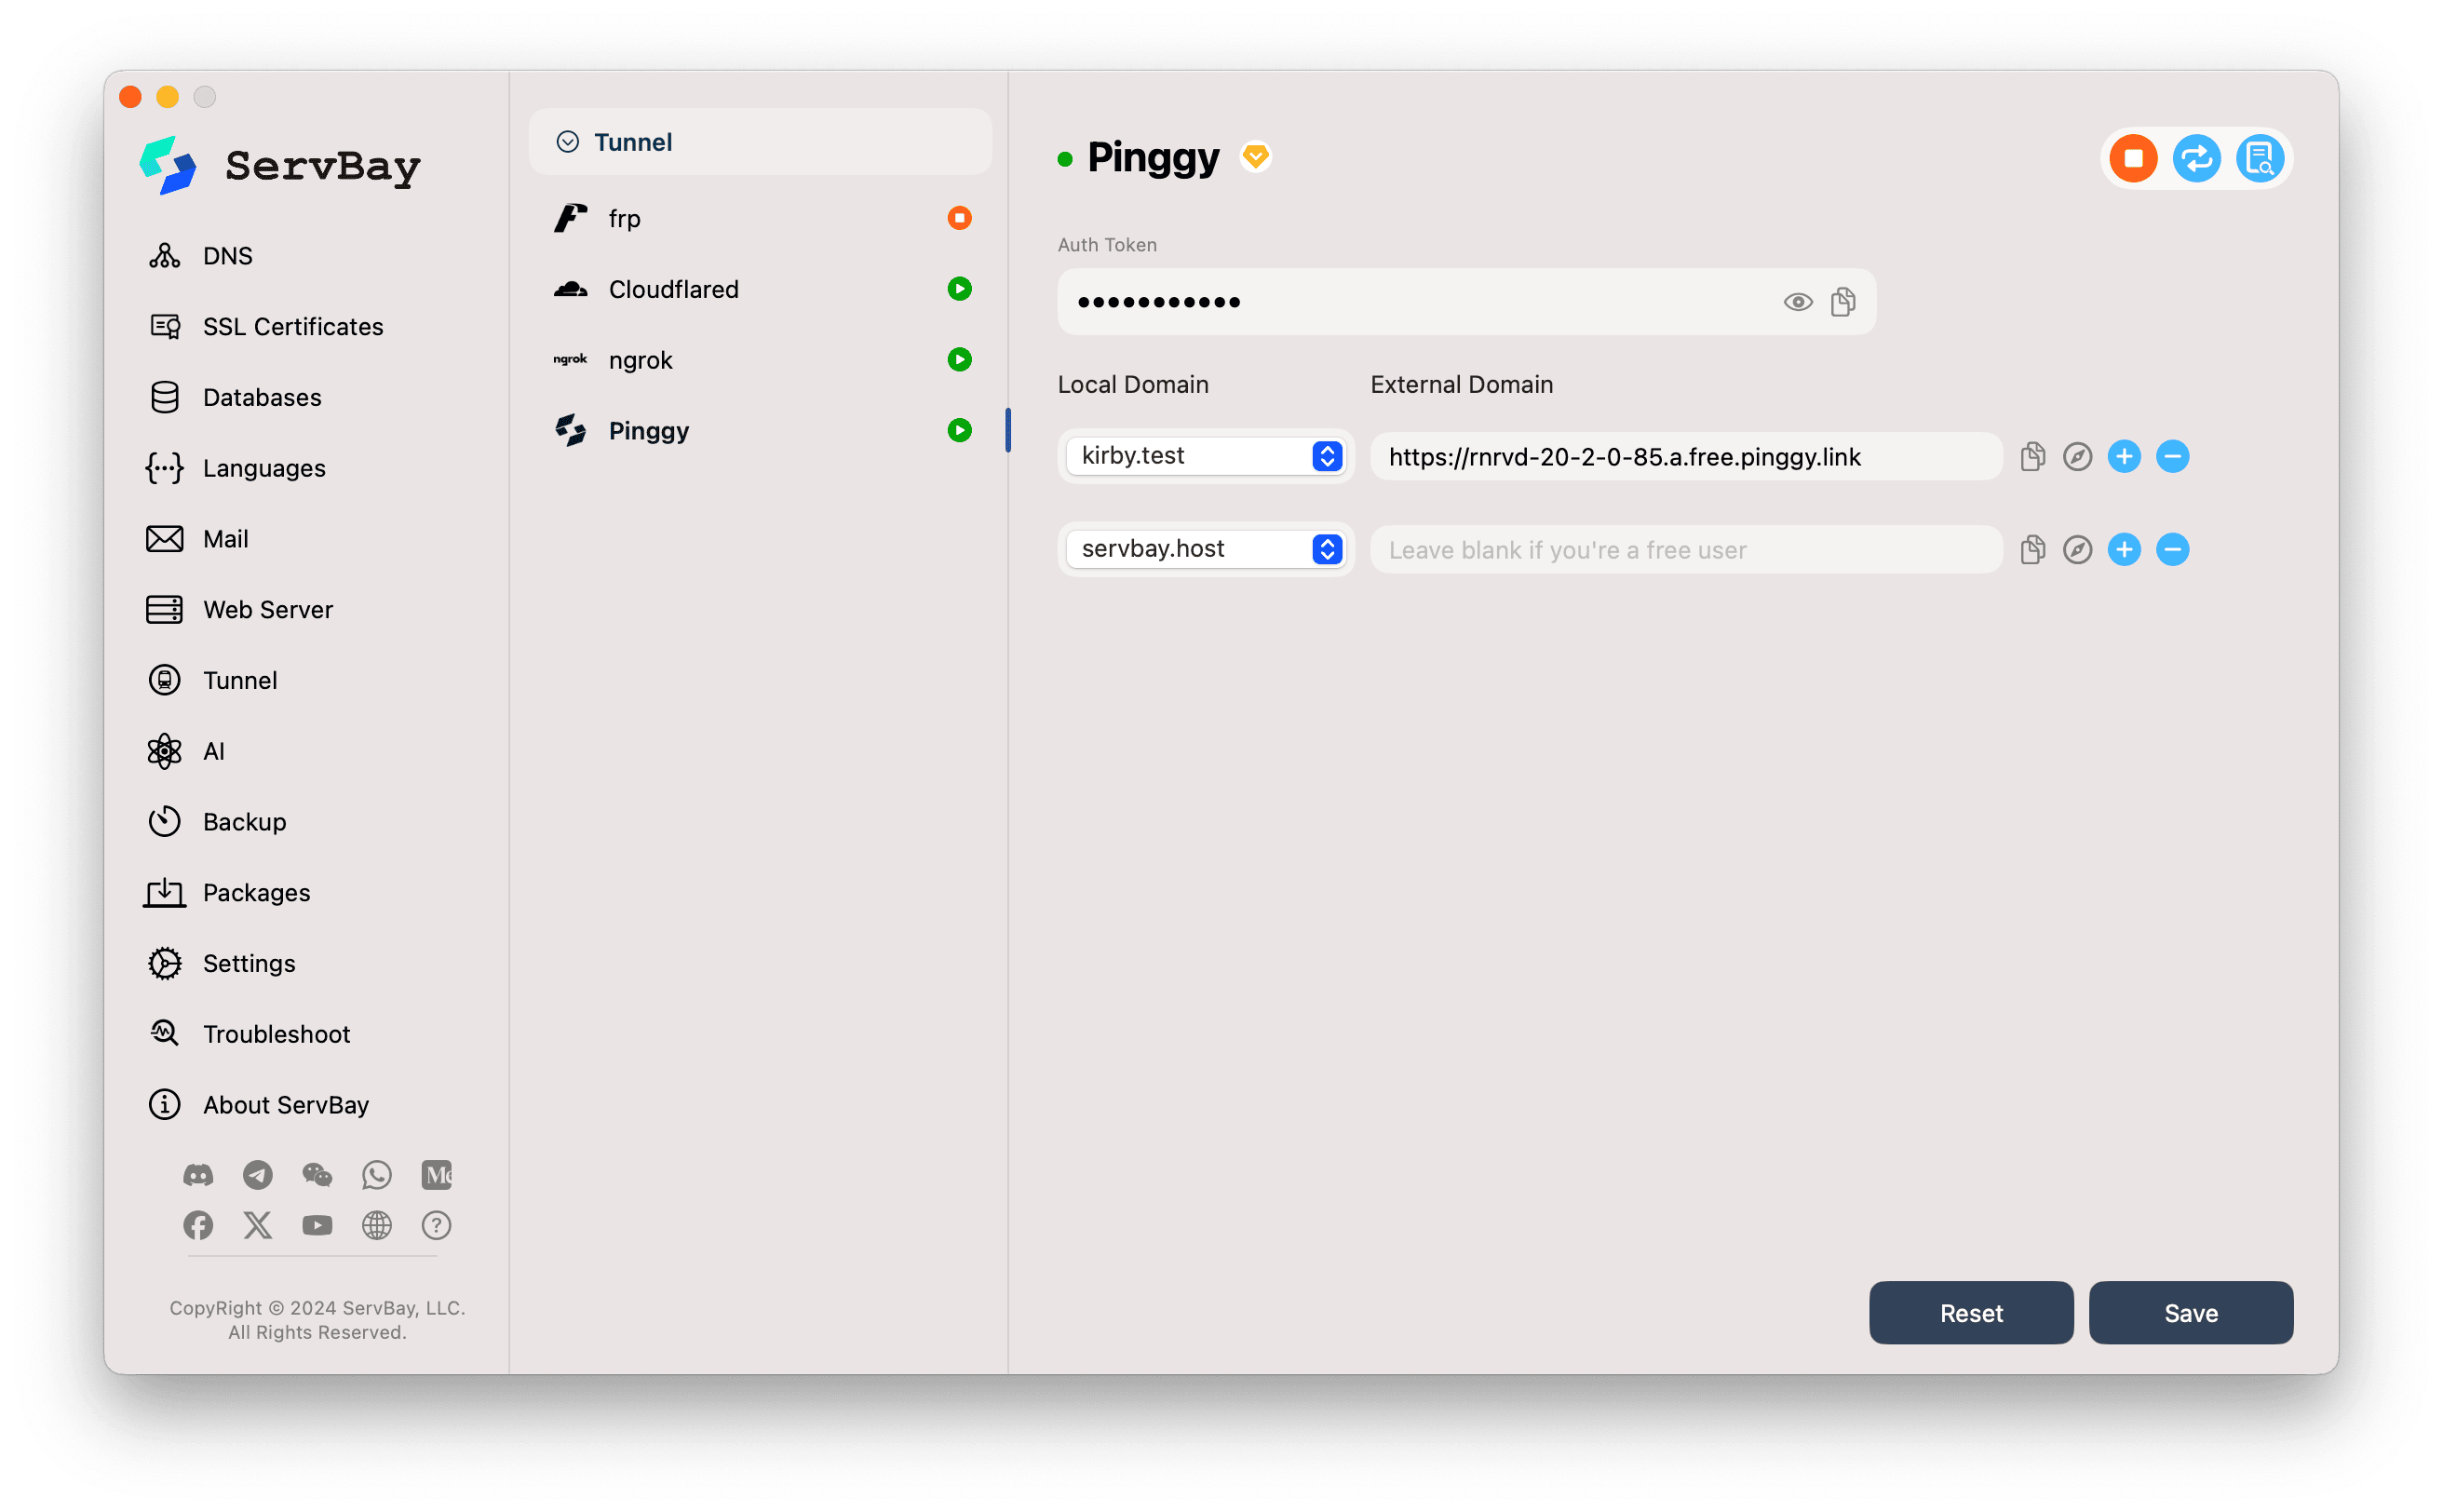
In ServBay’s left sidebar, select Tunnel.
In the Tunnel services list, click Pinggy.
Auth Token:
- Precisely paste the Access token you copied from the Pinggy dashboard into the
Auth Tokeninput box.
- Precisely paste the Access token you copied from the Pinggy dashboard into the
Configure the Tunnel (Local Domain and External Domain): ServBay lets you create Pinggy tunnels for multiple locally hosted websites.
- Local Domain:
- Click the dropdown and select the local site you want to expose via Pinggy. For example, you can pick
thinkphp.testorservbay.demo.
- Click the dropdown and select the local site you want to expose via Pinggy. For example, you can pick
- External Domain:
- For Pinggy Free Users: Leave this field empty. Pinggy will automatically generate a random public URL for your tunnel (usually ending in
.a.free.pinggy.linkor.pinggy.link). Once the tunnel is successfully established, ServBay will automatically display this URL here. - For Pinggy Paid Users: If your Pinggy account supports custom or reserved domains, you can enter your desired external domain here.
- For Pinggy Free Users: Leave this field empty. Pinggy will automatically generate a random public URL for your tunnel (usually ending in
- Local Domain:
Add More Tunnels:
- To create tunnels for additional local sites, click the
+(plus) button to the right of an existing tunnel entry and repeat step 4 to configure the new tunnel.
- To create tunnels for additional local sites, click the
Save Configuration:
- Once you’ve configured all tunnels, click the Save button in the bottom-right corner.
4. Start and Verify the Pinggy Service
- After saving, ServBay will attempt to launch the Pinggy service using your new settings.
- Watch the status indicator light next to the
Pinggyentry in the Tunnel list. If set up correctly and Pinggy connects to its server, the light will turn green, indicating the service is running. - For each successfully started tunnel, its
External Domainfield (if previously empty) will now display the public URL assigned by Pinggy, such ashttps://random-string.a.free.pinggy.link. - Verify Access:
- Click the copy icon next to the external domain to copy the public URL.
- Or click the browser icon (typically a compass or globe) to open the URL directly in your default web browser.
- If everything is set up correctly, you should be able to access your local website via the Pinggy URL.
5. Manage Pinggy Tunnels
ServBay’s Pinggy configuration interface makes tunnel management easy:
- Copy External Domain: Click the copy icon to quickly get the public URL for sharing.
- Open in Browser: Click the browser icon for a quick access test.
- Add Tunnel: Click the
+icon to configure a new tunnel. - Remove Tunnel: Click the
-(minus) icon to delete tunnels you no longer need. - Stop/Start Service: Use the toggle switch next to the
Pinggyservice entry to globally stop or start all Pinggy tunnel services.
Notes
- Pinggy Free Version Features: The free edition of Pinggy provides dynamic external domains, which may change each time you restart the Pinggy service or tunnel. The free plan might also be limited in terms of concurrent connections, bandwidth, and usage duration. For a fixed domain, higher performance, or more advanced features, consider upgrading to a paid Pinggy plan.
- Local Service Dependencies: Ensure the local website selected in the
Local Domainfield is properly configured and running within ServBay (e.g., the appropriate PHP version, web server like Caddy/Nginx is running, and site configuration is correct). Pinggy only handles forwarded network traffic. - Firewall & Network: Be sure macOS’s built-in firewall or any third-party security software isn’t blocking network access for ServBay or the Pinggy client.
- HTTPS Security: Pinggy typically provides HTTPS support for its tunnels, ensuring encrypted data transfer—which is essential for modern web application security.
Frequently Asked Questions (FAQ)
- Q: The Pinggy service fails to start and the status light isn’t green. What should I do?
- A: First, double-check that you entered the Pinggy Access token correctly. Next, ensure your internet connection is working. Check the Pinggy client log (click the log icon on the service’s right side) for specific error messages.
- Q: I’m a Pinggy free user. Why am I prompted to leave the
External Domainfield empty?- A: This is standard for the Pinggy free service. You don’t need to specify the external domain manually. Once the tunnel is connected, ServBay automatically retrieves the temporary public URL assigned by the Pinggy server and displays it.
- Q: How is Pinggy different from other tunnel services like Ngrok? Which should I use?
- A: Both Pinggy and Ngrok are excellent NAT traversal tools, but they may differ in features, free plan limitations, pricing, configuration complexity, and server distribution. Pinggy is especially known for its lightness and ease of use. Choose based on your specific needs (such as protocol support, custom domain requirements, or budget) and personal preference—ServBay supports a variety of such tools, giving you flexibility.
Conclusion
ServBay’s integrated Pinggy functionality offers macOS web developers a straightforward solution for sharing local websites. With just a few simple steps, you can securely expose your development environment to the internet, greatly facilitating demos, testing, and collaboration. Be sure to configure according to your Pinggy account type and always keep your local web services in a healthy state to fully enjoy the convenience Pinggy provides.
