
Enabling the High-Performance Phalcon PHP Framework Module in ServBay
ServBay is a powerful local web development environment designed specifically for developers, integrating various mainstream technology stacks. For PHP developers, ServBay comes pre-installed with the high-performance Phalcon framework module and provides an extremely simple way to enable it. Known for its speed and efficiency, Phalcon's modular design helps developers build efficient web applications.
Introduction to the Phalcon Framework
Phalcon is an open-source, full-featured PHP framework renowned for its outstanding speed and minimal resource consumption. Unlike most frameworks implemented purely in PHP, Phalcon is written in C and runs as a PHP extension. This unique architecture grants Phalcon significant performance advantages while also providing a complete and powerful feature set.
Key Features
- High Performance: Since Phalcon runs as a low-level C extension, it outperforms frameworks purely written in PHP, consuming less memory and CPU resources when handling requests.
- Low Overhead: Phalcon optimizes resource usage, maintaining high efficiency even when handling a large number of concurrent requests.
- Feature-Rich: Phalcon offers full MVC (Model-View-Controller) architecture support, a robust ORM (Object-Relational Mapping), templating engine, flexible routing system, caching, queue services, and more—meeting the needs of complex web development.
- Easy to Use: While the core is written in C, developers can use familiar PHP syntax for application development. The framework provides a clear API and comprehensive documentation, lowering the learning curve.
- Modular Design: With highly decoupled and modular components, developers can selectively use or replace specific parts based on project requirements.
Phalcon Module Versions Preinstalled in ServBay
ServBay supports multiple popular PHP versions and has pre-integrated the corresponding Phalcon modules for each. ServBay continuously updates the supported PHP versions and bundled packages to provide the latest technology. The integrated Phalcon module versions are usually compatible with each PHP version, and detailed information can be found in ServBay's package management interface. Below are some common PHP version and Phalcon version mappings (please note: ServBay may support more or newer versions):
- PHP 5.6, 7.0, 7.1: Phalcon 3.4.5
- PHP 7.2, 7.3, 7.4: Phalcon 4.1.2
- PHP 8.0, 8.1, 8.2, 8.3: Phalcon 5.7.0
- PHP 8.4, 8.5-dev: Phalcon 5.8.0
How to Enable the Phalcon Module
Enabling the Phalcon module in ServBay is a very intuitive process. By default, to keep the environment lean, the Phalcon module may be disabled. You only need a few clicks in ServBay's GUI to enable it.
Recommended Method: Enable via ServBay Graphical Interface
This is the most recommended and convenient way:
- Launch the ServBay application.
- Navigate to the Languages section in the left menu.
- In the package list, locate and select the PHP version you want to enable Phalcon for, such as
PHP 8.3orPHP 8.4. - Click the Extensions button next to the PHP version.
- In the popup extensions list, find the Phalcon module.
- Click the switch next to the Phalcon module to turn it on.
- Click the Save button at the bottom of the window.
- ServBay will prompt you to restart the related PHP service for changes to take effect. Confirm to restart.
Once restarted, the Phalcon module will be successfully loaded for your selected PHP version.
Manually Edit Configuration Files (Advanced Users)
For users who require automated configuration or advanced debugging, you can also manually enable the Phalcon module by modifying the PHP configuration files.
Step 1: Locate the Configuration File
First, find the conf.d directory for your PHP version, where PHP extension config files are stored. For example, to enable Phalcon for PHP 8.3, the configuration file path is usually:
bash
/Applications/ServBay/etc/php/8.3/conf.d/phalcon.iniOpen this file with a text editor.
Step 2: Edit the Phalcon Configuration File
Find the following content and remove the semicolon ; in front of extension = phalcon.so to uncomment the line and enable the extension:
ini
[Phalcon]
; Uncomment the following line to enable Phalcon
extension = phalcon.soAfter editing, it should look like:
ini
[Phalcon]
extension = phalcon.soStep 3: Enable the PSR Module (PHP 7.2 - PHP 7.4 Only)
Note: If you are enabling via the ServBay GUI, skip this step.
For PHP 7.2 to PHP 7.4, the Phalcon framework depends on the PSR (PHP Standards Recommendations) extension. ServBay has the PSR extension preinstalled, but you need to ensure it's loaded as well. In the phalcon.ini file or the corresponding PSR config file (usually psr.ini), make sure the following lines are uncommented:
ini
; Uncomment both Psr & Phalcon to enable Phalcon
[Psr]
extension = psr.so

[Phalcon]
extension = phalcon.soStep 4: Restart PHP Service
Whether you used the GUI or manual modification, you must restart the corresponding PHP service for extension changes to take effect.
In the ServBay main interface or Packages screen, locate the PHP version you modified, and then click the restart button (usually a circular arrow icon) next to it to restart the service.
Verifying Successful Loading of the Phalcon Module
The most common way to verify if the Phalcon module is loaded is to check PHP runtime information (phpinfo()):
- In the root directory of any website configured in ServBay, create a new file named
phpinfo.php. For example, if your siteservbay.demohas its root at/Applications/ServBay/www/servbay.demo, createphpinfo.phpthere. - Add the following contents to
phpinfo.php:php<?php phpinfo(); ?> - Visit the corresponding site URL in your browser, e.g.,
https://servbay.demo/phpinfo.php. - On the resulting PHP info page, search for the "Phalcon" section. If you see Phalcon configuration info, version number, etc., it means the module has been successfully loaded.
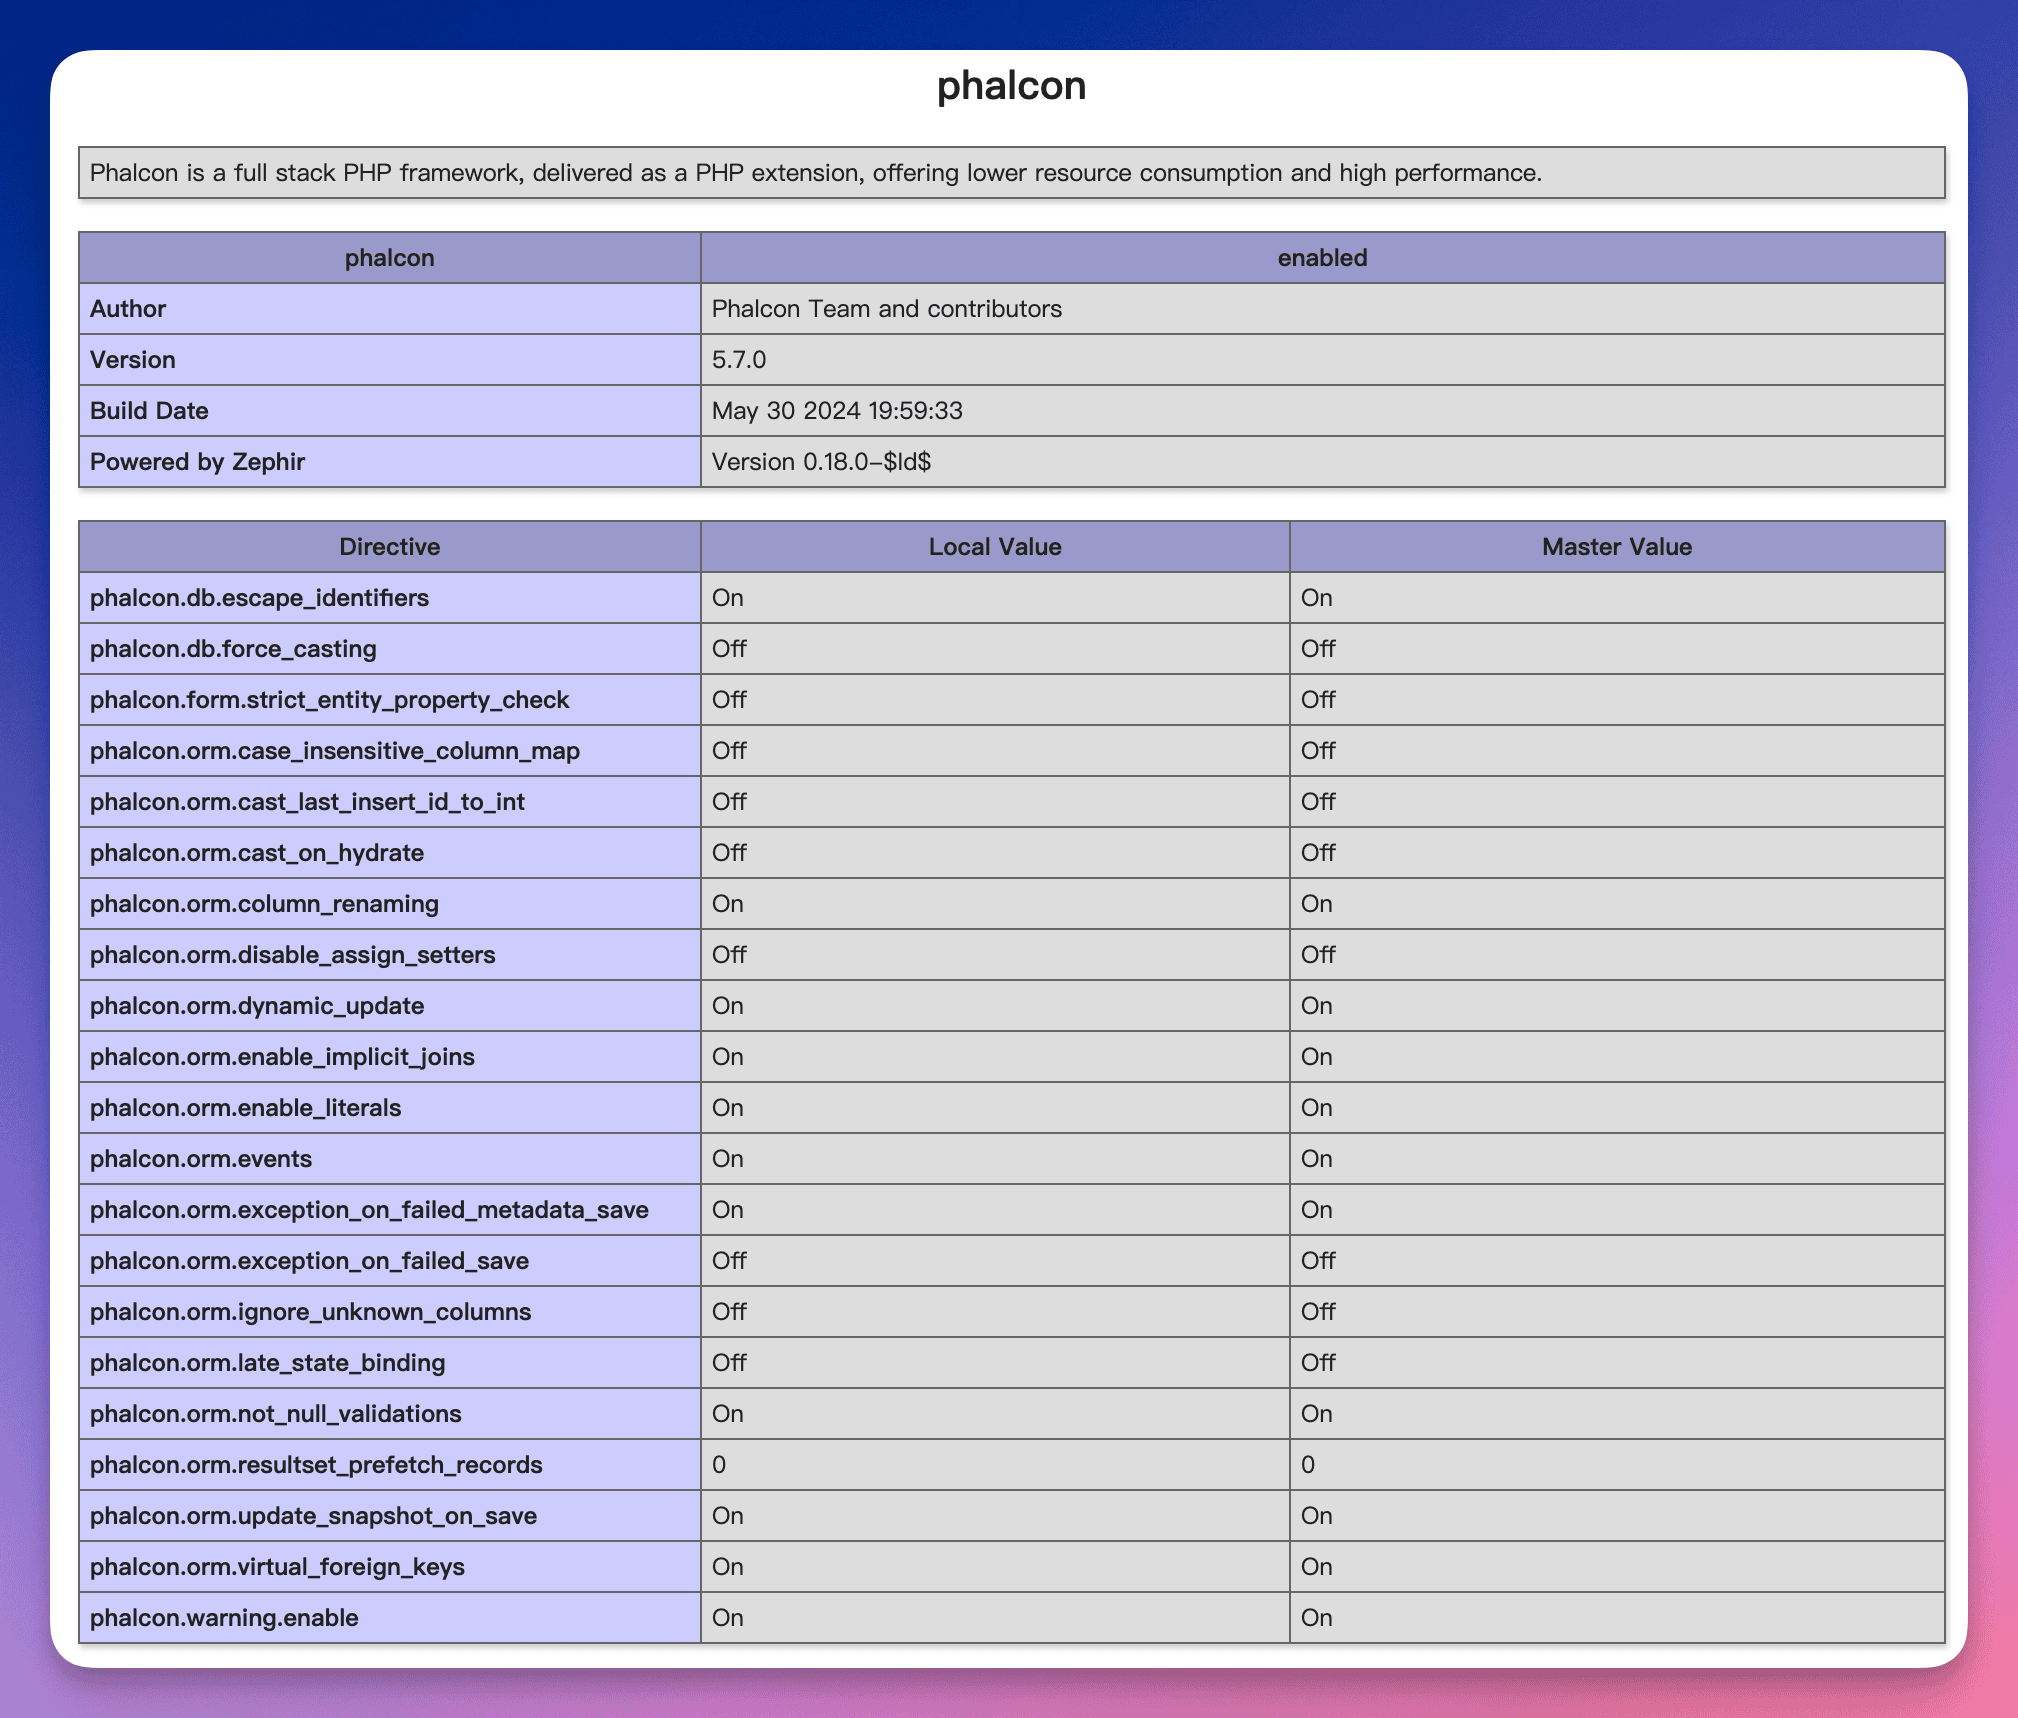 Figure: Locate Phalcon information in phpinfo output
Example Usage
Once the Phalcon module is enabled, you can start developing web applications with the Phalcon framework. Below is a simple example showing how to create a basic Phalcon app and run it in ServBay.
Assume you want to store your project at /Applications/ServBay/www/phalcon-demo.
Step 1: Create the Project Directory Structure
Following Phalcon's recommended structure, create these folders and files:
/Applications/ServBay/www/phalcon-demo/
├── app/
│   ├── controllers/
│   │   └── IndexController.php
│   └── views/
│       └── index/
│           └── index.phtml
└── public/
└── index.phpStep 2: Create ServBay Website Configuration
In ServBay, create a new Website configuration, set the domain to phalcon-demo.servbay.demo, set the root directory to your project's public folder (/Applications/ServBay/www/phalcon-demo/public), and make sure this site uses the PHP version you enabled Phalcon for.
Step 3: Write Example Code
Front Controller:
public/index.phpThe entry point for the application.php<?php use Phalcon\Autoload\Loader; use Phalcon\Di\FactoryDefault; use Phalcon\Mvc\View; use Phalcon\Mvc\Url; use Phalcon\Mvc\Application; // Define constants for project root and app directory define('BASE_PATH', dirname(__DIR__)); // Points to /Applications/ServBay/www/phalcon-demo define('APP_PATH', BASE_PATH . '/app'); // Points to /Applications/ServBay/www/phalcon-demo/app // Register autoloader for controllers and models $loader = new Loader(); $loader->setDirectories( [ APP_PATH . '/controllers/', APP_PATH . '/models/', // Register the models directory, if any ] ); $loader->register(); // Create Dependency Injection (DI) container $container = new FactoryDefault(); // Register view service in the DI container $container->set( 'view', function () { $view = new View(); $view->setViewsDir(APP_PATH . '/views/'); // Set views directory return $view; } ); // Register URL service in the DI container $container->set( 'url', function () { $url = new Url(); $url->setBaseUri('/'); // Set base URL return $url; } ); // Create Phalcon application instance $application = new Application($container); try { // Handle request and send response $response = $application->handle( $_SERVER["REQUEST_URI"] ); $response->send(); } catch (\Exception $e) { // Catch exceptions and output error message echo 'Exception: ', $e->getMessage(); } ?>Controller:
app/controllers/IndexController.phpHandles requests to the home page.php<?php use Phalcon\Mvc\Controller; use Phalcon\Support\Version; // Import Version class to get Phalcon version class IndexController extends Controller { // Default action public function indexAction() { // Get current Phalcon version $phalconVersion = new Version(); $versionString = $phalconVersion->get(); // Pass version to the view $this->view->phalconVersion = $versionString; // Renders app/views/index/index.phtml } }View:
app/views/index/index.phtmlView file that displays a welcome message and the Phalcon version.html<!DOCTYPE html> <html> <head> <meta charset="utf-8"> <title>Hello ServBay with Phalcon</title> <style> body { font-family: sans-serif; margin: 40px; text-align: center; } h1 { color: #333; } p { color: #666; } </style> </head> <body> <h1>Hello ServBay!</h1> <p>You have successfully run a Phalcon app in ServBay.</p> <p>Current Phalcon version: **<?= $phalconVersion ?>**</p> </body> </html>
Step 4: Accessing the Application
Make sure that Nginx/Caddy and your chosen PHP version are running in ServBay. Open your browser and visit the configured domain, such as https://phalcon-demo.servbay.demo. You should see a page displaying "Hello ServBay!" and the current Phalcon version.
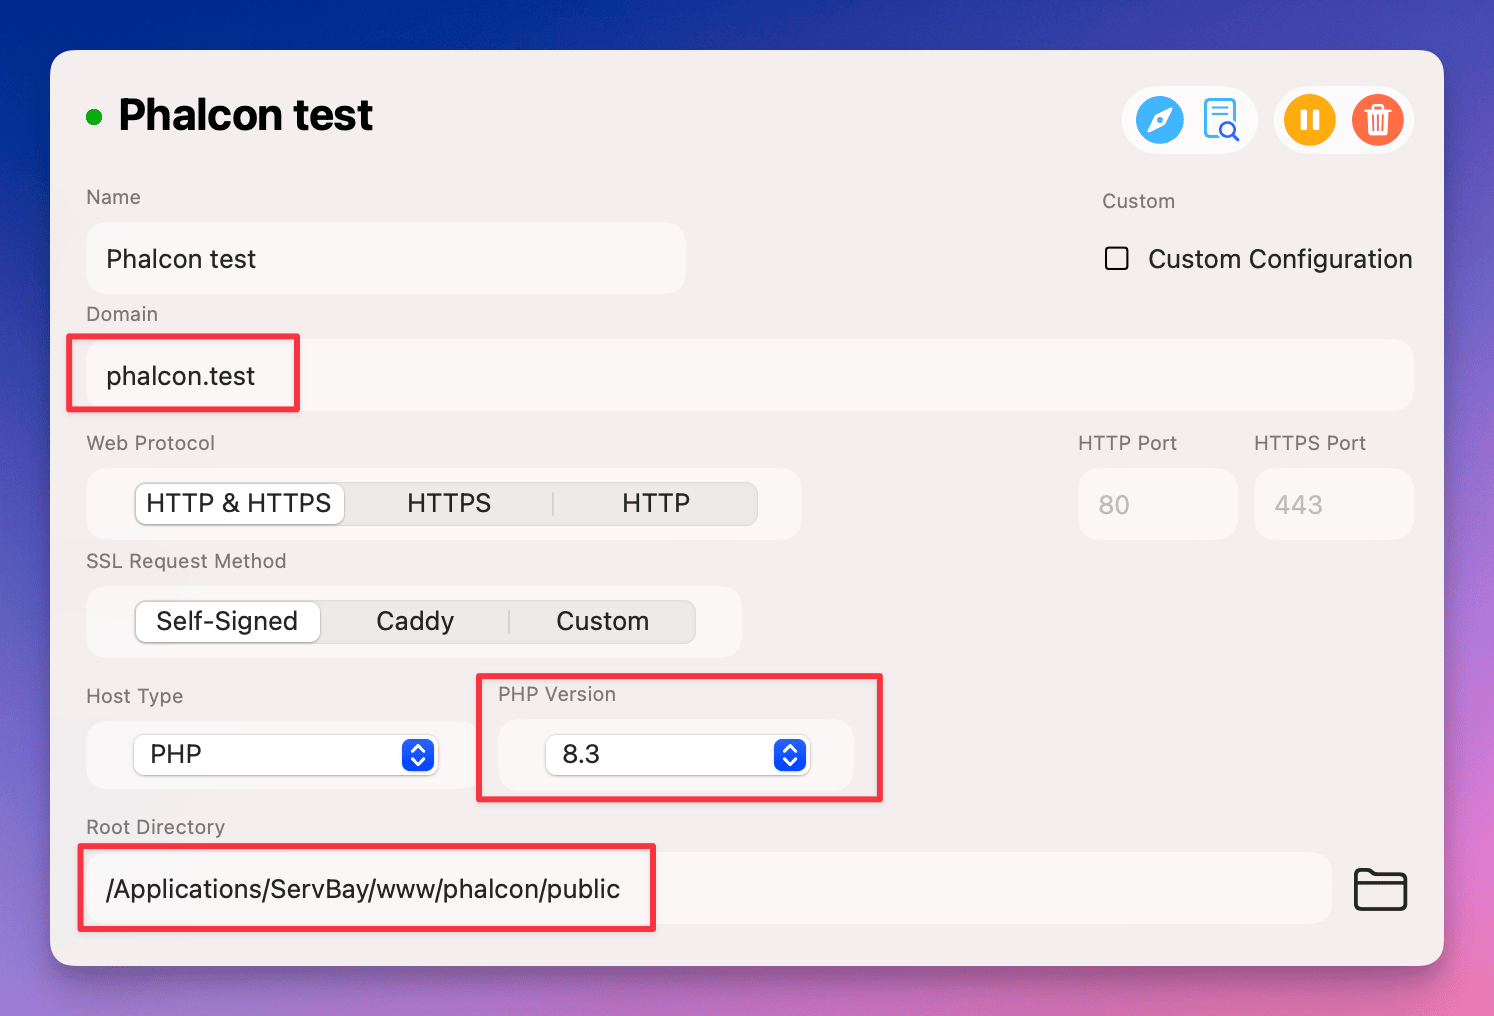 Figure: Phalcon sample app running successfully
Notes
- Ensure your chosen PHP version is compatible with your Phalcon project.
- Always restart the relevant PHP service after manually editing config files.
- If you encounter issues, check PHP error logs and your web server (Nginx/Caddy) error logs—these are usually found in
/Applications/ServBay/var/log/.
Frequently Asked Questions (FAQ)
Q1: I followed the steps to enable Phalcon, but don't see it in phpinfo(). What should I do?
A1: Please check the following:
- Make sure you modified the correct PHP version's configuration file (if edited manually).
- Ensure the semicolon
;in front ofextension = phalcon.sohas been removed. - Verify that you have restarted the corresponding PHP service.
- Make sure your website is configured to use the PHP version you enabled Phalcon for.
- Check ServBay's PHP error log for any extension loading failed warnings.
Q2: My Phalcon app reports Class 'Phalcon\...' not found. What's the reason?
A2: This usually means the Phalcon module has not been successfully loaded into the current PHP environment. Repeat the enabling and verification steps in this document to ensure the Phalcon module is active for your website's PHP version, and confirm the Phalcon info is visible in phpinfo(). If the module is loaded, also check your app code for namespace or autoloader configuration issues.
Q3: Does Phalcon require any additional dependencies?
A3: For PHP 7.2 to 7.4, Phalcon depends on the PSR extension. ServBay includes the PSR extension by default; just ensure both extension = psr.so and extension = phalcon.so are enabled in phalcon.ini. For PHP 8.0 and above, Phalcon 5.x generally does not require enabling PSR as it handles relevant standards internally.
Conclusion
ServBay greatly simplifies setting up the Phalcon framework in a local development environment. Through its intuitive graphical interface or straightforward configuration file editing, developers can easily enable the high-performance Phalcon module for different PHP versions. Combined with ServBay's comprehensive support for other web technology stacks, you can quickly build a fully functional, high-performance local development environment, and efficiently develop web apps based on the Phalcon framework. Leverage Phalcon's high performance to create modern web applications that are fast and resource-efficient.
