
ServBay Frequently Asked Questions
When using ServBay’s local web development environment, developers may run into certain problems. This document addresses some of the most commonly encountered issues, including ServBay Runtime upgrades, resolving problems with local website access caused by proxy tools like ClashX Pro, and network access failures resulting from the dnsmasq service.
How do I upgrade ServBay Runtime?
ServBay Runtime is the core component of ServBay, and is essential for the stable operation of ServBay and its hosted services. When a new version is released, ServBay will prompt users to upgrade upon startup. Upgrading the Runtime promptly can improve ServBay’s overall performance, stability, and compatibility.
To upgrade ServBay Runtime, follow these steps:
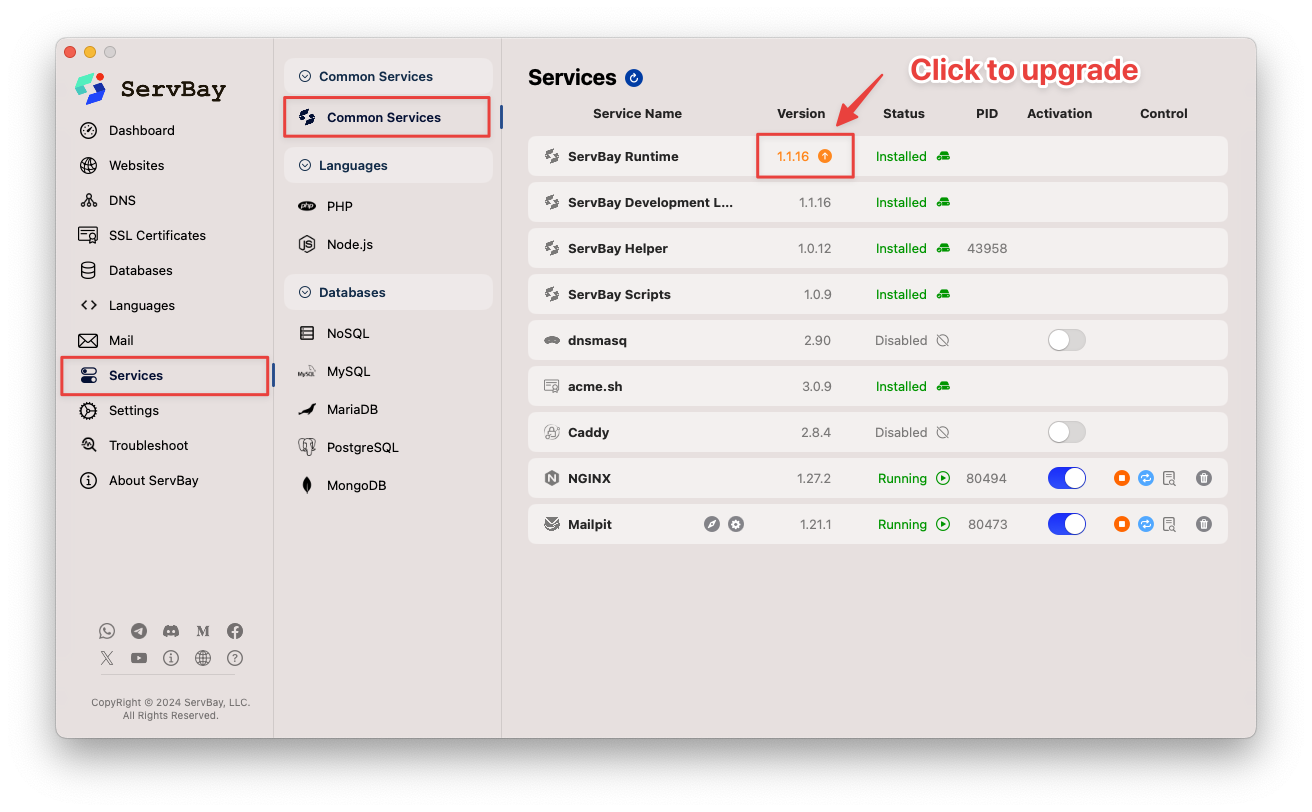
- Open the ServBay application.
- In the left sidebar, select Packages > General Services.
- In the right panel, locate the ServBay Runtime entry.
- If an update is available for ServBay Runtime, you’ll see a yellow upgrade prompt or an upgrade button. Click this yellow upgrade button.
- ServBay will begin downloading and installing the latest version of the Runtime. Please wait patiently until the upgrade process completes.
Once the upgrade is finished, ServBay Runtime will run the latest version, bringing improved stability and performance.
Why are local websites in ServBay inaccessible after using ClashX Pro (or other proxy tools)?
Many developers use ServBay for local development and testing, commonly setting up custom local domains (such as servbay.demo, myproject.servbay.demo, etc.), which typically resolve to the local loopback address 127.0.0.1.
When you use ClashX Pro or other VPN/proxy tools (like Surge, Quantumult X, etc.), these tools may hijack or redirect DNS requests to force all domain name resolutions through their proxy servers. This behavior bypasses the operating system’s native DNS process and local hosts file configuration (which is relied on by ServBay local domain resolution), resulting in your custom development domains in ServBay not resolving correctly to the local IP address—thereby making your local websites inaccessible.
To fix this issue, you need to configure your proxy tool with rules instructing it not to proxy or hijack DNS requests for your local development domains. This is usually done through “Bypass Proxy,” “Ignore Proxy,” “Whitelist,” or “Exclusion List” settings.
For ClashX Pro, follow these steps:
- Open the ClashX Pro application.
- Locate the ClashX Pro icon in the macOS menu bar, click it, then select More Settings.
- In the settings window, go to the General tab.
- Find the input box labeled Ignore Proxy for These Hosts and Domains (or a similar name).
- Add your local development domains to this list. To cover common ServBay local domains, it’s recommended to add
localhost,127.0.0.1, as well as the specific domains or wildcard domains you use in ServBay. For example, if your local domains end with.servbay.demo, you can add*.servbay.demo. Entries are typically separated by commas,or line breaks. A typical configuration might look like:localhost, 127.0.0.1, *.servbay.demo, yourproject.servbay.demo - Save your changes; you may need to reload or apply the configuration for the settings to take effect, as prompted by ClashX Pro.
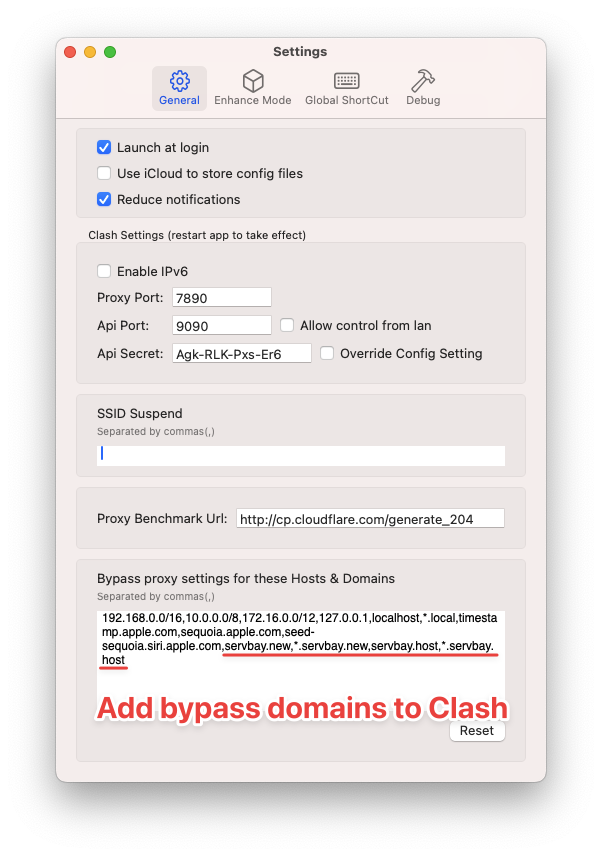 (Illustration: Configuring ignored hosts and domains in ClashX Pro)
After this configuration, ClashX Pro will no longer interfere with DNS resolution for these local domains and your ServBay local websites should become accessible. If the problem persists, make sure you’ve correctly set up the domain in ServBay’s Sites settings and that relevant ServBay services (like Caddy or Nginx) are running. You can also use terminal commands like ping yourproject.servbay.demo or dig yourproject.servbay.demo to diagnose DNS resolution.
Why can’t I access any websites after restarting the system with ServBay’s dnsmasq enabled?
If, after enabling ServBay’s dnsmasq service, you find yourself unable to access any websites after a system restart, it usually indicates a problem with your DNS settings. The dnsmasq service runs locally on 127.0.0.1, and when your system DNS server is set to 127.0.0.1, all DNS queries are forwarded to dnsmasq.
If dnsmasq fails to start after your system restarts but your DNS server remains set to 127.0.0.1, all DNS queries will fail, preventing access to any websites.
Solution
Follow these troubleshooting steps:
Check dnsmasq service status
First, open the ServBay application and check if the dnsmasq service is running:
- In the left sidebar, go to Packages > General Services
- Find the dnsmasq service and view its status
- If the service isn’t running, try starting it manually
Check system DNS settings
If the dnsmasq service isn’t running properly or you don’t need it temporarily, remove
127.0.0.1from your system DNS settings:- Open System Settings (or System Preferences)
- Go to Network
- Select your current connection (Wi-Fi or Ethernet)
- Click Details… or Advanced…
- Switch to the DNS tab
- Locate and delete the entry for
127.0.0.1in the DNS server list - Optionally, add other public DNS servers, such as:
8.8.8.8(Google DNS)1.1.1.1(Cloudflare DNS)223.5.5.5(Alibaba DNS)
- Click OK or Apply to save your changes
Re-enable dnsmasq (optional)
After resolving your DNS issues, if you wish to use ServBay’s dnsmasq service for local domain resolution:
- Ensure that dnsmasq is running in ServBay
- Add
127.0.0.1back to the very top of your system DNS server list - Make sure dnsmasq is configured correctly and can forward external domain requests to upstream DNS servers
Following these steps should restore your network access. When using dnsmasq, it’s best to make DNS changes only after confirming the service is running, so you can avoid similar issues in the future.
