
How to Upgrade and Migrate PostgreSQL in ServBay
For web developers, managing database versions in your local development environment is crucial. Upgrading or switching PostgreSQL versions is often necessary to benefit from new features, security updates, or to meet specific compatibility requirements for various projects. ServBay, as a powerful local web development environment, allows you to easily install and manage multiple PostgreSQL versions, and to switch between them seamlessly.
This guide will walk you through the steps to safely and efficiently switch the default PostgreSQL version in the ServBay environment. We’ll use migrating from PostgreSQL 10 to PostgreSQL 16 as an example, but these steps apply to switching between any PostgreSQL versions supported by ServBay.
Overview
The core process of changing PostgreSQL versions includes: backing up existing databases, installing the target version, configuring the default version in ServBay, and restoring backup data to the new version. Executing these steps correctly minimizes the risk of data loss or compatibility issues.
Use Cases
- Upgrading to the latest version: Gain access to performance improvements, new features, and security patches.
- Testing compatibility: Test your applications with the new PostgreSQL version locally before deploying to production.
- Meeting project requirements: Some projects may require a specific PostgreSQL version.
- Rolling back a version: Quickly revert to a previous version if compatibility issues arise.
Prerequisites
Before you begin, make sure the following conditions are met:
- ServBay is installed and running.
- You have a basic understanding of ServBay's package management and settings panel.
- You have administrative privileges in ServBay.
- You are comfortable using the command line.
- Your disk has enough free space to store a full backup of your databases.
Step-by-Step Instructions
Below are the detailed steps to switch the default PostgreSQL version in ServBay:
1. Back Up the Existing Database
It is strongly recommended that you fully back up your existing PostgreSQL databases before switching versions. This is the most crucial step to prevent data loss. You can use the pg_dumpall command to conveniently back up all databases (both system and user) on your PostgreSQL server.
Open your terminal and run:
bash
pg_dumpall -U postgres -f postgresql_backup.sql-U postgres: Connect as the default PostgreSQL superuserpostgres.-f postgresql_backup.sql: Output the backup to a file namedpostgresql_backup.sqlin the current directory.
When you run this command, you will be prompted for the postgres user's password. Enter the password to start the backup process. Once complete, you should see a postgresql_backup.sql file in your current directory. Make sure to store this backup securely.
2. Install the Desired New Version via ServBay
In the ServBay graphical user interface (GUI), locate and open the Package Panel (in older versions, this may be called the "Service Panel").
Select Database in the left sidebar, then click PostgreSQL. Here you'll see a list of all PostgreSQL versions supported by ServBay. Find your desired new version (e.g., PostgreSQL 16) and click the "Install" button next to it.
ServBay will automatically download and install the selected PostgreSQL version. Please wait for the installation to complete.
3. Disable the Old Version of PostgreSQL in ServBay
After installing the new version, it is advisable to disable the old PostgreSQL service to avoid potential port conflicts or accidental usage.
In the Package Panel under Database -> PostgreSQL, find the currently running old version (e.g., PostgreSQL 10). Click the toggle next to it (usually green for enabled; click to turn grey for disabled).

Confirm that the old version’s status is now shown as disabled.
4. Enable the New PostgreSQL Version in ServBay
After disabling the old version, enable the new PostgreSQL version you just installed.
In the Package Panel under Database -> PostgreSQL, find the new version (e.g., PostgreSQL 16). Click the toggle next to it (usually grey for disabled; click to turn green for enabled).

Wait a moment and make sure the new version’s status is running (green).
5. Switch the Default PostgreSQL Version in ServBay Settings
ServBay allows you to set a "default" PostgreSQL version. This determines which version will be used when you run commands like psql in the terminal.
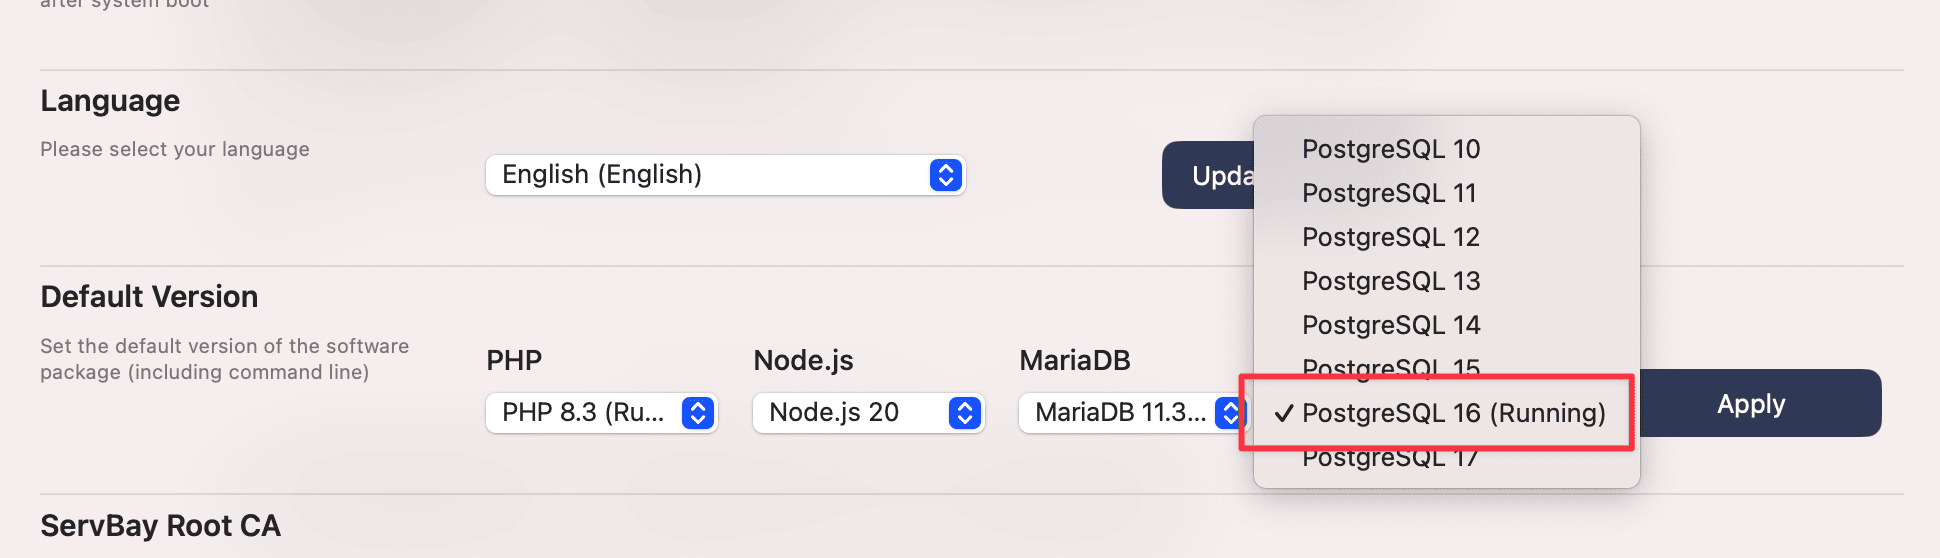
Open the Settings Panel in ServBay. Find the relevant section for databases or PostgreSQL settings. Here, you can select which installed PostgreSQL version should be set as the system default.
Choose the new version you just enabled (e.g., PostgreSQL 16), then click Apply at the bottom of the interface to save your changes.
6. Return to the Package Panel to Confirm the Default Version
Go back to the Package Panel under Database -> PostgreSQL. You should see that the new version (e.g., PostgreSQL 16) is labeled as "default" or similarly indicated.

7. Verify the Default Version in the Terminal
Although the ServBay GUI shows the default version, verifying in the terminal ensures that your system environment (especially the PATH variable) now points to the correct PostgreSQL executables.
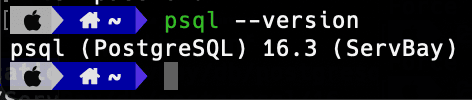
Open a new terminal window (or run source ~/.zshrc or source ~/.bash_profile, depending on your shell configuration, to reload your environment variables). Then run:
bash
psql --versionThe output should show the new version (e.g., psql (PostgreSQL) 16.x.x).
If the old version still appears, you may need to completely exit and restart the ServBay app, or manually update your terminal’s environment variables.
8. Restore Your Database
Now, restore the backup data to the new PostgreSQL instance. Make sure the new PostgreSQL version is running.
In the terminal, navigate to the directory containing your postgresql_backup.sql file, and execute:
bash
psql -U postgres -f postgresql_backup.sql-U postgres: Connect with thepostgresuser of the new PostgreSQL version.-f postgresql_backup.sql: Read and execute SQL commands from the backup file.
You will be prompted for the postgres user's password again. After entering it, the restore process will start. It may take some time depending on the size of your backup.
Note: If your backup includes commands to create databases, and those databases already exist in the new version, errors may occur during recovery. In this case, you’ll need to manually delete conflicting databases first (be very careful to ensure you have other backups or that deletion is safe). Use the DROP DATABASE dbname; command to delete a database.
9. Confirm Full Database Restoration
Once restoration completes, log in to the new PostgreSQL server and verify all your databases and data.
In the terminal, run:
bash
psql -U postgresEnter the postgres user's password to log in. Once inside, list all databases with:
sql
\lThen connect to a specific database (e.g., \c your_database_name), and check the tables and data (e.g., \d your_table_name, SELECT COUNT(*) FROM your_table_name;) for integrity.
sql
\c servbay_demo_db -- Connect to the sample database
\d                 -- List all tables
SELECT * FROM your_table_name LIMIT 10; -- View some data in the tableOnce you've confirmed all important data is present and intact, you can continue development with the new PostgreSQL environment.
Important Notes
- Data compatibility: Although PostgreSQL generally maintains compatibility between versions, migrating across major versions can occasionally cause data format or feature issues. Consult the PostgreSQL official documentation for your specific versions’ compatibility notes.
- Application compatibility: Your application code, database drivers, or ORMs may need updates to fully support the new PostgreSQL version. After switching, always thoroughly test your application.
- Password management: Throughout this process, you’ll need the
postgresuser password. Ensure you have this password. If you’ve forgotten it, ServBay provides options to reset the PostgreSQL root password. - Backup verification: While this guide covers restoration, it's best practice to test your backup files on a separate environment before a major upgrade, ensuring they can be successfully restored.
Frequently Asked Questions (FAQ)
- Q: What if I'm told the database already exists during restore?
- A: If your backup has
CREATE DATABASEstatements and those databases already exist, restoration will fail. If you didn’t manually create those databases in the new version and don’t need to keep them, log into PostgreSQL (psql -U postgres), useDROP DATABASE dbname;to delete the conflicting databases, then run the restore command again. Be very careful, and only delete databases if you’re certain they can be restored from backup.
- A: If your backup has
- Q: I have multiple PostgreSQL versions installed in ServBay, but
psql --versiondoesn’t show my chosen default?- A: This usually means your environment variables didn’t update. Try closing and reopening your terminal, or run
source ~/.zshrc(or the configuration file for your shell). If the issue persists, exit and restart the ServBay application.
- A: This usually means your environment variables didn’t update. Try closing and reopening your terminal, or run
- Q: After switching versions, my application can’t connect to the database?
- A: Check your application’s database connection settings to ensure it uses the port that the new PostgreSQL version is listening on (this is typically 5432). Also verify that your database drivers or ORM are compatible with the new version.
Conclusion
By following the steps in this guide, you can safely and smoothly switch the default PostgreSQL version in your ServBay environment. The key is to perform a full backup first, then use ServBay to manage package installation and default version settings, finally restoring your data and verifying everything works. ServBay makes it convenient for developers to flexibly manage local database environments and meet a variety of project requirements.
