
Guide: Configuring Independent Node.js Versions Per Project with ServBay (macOS)
ServBay is a powerful, developer-focused local web development environment, providing an all-in-one solution integrated with multiple programming languages, databases, and web servers—including Node.js. One of its standout features is native support for managing multiple Node.js versions flexibly. With a simple configuration file, you can easily specify the required Node.js version for each project without relying on external version managers like NVM/fnm or Docker containers, streamlining your workflow and avoiding global environment contamination or version conflicts.
This guide explains how to use ServBay’s .servbay.config file to implement project-level Node.js version control.
Why Manage Node.js Versions with ServBay’s .servbay.config?
Traditional Node.js version management approaches, such as using NVM or manual installations, present several inconveniences:
- Global Pollution & Conflicts: Installing or switching global versions often leads to dependency conflicts between projects.
- Time-consuming Installation/Compiling: Installing new versions or switching between different architectures (e.g., x86_64 vs. arm64) may require recompiling modules, which is complex and time-consuming.
- Docker Overhead: Using full Docker containers is overkill if you simply need a specific Node.js version.
ServBay pre-installs multiple mainstream Node.js versions (currently supporting all major and minor versions from v12 to v23—check and manage these under "Packages" in the ServBay app). Together with .servbay.config, this provides a more elegant solution:
- Instant Switching: Versions are already installed, so switching is virtually instantaneous.
- Project Isolation: Configuration takes effect only within the project directory, achieving true project-level version separation.
- No Global Pollution: Does not alter your global system environment, keeping your system clean.
- Integrated with ServBay: Seamlessly fits into ServBay’s development environment, working in sync with other managed packages such as PHP, databases, and web servers.
Prerequisites
Before you begin, please ensure that:
- ServBay is installed and running successfully on your macOS.
- Your required Node.js version is installed and enabled under the “Packages” list in ServBay.
- You have a project directory that requires a specific Node.js version.
Core Principle
When working in ServBay’s integrated terminal, the system monitors your current directory location. As you use the cd command to navigate, ServBay traverses the current and all parent directories, searching for a file named .servbay.config. Once found (preferring the closest one to your current directory), ServBay reads its settings and dynamically updates the environment variables for your current terminal session (for example, adjusting the PATH so it points to the Node.js version specified in .servbay.config).
This mechanism ensures that different terminal sessions in different project directories can automatically load and use their own specified Node.js versions—without any manual switching.
Configuration Steps
Setting up a project-specific Node.js version is a quick two-step process:
Step 1: Create and Edit the .servbay.config File
In the root folder of your project (commonly where the package.json is located), create a new file named .servbay.config.
Open this file with your favorite text editor and add the following:
bash
# Specify the major Node.js version for this project
# ServBay will automatically select the newest installed version within that major
NODE_VERSION=20

# Optional: Set npm or pnpm registry mirrors to speed up dependency installs
# If you are in Mainland China, domestic mirrors are recommended
YARN_CONFIG_REGISTRY=https://npmreg.proxy.ustclug.org/
NPM_CONFIG_REGISTRY=https://registry.npmmirror.com

# Optional: Specify the cache directory for npm or pnpm
# It's recommended to store cache in ServBay's temp directory to prevent clogging your user/system folder
NPM_CONFIG_CACHE=/Applications/ServBay/tmp/npm/cacheConfiguration Explanation:
NODE_VERSION: Required. Specifies the major version number of Node.js needed for the project. For example,20will use the latest installed Node.js 20.x version. Make sure the version you want is installed in ServBay.YARN_CONFIG_REGISTRY/NPM_CONFIG_REGISTRY: Optional. Sets the registry mirror address for Yarn or npm. Extremely useful for accelerating dependency installation, especially under slow network conditions.NPM_CONFIG_CACHE: Optional. Sets the cache directory for npm or pnpm. Storing the cache in ServBay's temp folder (/Applications/ServBay/tmp/npm/cache) helps centralize cache management and prevents cluttering the system with scattered cache files.
Save and close the .servbay.config file.
Step 2: Verify Version in ServBay Terminal
Open the ServBay main application interface.
Click the “Terminal” button to launch the integrated ServBay terminal.
Use
cdto move into your project directory:bashcd /Applications/ServBay/www/your-project-name(please replace
/Applications/ServBay/www/your-project-namewith your actual project path)Run the
node -vcommand to check which Node.js version is currently active:bashnode -vThe output should display the Node.js version specified in your
.servbay.config(e.g.,v20.x.x).You can also run
npm -v(orpnpm -v,yarn -v) to confirm the package manager is properly linked to the current Node.js version.
Now, any time you run Node.js or npm/pnpm/yarn commands within this project directory, the version specified in .servbay.config and all associated tools will be used.
Example in Action
Here’s a quick walkthrough to demonstrate how .servbay.config enables automatic Node.js version switching between different projects.
Assume you have two projects: project-a requires Node.js v18, while project-b requires Node.js v20.
Create Project Folders and Config Files:
bash# Create sample projects under ServBay's www directory mkdir /Applications/ServBay/www/project-a mkdir /Applications/ServBay/www/project-b # Create .servbay.config for project-a using Node.js v18 echo "NODE_VERSION=18" > /Applications/ServBay/www/project-a/.servbay.config # Create .servbay.config for project-b using Node.js v20 echo "NODE_VERSION=20" > /Applications/ServBay/www/project-b/.servbay.configVerify Switching in ServBay Terminal:
Open ServBay Terminal and execute:
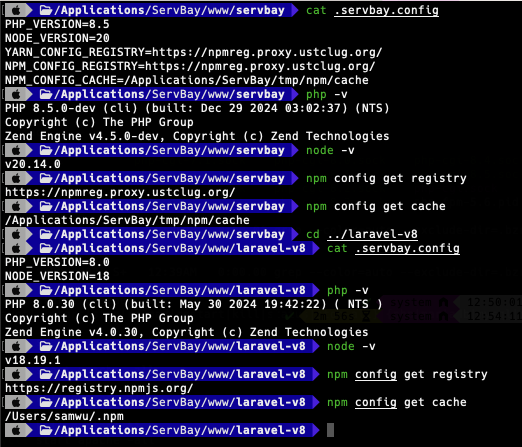
bash# Move into project-a directory cd /Applications/ServBay/www/project-a # Check Node.js version node -v # Expected output: v18.x.x # Move into project-b directory cd ../project-b # Check Node.js version node -v # Expected output: v20.x.x # Move back to project-a directory cd ../project-a # Check Node.js version node -v # Expected output: v18.x.x
As shown, ServBay automatically loads and applies the NODE_VERSION setting from the corresponding .servbay.config file based on your current directory, delivering seamless Node.js version switching.
The image below illustrates how Node.js versions automatically change according to .servbay.config when switching between project directories (actual interface may differ):
Important Notes
- The
.servbay.configfile must be placed in your project directory or one of its parent directories. ServBay will search upwards and use the first.servbay.configfile found (i.e., the closest to your current directory). - Always work within the integrated ServBay terminal, or in an external terminal that has the ServBay environment variables correctly set.
- The
NODE_VERSIONyou specify must be installed and enabled in ServBay. If the specified version is missing, ServBay may fall back to the default or fail to find the Node.js command. - Settings within
.servbay.configaffect only the current terminal session and its child processes—they do not impact the system globally or any processes running outside of the ServBay environment.
Frequently Asked Questions (FAQ)
Q: What happens if my project directory does not have a .servbay.config file?
A: If ServBay does not find a .servbay.config file in the current or any parent directory, it will use ServBay’s global or default Node.js version (generally the one marked as "default" in ServBay).
Q: How do I view which Node.js versions ServBay supports?
A: Open the ServBay app and navigate to the “Packages” section in the left menu. There you can see all available and installed packages, including different Node.js versions. You can enable or disable versions by checking/unchecking them.
Q: Do .servbay.config settings influence my entire system?
A: No. The settings in .servbay.config are temporary and only apply to the current ServBay terminal session or processes using ServBay’s environment. They do not modify your global system environment variables or affect programs running outside the ServBay context. This is key to ServBay’s project isolation.
Q: Besides NODE_VERSION, can .servbay.config configure other ServBay-related settings?
A: Yes. The .servbay.config file is a general-purpose, project-level environment variable configuration mechanism provided by ServBay. Beyond Node.js settings, you can define other environment variables as needed, which will be active for all commands run within the current project directory. Supported configuration options may expand with ServBay versions, but setting environment variables is its core feature.
Summary
By leveraging ServBay’s .servbay.config file, you can easily and efficiently assign and manage independent Node.js versions for each local development project. This lightweight method is even more convenient and streamlined than traditional version managers or container solutions and fits beautifully within ServBay’s integrated dev environment. Build more stable and collaborative workflows by adopting .servbay.config in your projects—experience the convenience ServBay brings today!
