
How to Modify Redis Settings in ServBay
ServBay, a powerful local web development environment, integrates several commonly used database services, including the high-performance key-value database Redis. This article provides a comprehensive guide on how to safely and efficiently modify Redis configuration settings within ServBay.
Important Note: Use ServBay UI for Configuration Whenever Possible
To ensure configuration stability and avoid having your changes accidentally overwritten when ServBay is updated or restarted, it is highly recommended that you use ServBay’s graphical user interface (UI) to modify Redis settings. The ServBay UI offers an intuitive set of configuration options and automatically handles configuration file generation and application.
Manual editing of configuration files should be reserved for temporary testing or debugging only and is not recommended as a standard approach.
Modify Redis Settings via ServBay Graphical User Interface (UI) (Recommended)
ServBay provides a straightforward and user-friendly graphical management interface, enabling developers to manage services and packages without having to edit complex configuration files. The best practice for modifying Redis settings is to do so through the ServBay UI.
Steps
- Launch the ServBay application.
- In the left navigation bar, go to
Database->NoSQL->Redis. - Open the Redis configuration page. Here you’ll find the most commonly used settings, such as:
- Bind Address (bind): Specifies which network interfaces Redis listens to. The default is
*:6379, meaning Redis listens on all available network interfaces. You can change this to a specific IP address (for example,127.0.0.1to allow only local access). - Port: Specifies the TCP port that the Redis service listens on. The default port is
6379. - Password (requirepass): Sets an access password for Redis to enhance security. For production environments, it is critical to set a strong password for Redis.
- Bind Address (bind): Specifies which network interfaces Redis listens to. The default is
- Edit the desired configuration values in the appropriate input fields.
- After making changes, click the
Savebutton in the interface. ServBay will automatically apply your changes to the Redis configuration, taking effect in real time without the need to manually restart the Redis service.
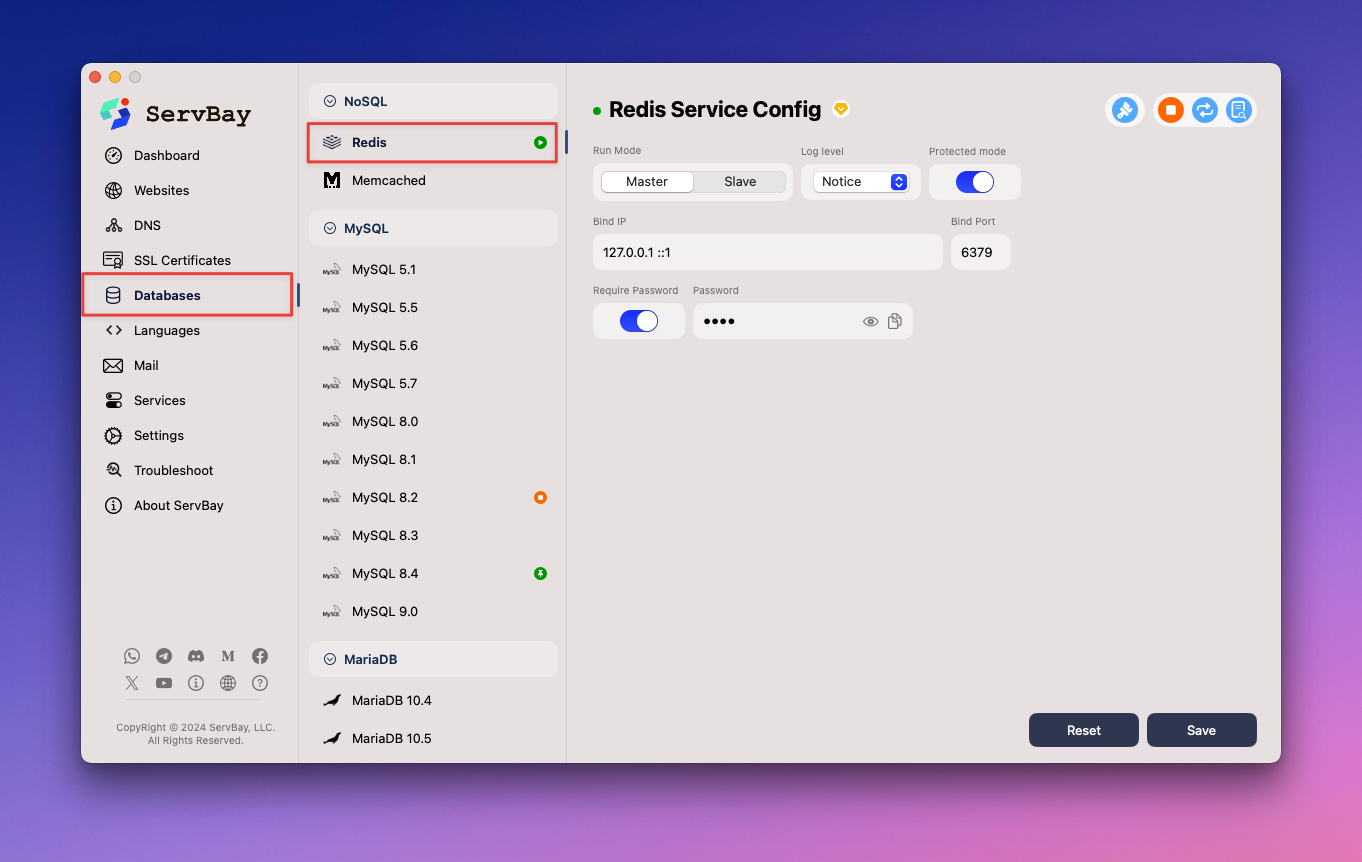 Illustration: Redis configuration page in ServBay UI
Modify Settings by Manually Editing Configuration Files (Not Recommended)
Although not recommended, there may be special circumstances (such as temporary debugging) where you need to directly view or edit the Redis configuration files.
Risks of Manual Modification
ServBay automatically generates and manages the configuration files of its packages whenever it starts, restarts, or updates. If you manually edit the configuration files in the ServBay installation directory, your changes may be overwritten the next time ServBay regenerates the configuration, causing your modifications to be lost. Therefore, be sure you understand the risks before proceeding.
Config File Location
In ServBay, the main Redis configuration file is located at:
redis.conf:/Applications/ServBay/etc/redis/redis.conf
Common Configuration Examples
Below are some common settings in redis.conf and their file syntax. Please note: these are examples only; your file may contain many more settings.
Change Bind Address:
inibind 0.0.0.0Note:
0.0.0.0listens on all network interfaces. For local access only, use127.0.0.1instead.Change Port:
iniport 6379Note: Changes the TCP port Redis listens on.
Set Maximum Memory Usage:
inimaxmemory 256mbNote: Sets the maximum amount of memory Redis can use. Helps prevent Redis from making your system unstable due to high memory usage.
Set Client Idle Timeout:
initimeout 300Note: Closes a client connection if it stays idle for the specified number of seconds.
Enable Slow Query Log:
inislowlog-log-slower-than 10000Note: Logs any command that takes longer than the specified microseconds (
10000= 10 ms) to execute.
Applying Manual Changes
If you made changes by manually editing the redis.conf file, you’ll need to restart the Redis service for those changes to take effect.
Restarting the Redis Service
Whether you edit Redis settings via the ServBay UI or manually, you may need to restart the Redis service to make sure all changes are properly loaded and applied.
Restart via ServBay Management Interface
- Open the ServBay management interface.
- In the left navigation bar, go to
Packages. - Locate the Redis package version you want to modify.
- Click the
Restartbutton next to the Redis package.
Restart via servbayctl Command Line Tool
ServBay offers the servbayctl command line tool for developers to manage services and packages conveniently from the terminal.
Restart the Redis service using the following command:
bash
servbayctl restart redis -allSummary
When modifying Redis configurations in ServBay, the safest and most recommended method is to use the ServBay graphical user interface. This ensures your changes remain persistent and stable. Manually editing the config file at /Applications/ServBay/etc/redis/redis.conf is for temporary scenarios only and carries the risk of being overwritten. After changing configurations, you typically need to restart the Redis service for your adjustments to take full effect. You can restart either via the ServBay UI or the servbayctl command line tool. Mastering these methods will help you manage and use Redis in your local development environment more effectively.
