
Configuring Upstream DNS Forwarding Servers in ServBay
In the ServBay local web development environment, the built-in DNS server is responsible for resolving domain names you’ve set up for your local projects (such as .servbay.demo). By default, if ServBay’s DNS server cannot resolve a particular domain locally, it forwards the query to the default upstream DNS servers configured in your operating system (macOS). However, to optimize network performance, enhance privacy, or adhere to specific network policies, many developers prefer to customize the upstream DNS servers used by ServBay (for example, public DNS like 1.1.1.1 or 8.8.8.8). This article provides a detailed guide on how to configure custom upstream DNS forwarding servers in ServBay.
What Is an Upstream DNS Forwarding Server?
An upstream forwarding server (often called an Upstream DNS Server or DNS forwarder) is a DNS server to which ServBay’s built-in local DNS service (typically dnsmasq) forwards queries when it cannot resolve a domain name directly. Local DNS services like ServBay rely on upstream DNS servers to resolve domain names on the public internet, such as google.com or any external API addresses your projects depend on.
Why Customize ServBay’s Upstream DNS Servers?
Customizing the upstream DNS servers used by ServBay brings several benefits, especially in local development environments:
1. Improve DNS Resolution Speed and Reliability
Certain public DNS services (such as Cloudflare’s 1.1.1.1 or Google’s 8.8.8.8) operate worldwide, providing faster response times and higher stability. Using these high-performance upstream DNS servers can speed up ServBay’s resolution of external resources and reduce latency caused by DNS queries.
2. Enhance Privacy Protection
Some upstream DNS services provide stronger privacy features, such as support for DNS over HTTPS (DoH) or DNS over TLS (DoT), encrypting your DNS queries to prevent them from being monitored or logged by third parties. Selecting a privacy-focused public DNS service increases the security of your local development environment.
3. Bypass Geo-Restrictions or Access Certain Resources
In some networks, the default DNS servers provided by ISPs might impose access restrictions or even DNS hijacking. By specifying different upstream DNS servers, developers can sometimes access desired external development resources, code repositories, or services more smoothly.
4. Avoid Local Network DNS Conflicts
In complex local networking environments (such as corporate networks or during VPN usage), the system’s default DNS settings may conflict with ServBay’s method for handling local domains. Customizing ServBay’s upstream DNS gives you clearer DNS routing control and helps reduce potential network issues.
How to Set Custom Upstream DNS Forwarding Servers in ServBay
ServBay offers an intuitive graphical interface for configuring upstream DNS forwarding servers. Follow these steps to set it up:
Step 1: Open the ServBay Application
Locate the ServBay icon in your Mac's “Applications” folder and double-click it to launch the ServBay control panel.
Step 2: Navigate to DNS Forwarding in Network Settings
In the left navigation bar of the ServBay control panel, click on Settings. Within the settings page, find and click DNS Forwarding.
Step 3: Enable Custom Upstream DNS Servers
In the DNS Forwarding settings area, locate the Customize upstream DNS option. Check this box to enable manual entry of upstream DNS server addresses.
Step 4: Enter Upstream DNS Server Addresses
Once you’ve checked Customize upstream DNS, an input field will appear below. Enter the IP addresses of the upstream DNS servers you want ServBay to use. You may enter one or more IPv4 or IPv6 addresses. If entering multiple addresses, separate them using a comma ','.
For example, to enter the public DNS addresses of Cloudflare (IPv4 and IPv6) and Google (IPv4):
1.1.1.1, 1.0.0.1, 8.8.8.8, 2606:4700:4700::1111, 2001:4860:4860::8888Note: IPv6 support in ServBay depends on the configuration and version of its internal DNS service (dnsmasq). Newer versions typically support IPv6.
Step 5: Save and Apply Your Settings
After entering your addresses, click the Save button at the bottom of the page.
Step 6: Restart the DNS Service to Apply Changes
To make sure your new upstream DNS settings take effect immediately:
- In the ServBay control panel's left navigation bar, click
Packages. - Find
dnsmasqin the package list (this is the DNS service ServBay normally uses). - Click the restart button next to the
dnsmasqpackage (usually looks like a circular arrow). Alternatively, you can restart the entire ServBay service using the main power button in the bottom left corner of the control panel, which will restart all related services, including DNS.
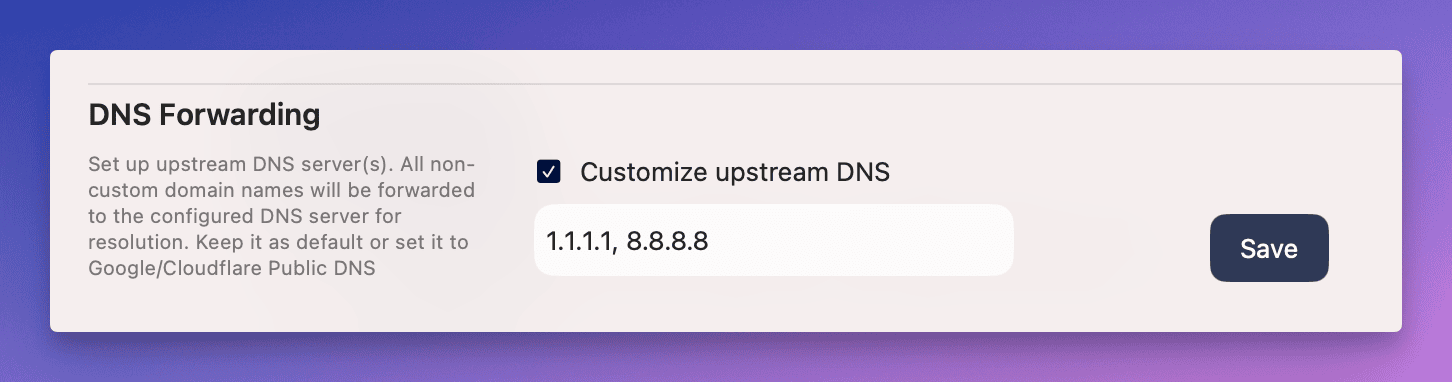 (Screenshot: Location and interface of DNS Forwarding settings in the ServBay control panel)
Example Configuration
Here’s a complete example of setting Cloudflare’s public DNS servers (1.1.1.1 and 1.0.0.1) as upstream DNS forwarding servers in ServBay:
- Open the ServBay application.
- Navigate to
Settings->DNS Forwarding. - Check the
Customize upstream DNSbox. - Enter the following in the input field:
1.1.1.1, 1.0.0.1 - Click the
Savebutton at the bottom of the page. - Go to
Packages, finddnsmasq, and click the restart button.
Important Notes
- Ensure DNS Servers Are Reachable and Responsive: Before configuring upstream DNS servers, it's recommended to use command-line tools like
ping,nslookup, ordigto test whether your chosen DNS servers are reachable and performing well. An unreachable or slow upstream DNS server will affect ServBay’s functionality and your development experience. - Input Format: Multiple IP addresses must be separated by a comma ',' and ensure the format is correct. Do not include spaces (unless the ServBay interface explicitly allows or requires them).
- Applying Changes: After saving your settings, be sure to restart ServBay’s DNS service (
dnsmasq) or the entire ServBay service to ensure the new configuration is loaded. - Local Domain Resolution: Custom upstream DNS only affects domains that ServBay cannot resolve locally. Domains you've configured in ServBay for local sites (such as
.servbay.demo,.test, or other custom suffixes) will always be resolved by ServBay locally and won't be forwarded upstream.
How to Verify That Your Custom DNS Settings Are Active
Once you've configured custom upstream DNS, you can verify that ServBay is using your chosen DNS servers with the following steps:
- Use Command-Line Tools: Open the “Terminal” app on macOS.
- Use the
digcommand to query an external domain (e.g.,google.com) and explicitly specify ServBay’s local DNS server address (usually127.0.0.1orlocalhost).bashdig google.com @127.0.0.1 - Check the output from
dig. TheSERVER:line should say127.0.0.1, indicating the query was sent to ServBay’s local DNS service. - To confirm that ServBay is actually forwarding the request to your configured upstream DNS, the most direct method is to check the DNS service (
dnsmasq) logs in ServBay. The log will usually record received queries and the addresses of upstream servers used. ServBay's control panel may offer a way to view logs, or you can manually find the dnsmasq log file path (location depends on your ServBay installation and configuration). - Alternatively, use a network packet capture tool (such as Wireshark or tcpdump) to monitor your computer's outgoing traffic to the upstream DNS server IP addresses on UDP/TCP port 53, then run
dig google.com @127.0.0.1and check if outbound traffic is generated.
Note: It's not always intuitive to determine which upstream DNS server is used solely from the dig output. Checking ServBay's internal logs or using network monitoring tools is a more reliable way to verify.
Frequently Asked Questions (FAQ)
Q: I set up custom upstream DNS, but I still can't open certain websites. What should I do?
A: First, verify that the upstream DNS IP addresses you entered are correct and reachable (try testing with the
pingcommand). Ensure you have clicked “Save” and have restarted ServBay's DNS service (dnsmasq) or the entire ServBay application. If the issue persists, it could be due to network firewalls blocking ServBay’s access to those external DNS servers, or a conflict between your local and external domain names. Check ServBay’s log files for more detailed error information.Q: Can I use IPv6 addresses as upstream DNS servers?
A: Yes, ServBay’s DNS Forwarding feature generally supports IPv6 addresses for upstream DNS. Be sure to use the correct IPv6 format, and separate IPv6 addresses from IPv4 or other IPv6 addresses with commas.
Q: Is it safe to use public DNS servers?
A: Most well-known public DNS servers (such as Cloudflare’s 1.1.1.1, Google’s 8.8.8.8, and Quad9’s 9.9.9.9) are widely used and considered safe and reliable. They typically offer better performance and privacy than default ISP DNS. However, always consider their privacy policies and service reliability before use.
Q: Will customizing upstream DNS affect ServBay’s resolution of my local domains?
A: No. ServBay will always prioritize resolving domains configured in the “Websites” section (like
.servbay.demoor any custom suffixes). Only queries ServBay cannot resolve locally are forwarded to the upstream DNS servers you’ve specified.
Summary
With ServBay’s intuitive settings interface, you can easily configure custom upstream DNS forwarding servers. This not only improves network performance and response times in your local development environment, but also enhances privacy and provides greater flexibility for your network configuration. By following the steps in this guide, you can optimize ServBay’s DNS behavior to fit your needs, ensuring a smoother, more efficient local development experience. Remember to save your settings and restart the DNS service for your changes to take effect.
