
Add Your First Website
In ServBay, adding a new website to kick off your local development project is simple and intuitive. This guide walks you through the process of adding your first website in ServBay, including step-by-step instructions, key configuration options, and some practical tips.
Whether you're developing a PHP site, Node.js app, static website, or need to set up reverse proxy or redirects, ServBay offers flexible support for your needs.
Overview
ServBay is designed to provide web developers with a powerful yet easy-to-manage local development environment. Its user-friendly graphical interface (GUI) lets you seamlessly add, configure, and manage multiple local sites. By following these steps, you can quickly create your first local website in ServBay and configure all necessary settings according to your project requirements.
Prerequisites
Before adding your first website, please make sure:
- You have successfully installed and launched the ServBay application on your macOS system.
Steps to Add a Website
Here's a detailed walkthrough for adding a new website using the ServBay GUI:
Step 1: Open the ServBay Application
First, locate the ServBay icon in your macOS Applications folder and double-click to launch the app.
Step 2: Navigate to the Site Management Interface
Once ServBay launches, you’ll see the main interface. In the navigation menu on the left, click the option labeled Sites. This will take you to the ServBay site management page.

Step 3: Start Adding a New Website
On the site management page, find and click the + button at the bottom left. After clicking, a new form area appears on the right for you to enter the configuration details of your new website.
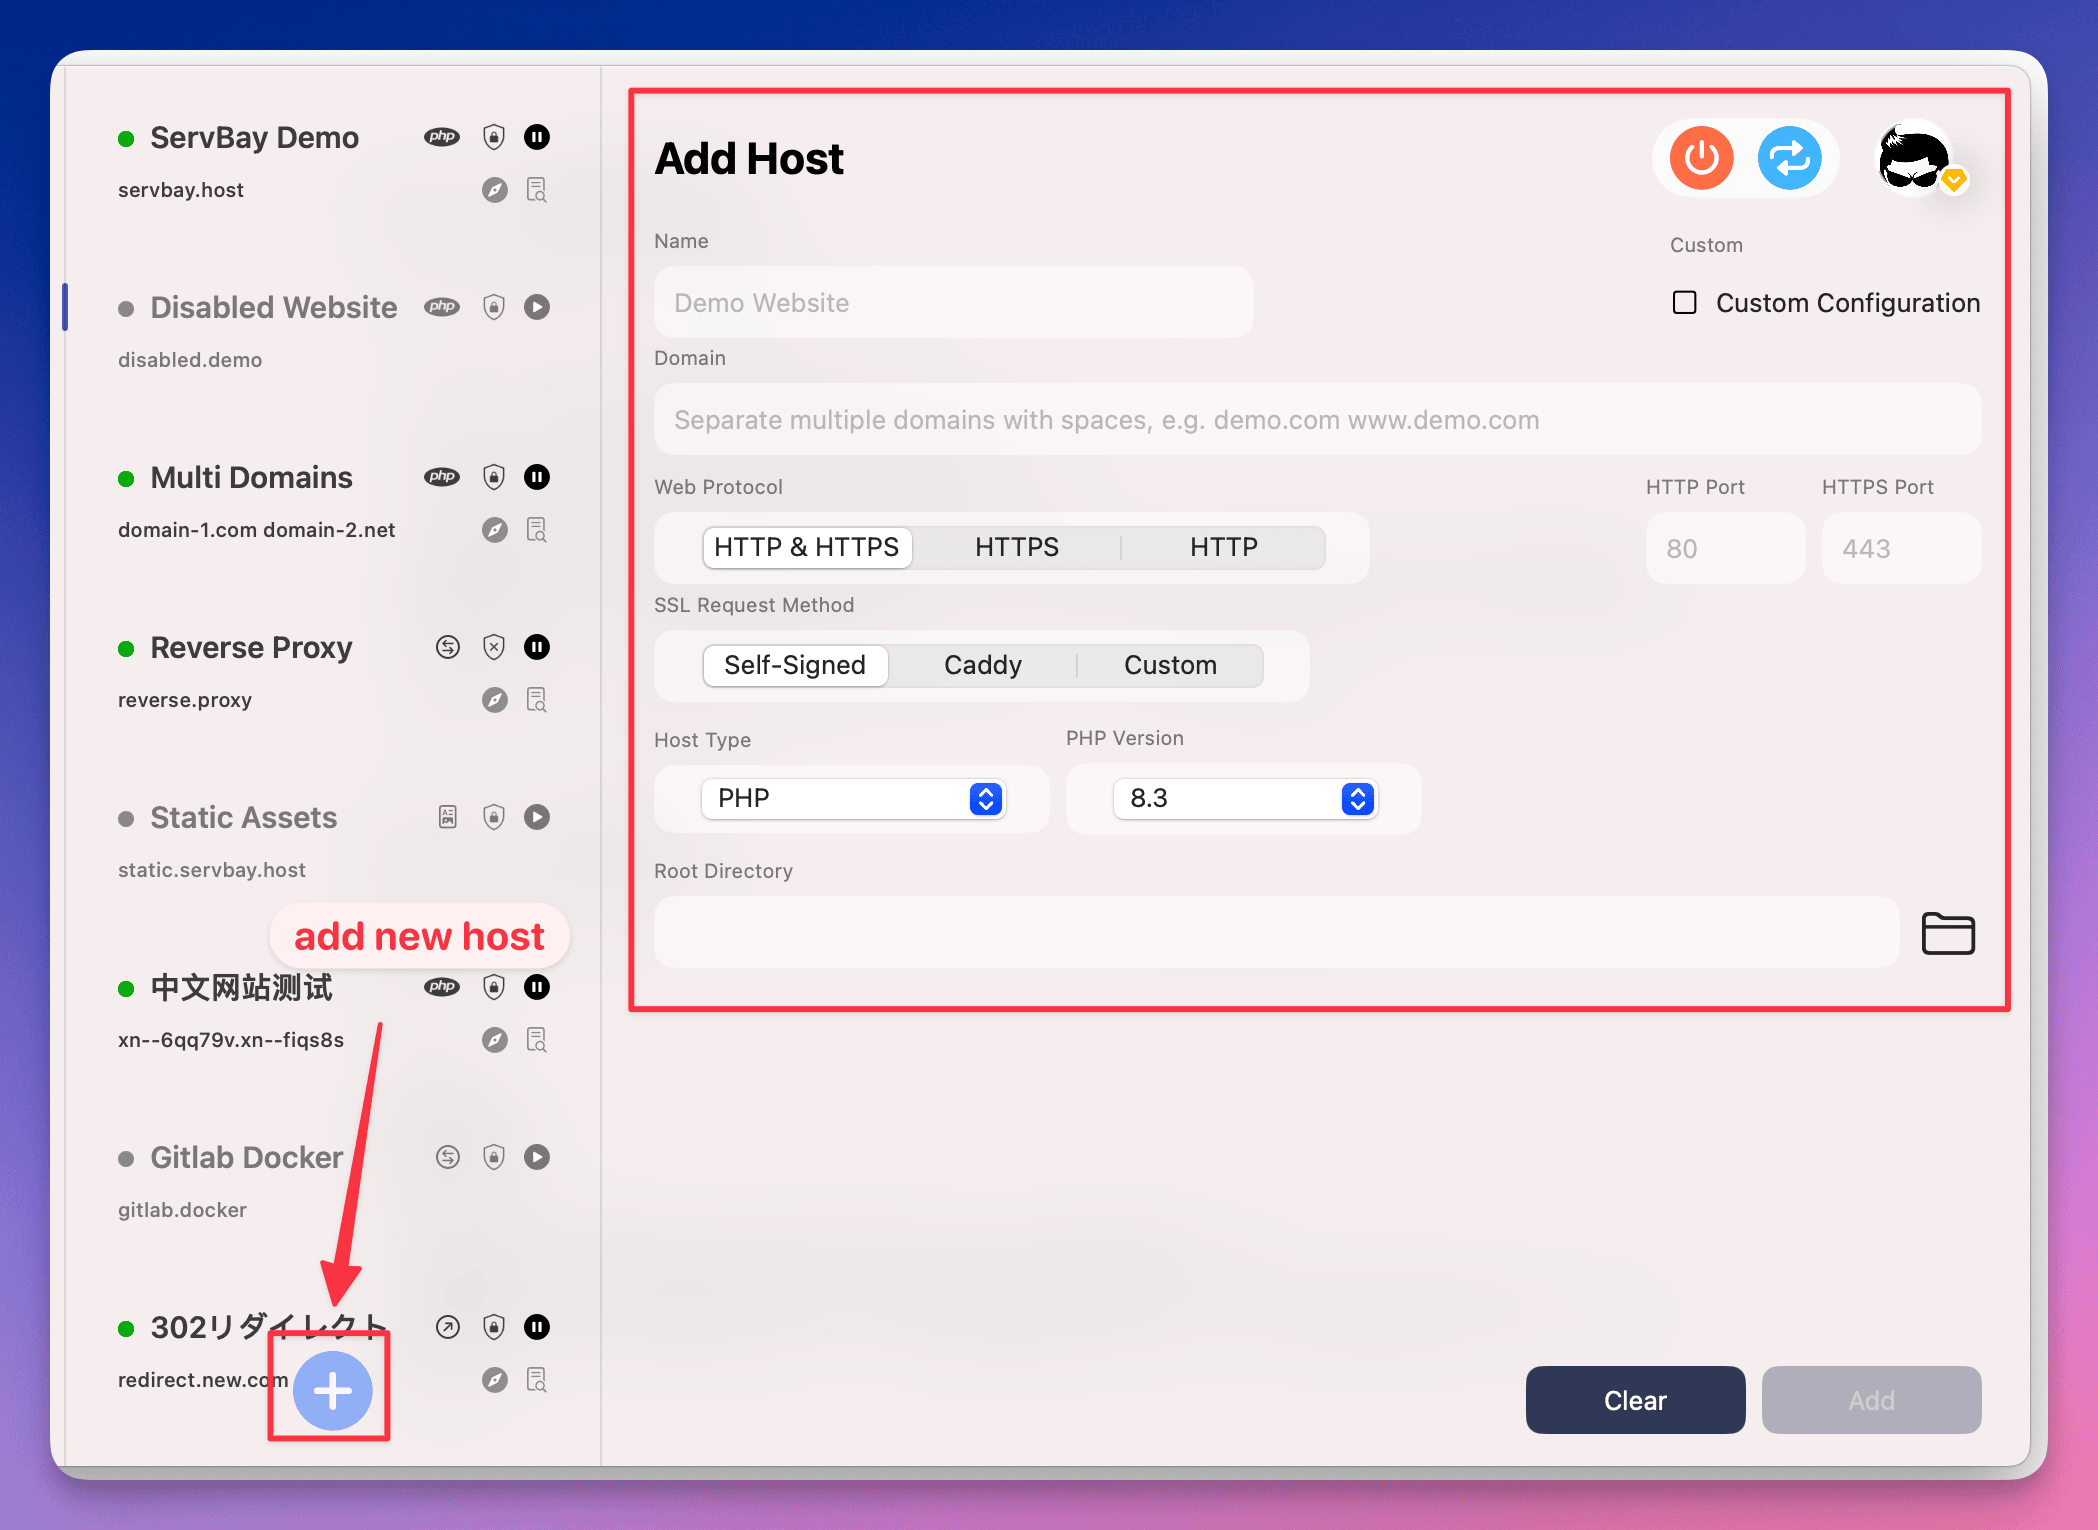
Step 4: Configure Website Settings
On the new website configuration form, you will need to fill in or select the following key information:
- Name: Provide an easy-to-remember name for your local website. This is used internally in ServBay to help you distinguish between different configurations.
- Domain: Enter the domain name you want to use to access the site locally. To avoid conflicts with real-world domains, it’s strongly recommended to use
.demoor another local top-level domain (TLD) configured by ServBay, such asservbay.demoormyproject.servbay.demo. ServBay automatically manages local DNS resolution so you can visit your site using this domain in your browser. - Protocol: Select the protocol your website will support. Typically,
HTTP/HTTPSis chosen by default, and ServBay will automatically handle the local HTTPS configuration. - SSL Certificate Request Method: Configure SSL/TLS encryption for your local site.
- ServBay CA: Recommended for local development. ServBay will generate and manage an SSL certificate issued by the built-in ServBay PKI. You just need to trust the ServBay root certificate (ServBay User CA or ServBay Public CA) in your system to achieve warning-free HTTPS access in your browser.
- ACME: If you want to simulate a production environment, you can use the ACME protocol (e.g. Let's Encrypt, ZeroSSL, Google Trust Services) to issue a real public trust certificate for your local domain—if the domain is publicly accessible and points to your local ServBay instance. ServBay supports automatic ACME certificate request and renewal.
- Site Type: Choose the appropriate type according to your project tech stack:
- PHP: For PHP-based projects like WordPress, Laravel, Symfony, etc. ServBay will configure a web server (Nginx or Apache) to work with PHP-FPM to handle PHP requests.
- Node.js: For Node.js applications. ServBay will typically set up a reverse proxy to forward web requests to the port your Node.js app listens on.
- Static: For static sites built with HTML, CSS, JavaScript, etc. The web server will serve files directly.
- Reverse Proxy: Lets you forward requests for a certain domain or path to another local or remote address and port. Great for proxying to other services or applications.
- Redirect: Redirects all requests from this domain to another URL.
- PHP Version: If "PHP" is selected as the site type, pick an installed and running PHP version from the dropdown to execute your site’s PHP scripts. Make sure your required PHP version is installed via ServBay's package management interface.
- URL Rewrite (Pretty URL) Rules: Most modern web frameworks and CMSes require URL rewrite rules to enable pretty URLs (like
/aboutinstead of/index.php?page=about). ServBay provides preset rewrite rule options for popular apps (Laravel, WordPress, Discuz!, etc.) that you can apply directly. If your framework/app isn’t listed or you need custom rules, you may need to manually edit the associated web server (Nginx or Apache) config file. - Root Directory: Specify the physical path for your site files. This is the starting directory where the web server serves files from. It’s recommended to store your project files in ServBay’s default
wwwdirectory, e.g./Applications/ServBay/www/servbay-demo. Ensure that this directory exists and ServBay processes have read access.
WARNING
For developers using frameworks (like Laravel), be sure to set the root directory to the public folder containing index.php, not the project root.

Step 5: Save and Activate the Website
Once you have filled in and double-checked all the configuration details, click the Add button at the bottom of the form. ServBay will automatically generate and load your new website’s configuration into its web server (such as Nginx or Apache) and update local DNS settings.
If the save succeeds, your new site will appear in the site list. You can quickly access your site by clicking the browser icon in the top right corner.
Step 6: Manage Sites with Quick Actions
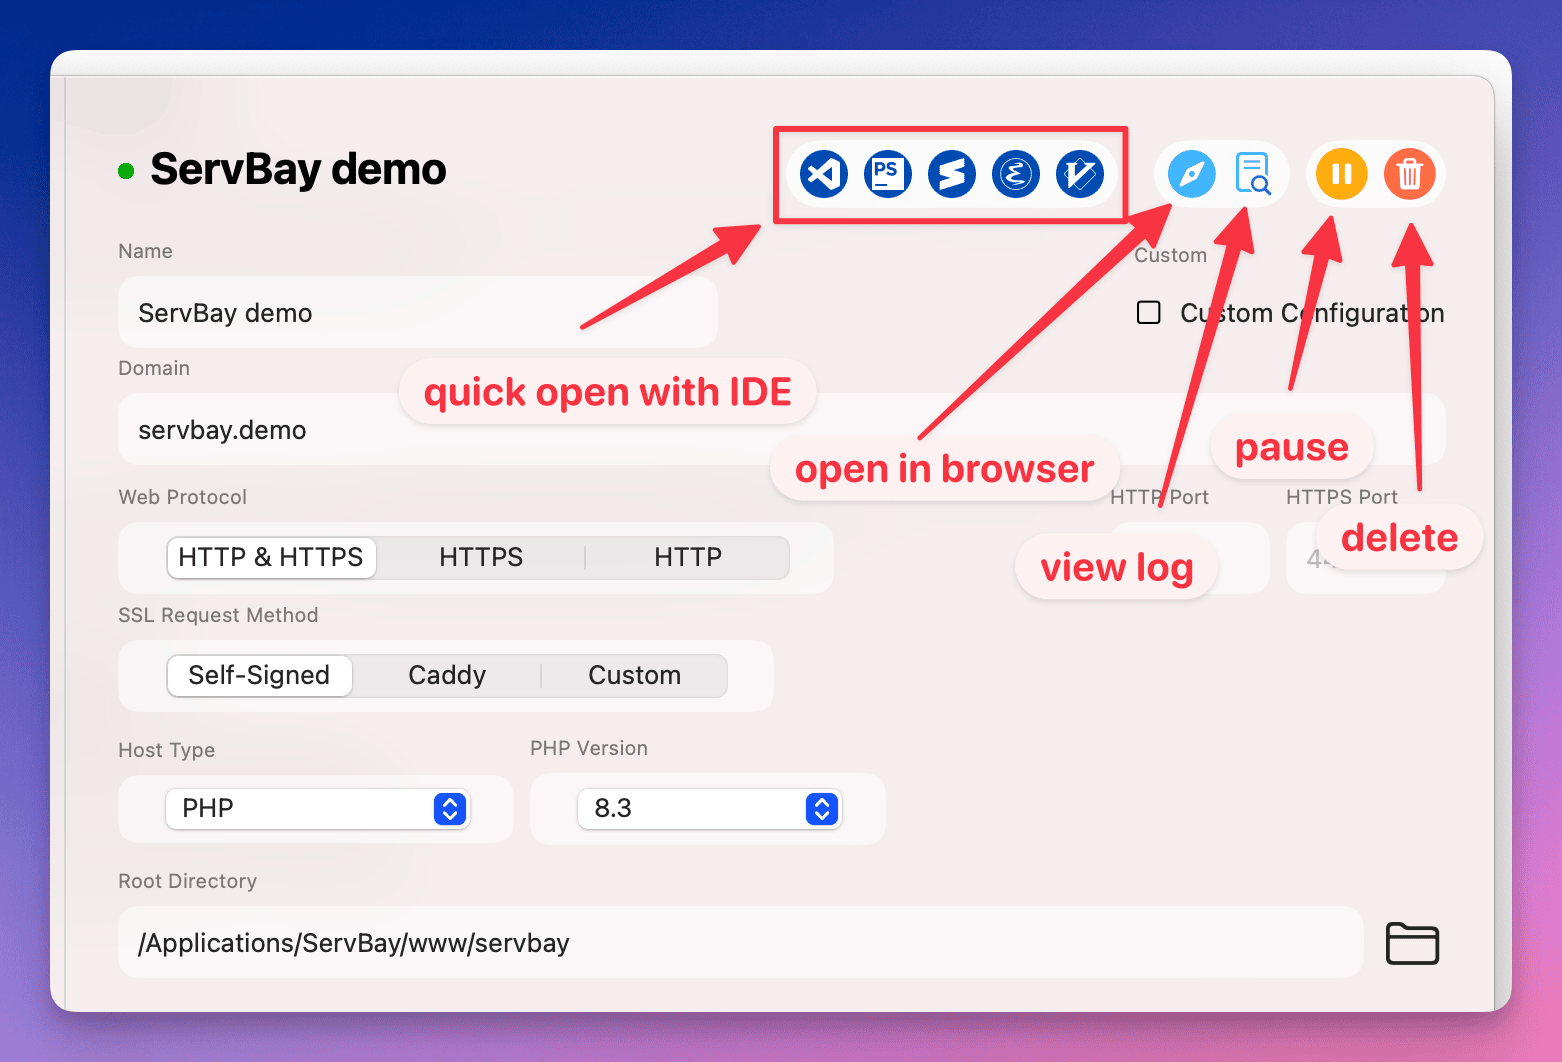
ServBay provides a range of handy quick action buttons for each site in the list, helping you efficiently manage your local development workflow:
- Open with IDE: Instantly open the site root directory in your configured default code editor or IDE.
- Open in Browser: Directly open the website URL in your default web browser.
- View Site Logs: Easily access the relevant web server access and error logs for debugging.
- Pause/Resume Site: Temporarily disable or re-enable access to the site.
- Delete Site: Remove the site from ServBay configuration (this does not delete your actual website files).
Simple Example: Creating a Static HTML Website
To verify that your site is set up correctly, you can try this quick test:
Add a website as described above, with the domain set to
servbay.demo, site type set toStatic, and root directory as/Applications/ServBay/www/servbay-demo-static.On your file system, create the directory
/Applications/ServBay/www/servbay-demo-static.Inside that directory, create a file named
index.html.Open
index.htmlin a text editor and add the following simple HTML code:html<!DOCTYPE html> <html> <head> <title>ServBay Static Test</title> </head> <body> <h1>Congratulations! Your first ServBay website is running successfully!</h1> <p>If you see this page, it means ServBay is correctly configured and serving your static website.</p> </body> </html>Save the
index.htmlfile.Return to the ServBay site management page, find your recently added
servbay.demosite, and click the browser icon in quick actions.Your browser should open
http://servbay.demo(orhttps://servbay.demo, depending on your SSL settings) and display the contents of yourindex.htmlfile.
Notes
- Domain Conflicts: Avoid using domain names that may conflict with your local network or VPN. Using
.demois a safe option. - Root Directory Permissions: Make sure the user running ServBay (usually your current user) has read access to the specified site root and all files within.
- Port Usage: ServBay defaults to standard ports (HTTP 80, HTTPS 443). If these ports are used by other programs, ServBay may not launch its web server or your site may be inaccessible. Check and close other applications occupying these ports.
- ServBay CA Trust: If you use ServBay CA for HTTPS and want to avoid browser warnings, you must trust the ServBay User CA or ServBay Public CA certificate in macOS. Detailed instructions are generally found in the ServBay docs.
FAQ
- Q: Why do I get
HTTP Error 403 - ForbiddenorHTTP Error 404 - File not foundwhen loading my site?- A: This is one of the most common errors for developers.
- First, check whether you've set the site root directory correctly. In most modern frameworks (like Laravel, Symfony, CakePHP), for security and project structure, the project root (where files like
vendor,composer.json,package.jsonlive) is not the website root/actual entry point. - Therefore, be sure the site root points to the directory containing the actual entry file such as
index.php,index.htm, orindex.html. - Common entry directories:
public,web,www,htdocs,wwwroot,webroot, etc.
- Q: I added a site, but when I access the domain in the browser, I get "Site can't be reached" or "Connection refused"?
- A: First, ensure ServBay is running, and that the web server (Caddy/Nginx/Apache) is healthy (check the ServBay main interface).
- Make sure the domain you enter in your browser matches exactly with what's configured in ServBay.
- Check if the website in ServBay’s site list is in “running” status (not paused).
- Verify the site root directory path is correct, and that it contains an entry file (like
index.html,index.php). - See if any other applications are using ports 80 or 443.
- Q: My PHP site isn’t working as expected, showing blank pages or downloading files?
- A: Make sure you selected the correct PHP version during site configuration, and that PHP is installed via ServBay package management and running.
- Check file permissions under the site root.
- Review the site logs (via quick actions) for any PHP errors.
- Ensure your project has an
index.phpor other default index file recognized by ServBay.
- Q: I enabled HTTPS but the browser shows a certificate warning?
- A: If using ServBay CA, you need to trust ServBay’s root certificate in your OS or browser. See ServBay's documentation for how to trust CA certificates.
- If using ACME, ensure your domain points to your ServBay instance and the certificate was successfully obtained and installed. Check ServBay’s logs for detailed ACME request info.
- Q: My URL rewrite rules aren’t working and pages aren’t accessible?
- A: Make sure you picked the rewrite rule that matches your framework/application in the site config.
- If using Apache, check that a
.htaccessfile exists in the root or subdirectory and that ServBay’s Apache config allows reading.htaccess. - If using Nginx or Caddy, rewrite rules are usually found in the ServBay-generated config file; verify that the rules were correctly loaded.
Conclusion
By following the steps in this guide, you should have successfully added and launched your first website in the ServBay local development environment. ServBay’s powerful site management, flexible configuration options (like SSL certificates, site types, PHP versions, URL rewriting), and convenient quick actions will greatly boost your local development efficiency. Continue exploring other features such as package management and database management in ServBay to build a more complete local development workflow.
