
Adding and Configuring Docker Container-Based Websites in ServBay
ServBay is a local web development environment for macOS and Windows, supporting multiple languages and technology stacks. Beyond hosting websites using ServBay’s built-in packages (such as PHP, Node.js, Python, Go, Java, databases, etc.), you can also leverage Docker containers to run and manage your sites or services. This approach provides outstanding flexibility, isolation, and consistency—especially valuable for projects with specific environmental requirements or dependencies.
This guide explains in detail how to add a website powered by a Docker container to ServBay and integrate it into your local development workflow using ServBay’s reverse proxy functionality.
Overview
By configuring ServBay as a reverse proxy, you can route specific domain requests to a service port running inside a Docker container. ServBay handles incoming traffic (such as HTTPS certificates and domain name resolution), while your Docker container focuses on running the application itself. This setup combines ServBay’s convenient management interface with the robust containerization features of Docker.
Follow the steps below to add and configure a Docker-powered website in ServBay.
Prerequisites
Before you begin, make sure you meet the following requirements:
- ServBay installed and running: ServBay is successfully installed and started on your macOS.
- Docker installed and running: Docker Desktop or other Docker environment is installed and running on macOS.
- Prepared Docker image and container: You’ve built or pulled a Docker image with your website or application, and are able to run a container from that image.
Detailed Steps to Add a Website
Step 1: Prepare and Start Your Docker Container
First, ensure your Docker container is running, and that its internal service (such as a web server) is listening on a port which is exposed to your host machine (macOS) using Docker’s port mapping.
For example, if you have a basic Nginx container listening on port 80 internally, you can map it to port 8080 on your host with the following command:
bash
docker run -d --name my-nginx-servbay -p 8080:80 nginxIn this example, the Nginx service inside the my-nginx-servbay Docker container listens on port 80. With the -p 8080:80 option, Docker forwards the container’s port 80 to the host’s port 8080. ServBay will need to connect to the host's 8080 port.
Based on your application and Dockerfile configuration, ensure the container’s internal service listens on the correct port and that it’s mapped to an available port on your host machine.
Step 2: Open the ServBay Management Interface
Find the ServBay app icon in your macOS Applications folder and double-click it to launch the ServBay management interface.
Step 3: Navigate to the Website Management Page
After opening ServBay, you'll see the main dashboard. In the navigation menu on the left, locate and click the Websites option. This takes you to ServBay’s website management page, where you can view and configure all your local sites.
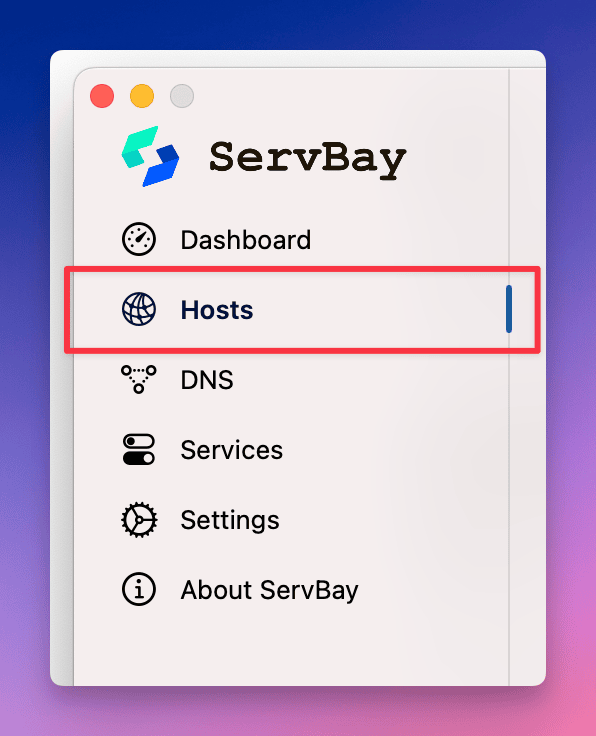 Image: Click “Websites” on the left sidebar to enter the management page.
Step 4: Add a New Website
At the bottom of the website management page, you’ll find a + button. Click this button, and ServBay will open a new form on the right for you to enter the settings of your new website.
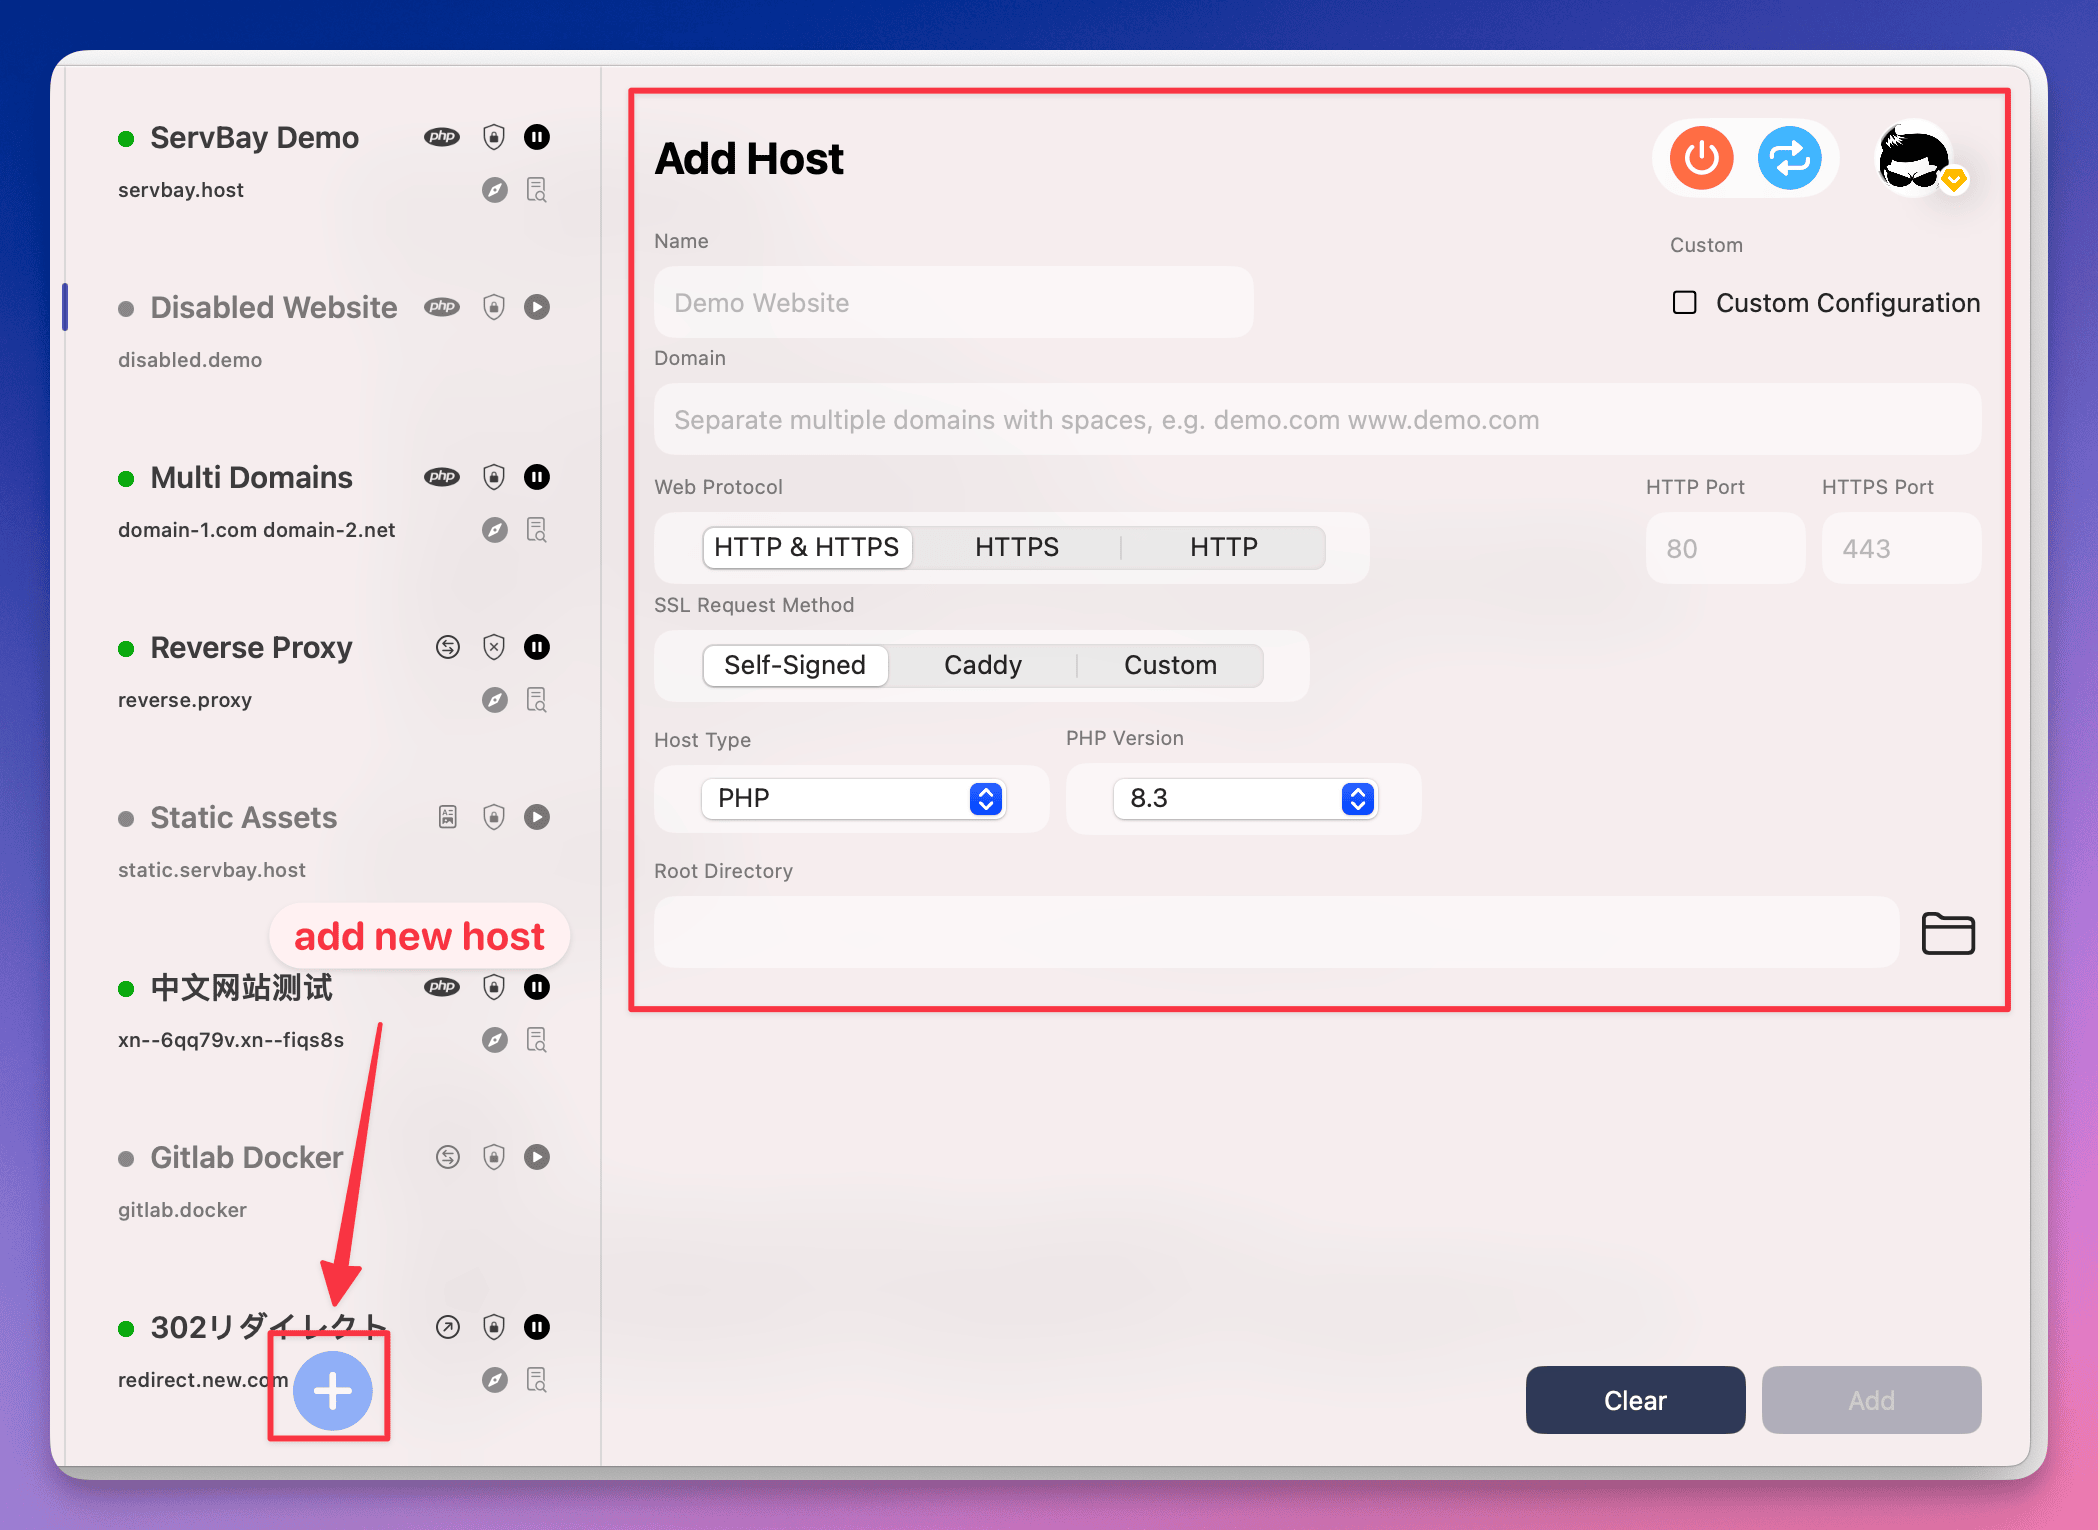 Image: Click the “+” button at the bottom to add a new website.
Step 5: Configure Website Settings
In the new website configuration form, fill in the following essential details:
- Name: Give your site an easily recognizable name, e.g.
Docker Nginx Demo. This is for internal management within ServBay. - Domain: Enter the local domain name you wish to use to access your Dockerized website in the browser. It's recommended to use a
.servbay.demosuffix to avoid conflicts with public domains (e.g.,docker.servbay.demo). ServBay will automatically update your system’s hosts file to point this domain to127.0.0.1. - Protocol: Choose the protocol your site supports. Typically, you can keep the default
HTTP/HTTPS. ServBay listens on both HTTP (80) and HTTPS (443) ports and handles SSL as configured. - SSL Certificate Request Method: It's recommended to select
ServBay CA. ServBay will automatically generate and manage a locally trusted SSL certificate issued by the ServBay User CA. By installing the ServBay Public CA into your macOS Keychain, your browser will trust these certificates—making local HTTPS development and testing easier. Alternatively, you can opt forACME(for Let's Encrypt) orCustom(use your own certificate). - Website Type: [Important] Select
Reverse Proxy. This instructs ServBay to act as the entry point for the domain and forward requests to your specified backend service address. - IP Address: Enter the IP address your Docker container’s service listens on. For typical local Docker setups, this is usually your local loopback address
127.0.0.1. - Port: Specify the port your Docker service is exposed on the host system. This matches the
<host port>portion in yourdocker run -p <host port>:<container port>command. For-p 8080:80, enter8080.
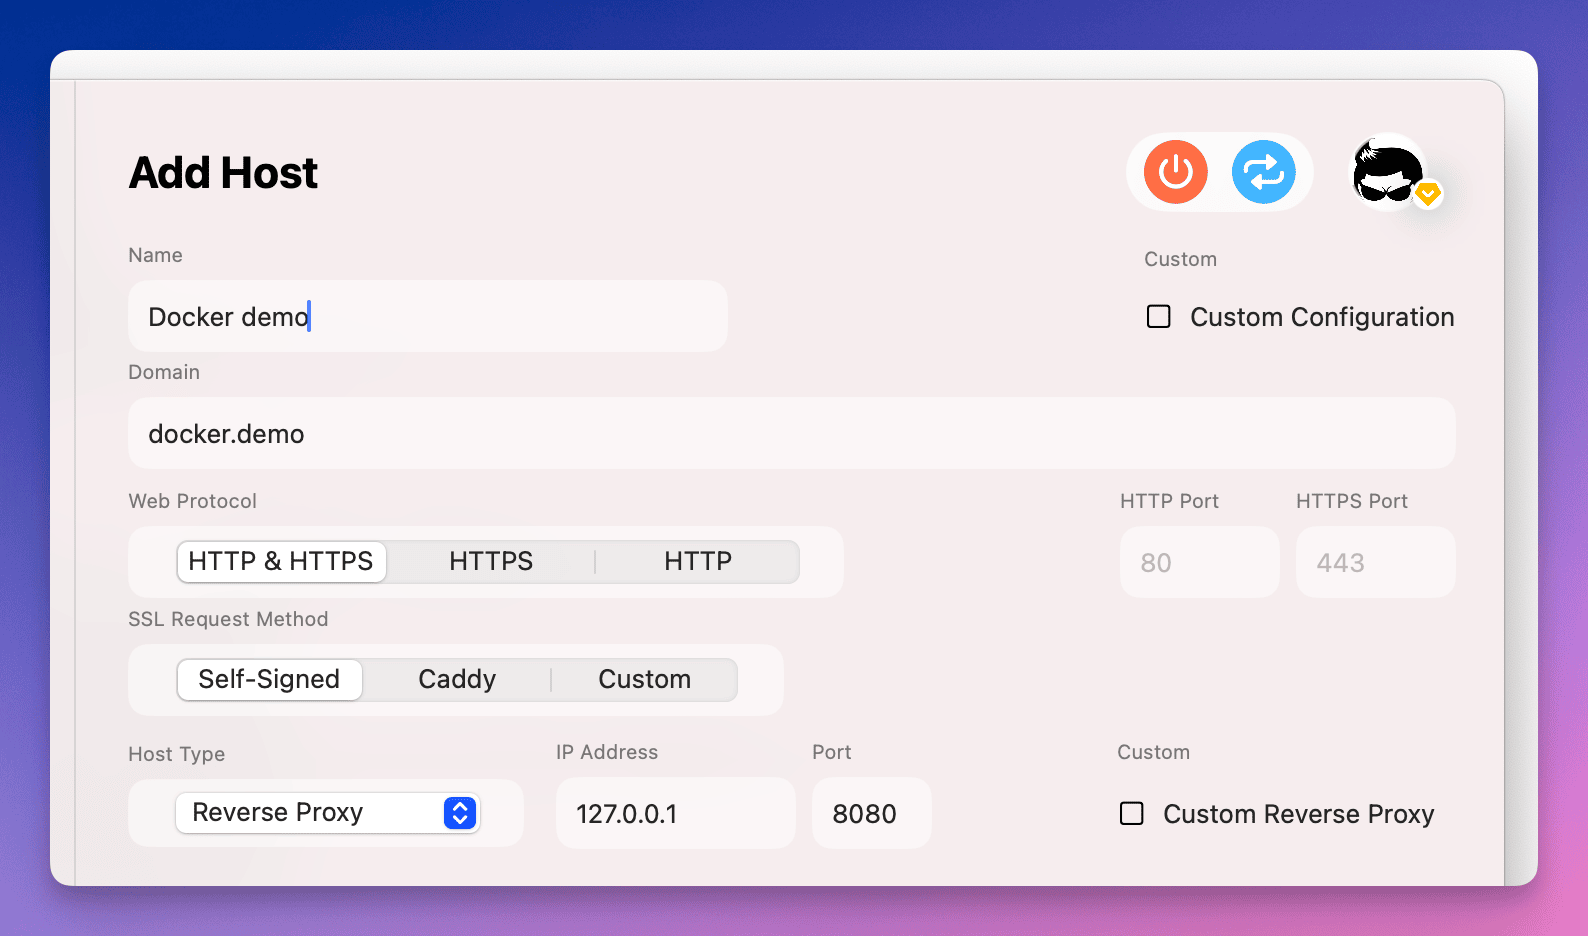 Image: Fill in the configuration for your Docker reverse proxy website.
Step 6: Complete and Save the Configuration
Once all required settings have been filled in, click the Add button at the bottom of the form.
ServBay will process your request, automatically add the appropriate reverse proxy rules to its web server (such as Caddy or Nginx), and update the system’s hosts file to point your chosen domain to localhost.
After saving, ServBay may briefly reload its configuration, after which you can try accessing your newly added domain.
Step 7: Access Your Website and Use Quick Actions
Once the configuration is saved successfully, return to the website management page and locate the entry for your new site. Ensure its status is marked as "Running".
You can now access your chosen domain (e.g. http://docker.servbay.demo or https://docker.servbay.demo) in your browser. If you’ve configured everything correctly, ServBay will forward your requests to the Docker container’s service, displaying the web content served from the container.
ServBay provides several handy quick action buttons in each website entry, including:
- Open root directory in IDE: (For reverse proxy sites, this button might not be available or may point to the ServBay configuration folder—actual behavior depends on your ServBay version and configuration.)
- Open the site in browser: Instantly launch the site URL in a new browser tab.
- View site logs: Review ServBay’s access and error logs for the website; very useful for debugging.
- Pause/Enable site: Temporarily disable or enable the ServBay reverse proxy configuration for the site.
- Delete site: Remove the site configuration from ServBay.
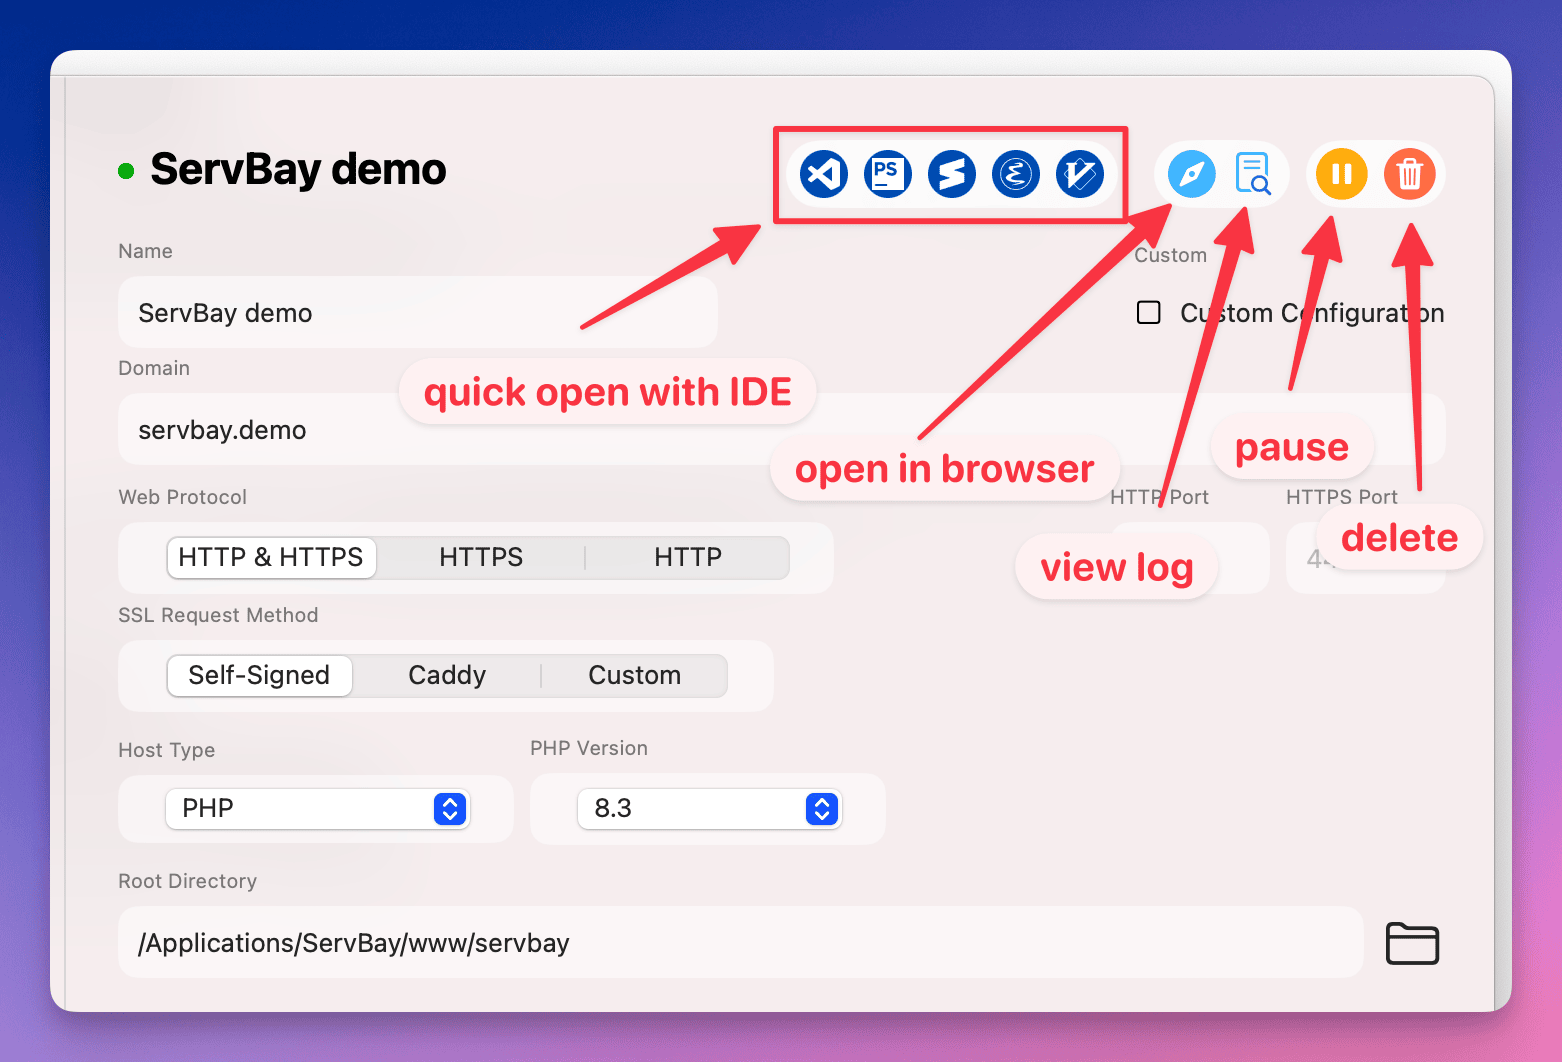 Image: Quick operation buttons available for each ServBay website entry.
Notes and Best Practices
- Docker container status: Make sure your target container is always running—or ServBay will not be able to forward requests successfully.
- Port mapping: Double check Docker’s port mapping (
-poption) and that the port entered in ServBay matches. Ensure the port isn’t used by another program on the host. - Firewall: Review your macOS firewall settings to confirm neither ServBay’s ports (by default 80, 443) nor any host-exposed Docker ports are blocked.
- Docker network mode: Most of the time, using the default
bridgemode and the-pflag for port mapping is simplest. If you usehostmode, ServBay can access the container’s internal listening port (i.e., if listening on 80, ServBay's port is also 80), but be aware port conflicts can occur with this approach. - ServBay CA: For hassle-free HTTPS development, it's highly recommended to install the ServBay Public CA. This makes all locally generated certificates trusted by your browser, eliminating security warnings.
FAQ & Troubleshooting
Q: After adding the website, I cannot access it. The browser shows a connection error or timeout?
A: Try the following checks:
- Check ServBay website status: On ServBay's website page, confirm the site shows as "Running".
- Check Docker container status: Run
docker psin a terminal and verify the target container is running. - Verify Docker port mapping: Run
docker psand look at thePORTScolumn. Ensure the host port (like0.0.0.0:8080->80/tcpor127.0.0.1:8080->80/tcp—the8080) matches the ServBay config. - Check service inside the Docker container: Make sure your internal web service (Nginx, Apache, Node app, etc.) is actually listening on the correct port and is running error-free. You can inspect container logs with
docker logs <container id/name>. - Check ServBay logs: Click the log icon for the website in ServBay to review its access and error logs, which can yield details on failed proxy requests.
- Check your system hosts file: Although ServBay auto-manages this, you can manually check
/etc/hoststo ensure the domain points to127.0.0.1. - Check firewall settings: Verify your firewall isn’t blocking ServBay’s or Docker’s exposed ports.
Q: Can ServBay manage Docker containers directly?
A: ServBay focuses on managing web services, databases, language runtimes, and routing traffic to backend services (including Docker containers), but does not provide full Docker container lifecycle management (such as start, stop, image building, etc.). You should continue to manage your containers with Docker CLI tools or Docker Desktop.
Q: What is ServBay CA, and why do I need to install it?
A: ServBay CA (Certificate Authority) is ServBay's SSL certificate management solution for local HTTPS development. ServBay User CA issues SSL certificates for your local sites, and ServBay Public CA is its root CA. By installing the ServBay Public CA in your system keychain, both your OS and browser will trust all certificates signed by ServBay User CA. This prevents "insecure connection" warnings when accessing local HTTPS sites and is essential for testing or simulating production-like HTTPS environments.
Summary
Adding a Docker-powered website in ServBay is an efficient and flexible approach which leverages ServBay as the central hub for local development traffic and domain management, while using Docker for isolated and robust app runtime environments. With simple reverse proxy configuration, you can seamlessly integrate all kinds of Docker-based projects into your ServBay workflow. By following the steps and best practices outlined here, you’ll be well-equipped to set up and launch your local Dockerized websites.
