
ServBay Mailpit Service Configuration Guide
ServBay integrates the Mailpit package, providing a convenient local email server designed for developers to test and debug application email-sending features. This article details how to install, enable, and configure the Mailpit package within ServBay, covering the four main configuration tabs: Common, SMTP, POP3, and Relay.
Overview of the Mailpit Package
Mailpit is an open-source tool offering an easy-to-use local SMTP/POP3 server and an intuitive web interface. It captures all emails sent by your application, allowing you to review message content, headers, attachments, and more in a centralized location—without sending test emails to real inboxes. This greatly streamlines development and debugging, especially for features like user registration, password reset, and notifications that require email sending.
Within ServBay, Mailpit is integrated as a core package, making it easy to install and manage. You can also leverage ServBay’s robust PKI system for automatic SSL/TLS configuration, ensuring a secure testing environment.
Installing and Enabling the Mailpit Package
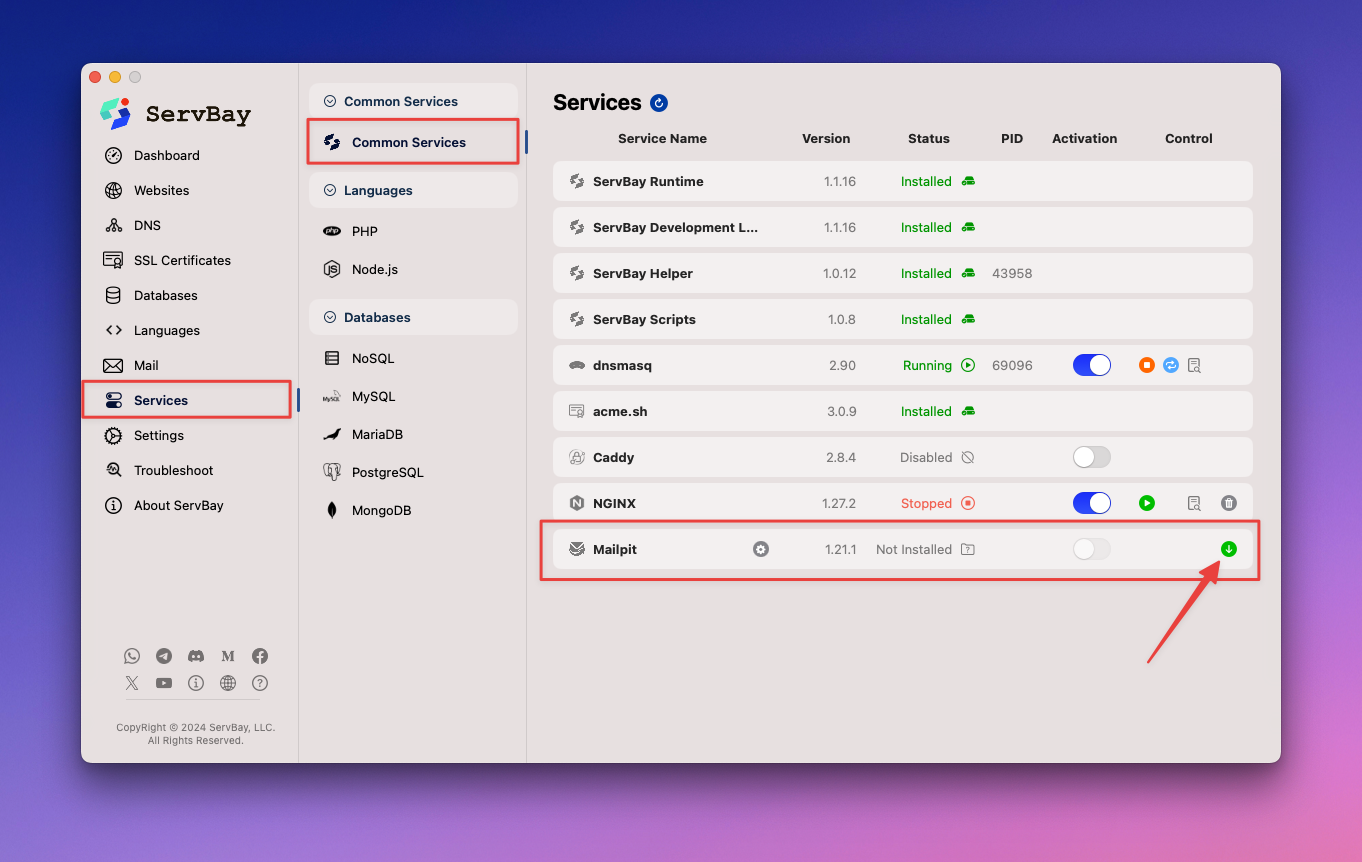
Before using Mailpit as your local email server, you need to install and enable the Mailpit package in ServBay.
- Open the ServBay app.
- In the left sidebar, select
Packages. - Under the package list, find the
Common Servicescategory. - Locate the
Mailpitpackage. - If Mailpit is not installed, click the green install button on the right to install it.
- After installation, toggle the switch to enable the Mailpit package.
Thanks to ServBay’s powerful PKI system, ServBay will automatically generate and configure the necessary SSL certificates for Mailpit’s web admin interface as well as the SMTP and POP3 services. This means you can directly enable STARTTLS or SSL/TLS encryption, without needing to manually apply for or set up certificates.
Webmail Management Interface
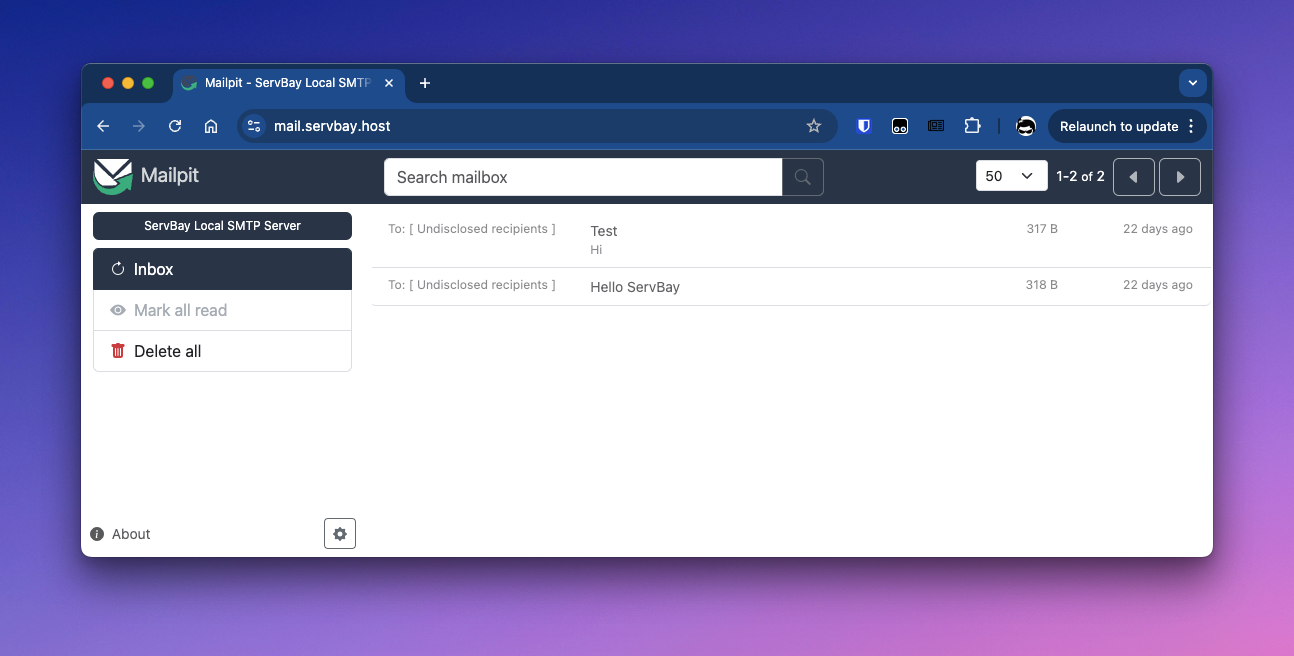
Mailpit comes with a powerful web interface for viewing and managing captured emails. ServBay automatically configures this for you. Once the Mailpit package is enabled, simply access this interface via your browser:
Access URL: https://mail.servbay.host
Using this interface, you can conveniently browse the list of received emails, view individual messages in detail (including HTML, plain text, source code), search mail, delete messages, and more.
Configuring the Mailpit Package
ServBay provides a graphical interface for configuring all Mailpit parameters. In the ServBay sidebar, select Mail, then click Mailpit Service Config to enter the configuration interface. Here, you’ll find four main tabs: Common, SMTP, POP3, and Relay.
1. Common Tab
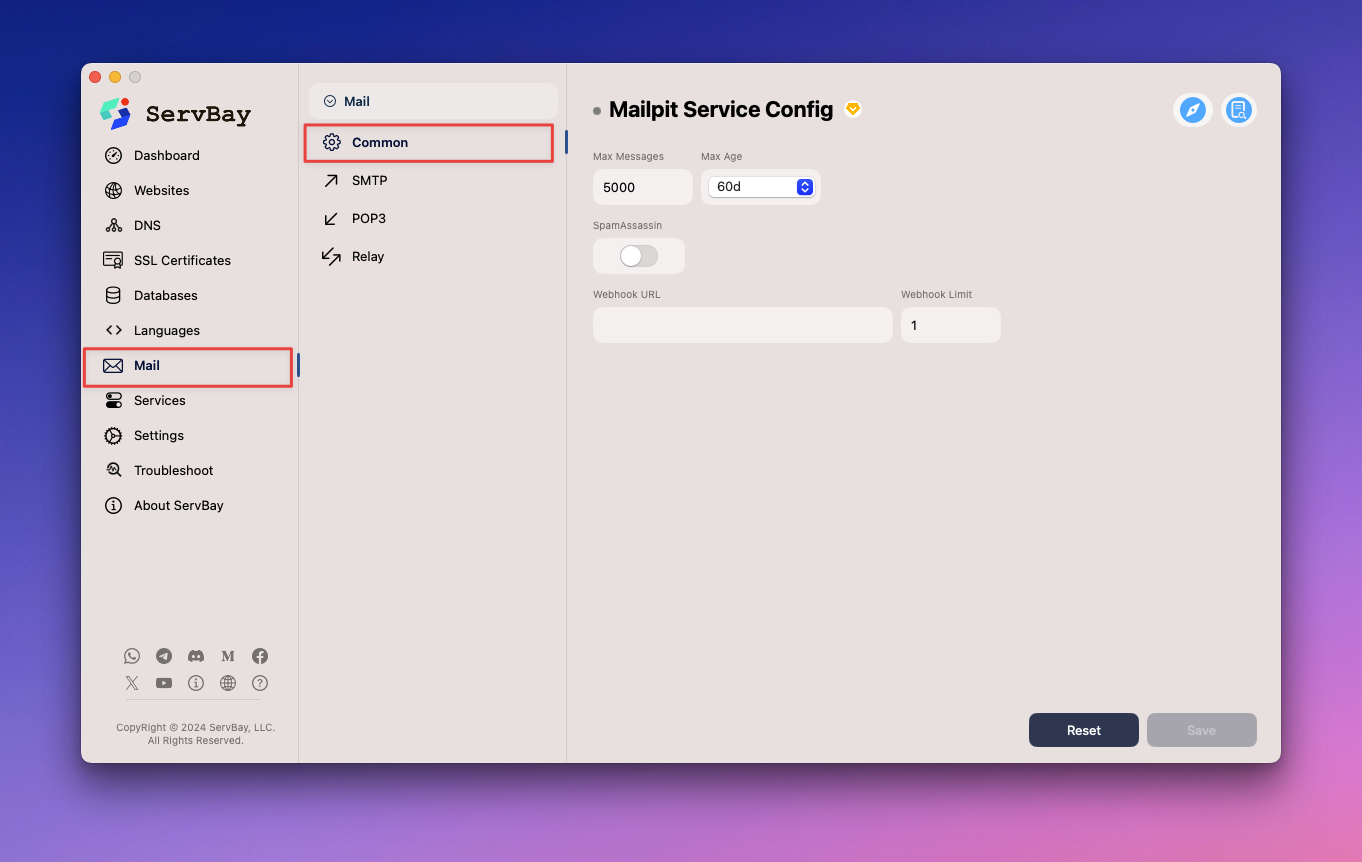
The Common tab lets you adjust Mailpit’s general settings and behavior:
- Max Messages: Sets the maximum number of messages the Mailpit server can store. When this limit is exceeded, the oldest emails are automatically deleted.
- Max Age: Specifies the maximum retention period (in days) for messages on the Mailpit server. Emails older than this will be automatically deleted.
- SpamAssassin: Enable or disable the SpamAssassin spam filtering feature. If enabled, Mailpit will attempt to mark incoming spam.
- Webhook URL: Set a Webhook URL. When Mailpit receives a new message, it will send an HTTP POST request to this URL to notify external systems or services—useful for integrating automated testing or notification systems.
- Webhook Limit: Sets an upper limit on the number of emails for which Webhook notifications are sent.
2. SMTP Tab
TIP
Thanks to ServBay’s robust PKI system, SSL certificates are generated and configured by default. You can enable STARTTLS or SSL/TLS encrypted connections right away, with no extra certificate setup required.

The SMTP tab lets you configure Mailpit’s SMTP server settings. Your application will connect to this SMTP server to send test emails:
- SMTP Port: Sets the port number for the Mailpit SMTP server to listen on. Your app should target
127.0.0.1orlocalhostand this port. Default is1025. - STARTTLS: Enable or disable STARTTLS encryption. Allows upgrading to encrypted communication after connection is established.
- SSL/TLS: Enable or disable SSL/TLS encryption. Uses encryption immediately upon connection.
- Username: Set an optional username for the SMTP server. If set, your application will need to provide this username to authenticate.
- Password: Set an optional password for the SMTP server, used in conjunction with the username for authentication.
- Max Recipients: Set the maximum number of recipients allowed per email to prevent excessive bulk sending.
- Allowed Recipients: Specify a list of allowed recipient addresses or domains (optional). If left blank, Mailpit will accept mail for any address. If set, only emails sent to these addresses/domains will be accepted.
3. POP3 Tab
TIP
Thanks to ServBay’s robust PKI system, SSL certificates are generated and configured by default. You can enable SSL/TLS encryption without any additional certificate setup.
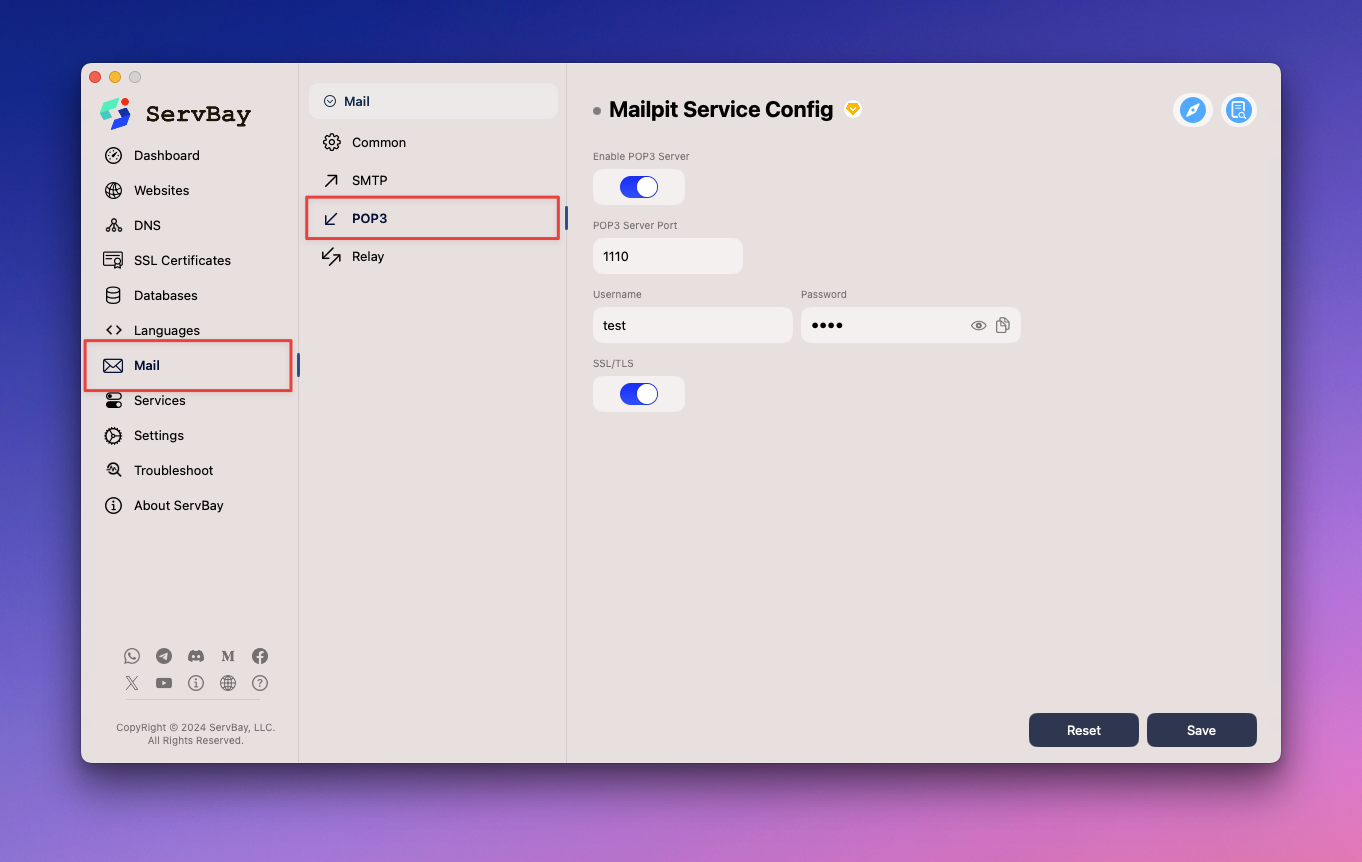
The POP3 tab lets you configure Mailpit’s POP3 server settings. If you need to test email receiving in your app, configure your client to connect to this server:
- Enable POP3 Server: Enable or disable Mailpit’s POP3 server functionality.
- POP3 Server Port: Set the port number that Mailpit’s POP3 server listens on. Default is
1110. - Username: Set an optional username for the POP3 server. Clients will need to provide this username for authentication.
- Password: Set an optional password for the POP3 server, used together with the username for authentication.
- SSL/TLS: Enable or disable SSL/TLS encrypted connections.
4. Relay Tab
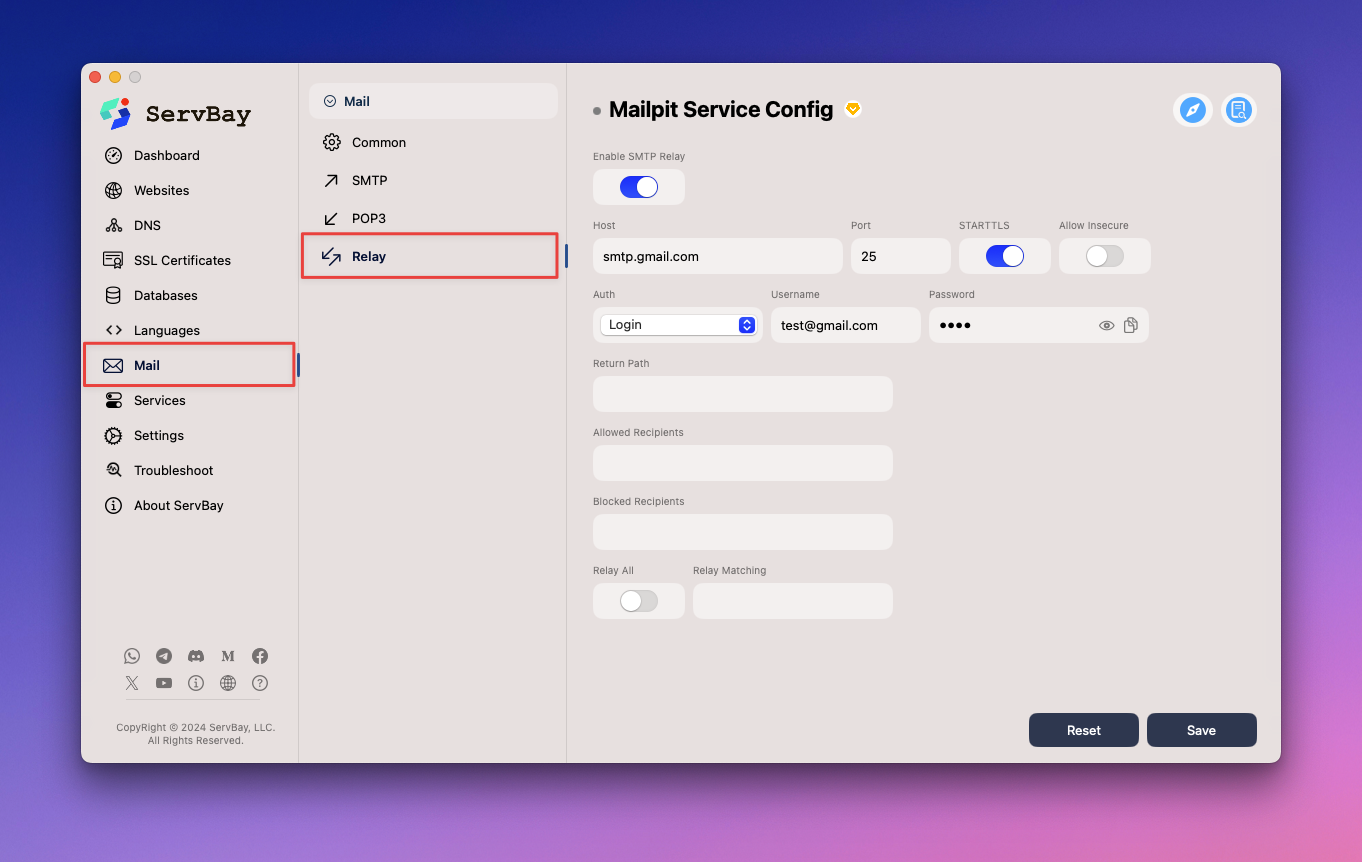
The Relay tab allows you to configure Mailpit’s email forwarding feature. You can set up Mailpit as a relay, forwarding some or all captured emails to an external SMTP server:
- Enable SMTP Relay: Enable or disable SMTP relay functionality.
- Host: Specify the address of the external SMTP server to relay emails (for example:
smtp.gmail.com,smtp.sendgrid.net). - Port: Set the port number for the external SMTP server. Usually
25(standard SMTP),465(SMTPS), or587(Submission). - STARTTLS: Enable or disable STARTTLS encrypted connection to the relay server.
- Allow Insecure: Allow connecting to relay SMTP servers using untrusted certificates (not recommended for production).
- Auth: Select the authentication method for the relay server. Common options include
Login(username and password),Plain(similar to Login), andCRAM-MD5(challenge-response mechanism). - Username: Username for authenticating with the relay SMTP server.
- Password: Password for authenticating with the relay SMTP server.
- Return Path: Set the return address for relayed mail (
Return-Pathheader). - Allowed Recipients: Specify a list of recipient addresses or domains allowed for relay (optional).
- Blocked Recipients: Specify a list of recipient addresses or domains to block from relay (optional).
- Relay All: If checked, Mailpit will attempt to relay all captured emails (subject to Allowed/Blocked Recipients settings).
- Relay Matching: If checked, Mailpit will only relay emails matching the Allowed Recipients or Blocked Recipients rules.
Saving Your Configuration
After making any changes to your Mailpit configuration, be sure to click the Save button at the bottom of the interface to apply your settings.
Clicking the Reset button will restore all configurations to Mailpit’s default settings.
Frequently Asked Questions (FAQ)
- Q: Why aren’t my application’s sent emails appearing in Mailpit?
- A: Double-check your app’s email sending configuration (typically the SMTP host and port) to ensure it points to the address where ServBay runs Mailpit (usually
127.0.0.1orlocalhost) and the SMTP port you set in Mailpit (default is 1025). Also, make sure the Mailpit package is running in ServBay. You can check its status in the package list.
- A: Double-check your app’s email sending configuration (typically the SMTP host and port) to ensure it points to the address where ServBay runs Mailpit (usually
- Q: Do I need to configure SSL certificates for Mailpit?
- A: No. Thanks to ServBay’s powerful PKI system, ServBay automatically generates and configures the SSL certificates needed for Mailpit’s web interface and for STARTTLS/SSL/TLS use in SMTP and POP3. You only need to enable the encryption option in the relevant config tab.
- Q: What is the default username and password for the Mailpit web management interface?
- A: By default, Mailpit’s web interface, accessed via
https://mail.servbay.host, does not require a username or password. The SMTP and POP3 services also do not require authentication unless you set up a username and password in their respective tabs.
- A: By default, Mailpit’s web interface, accessed via
Summary
With the Mailpit package integrated in ServBay, you can easily set up a local email testing environment. Configure Mailpit’s SMTP, POP3, and Relay settings, and take advantage of its intuitive web interface to significantly improve the efficiency and convenience of handling email functionality during development.
Please note: after modifying the configuration, you may need to restart the Mailpit package for changes to take effect. You can locate Mailpit in ServBay’s package management interface and click the restart button.
