
Installing and Managing MongoDB in ServBay
MongoDB is a leading NoSQL document database known for its flexibility, powerful query capabilities, and horizontal scalability, making it a popular choice for modern application development. ServBay provides macOS developers with an unprecedented integrated environment that greatly simplifies the process of installing, configuring, and managing multiple MongoDB versions, and comes with a full suite of core command-line tools, giving you a complete and efficient local development and testing workstation.
Overview: Why Use MongoDB in ServBay?
ServBay is more than just a launcher—it’s a comprehensive development environment manager. For MongoDB, this means:
- Multiple Versions Side-by-Side & Seamless Switching: You can install and run several MongoDB versions (such as 5.0, 6.0, 7.0, etc.) with a single click and switch between them easily according to your project needs, with no worries about environment conflicts.
- Graphical Configuration: No more tedious manual editing of configuration files. ServBay’s graphical interface allows you to intuitively configure core MongoDB parameters such as port, IP, data directory, and more.
- Integrated Toolchain: ServBay automatically manages and bundles the official MongoDB Shell (
mongosh) and MongoDB Database Tools, giving you instant access to essential tools likemongostat,mongotop,mongodump, andmongorestore.
This guide provides you with a comprehensive, step-by-step walkthrough from scratch to mastery—covering installation, configuration, interactive management, real-time performance monitoring, data backup, and restore.
1. Installing and Configuring MongoDB Service
Step 1: Install MongoDB Package
The first step in ServBay is to install the MongoDB service itself.
Open the ServBay application.
In the left navigation bar, click on Packages.
Scroll down to the
Databasescategory in the package list and locate theMongoDBsection.Choose the MongoDB version required for your project (e.g.,
MongoDB 7.0), and click the install button on its right. ServBay will automatically download and complete the installation.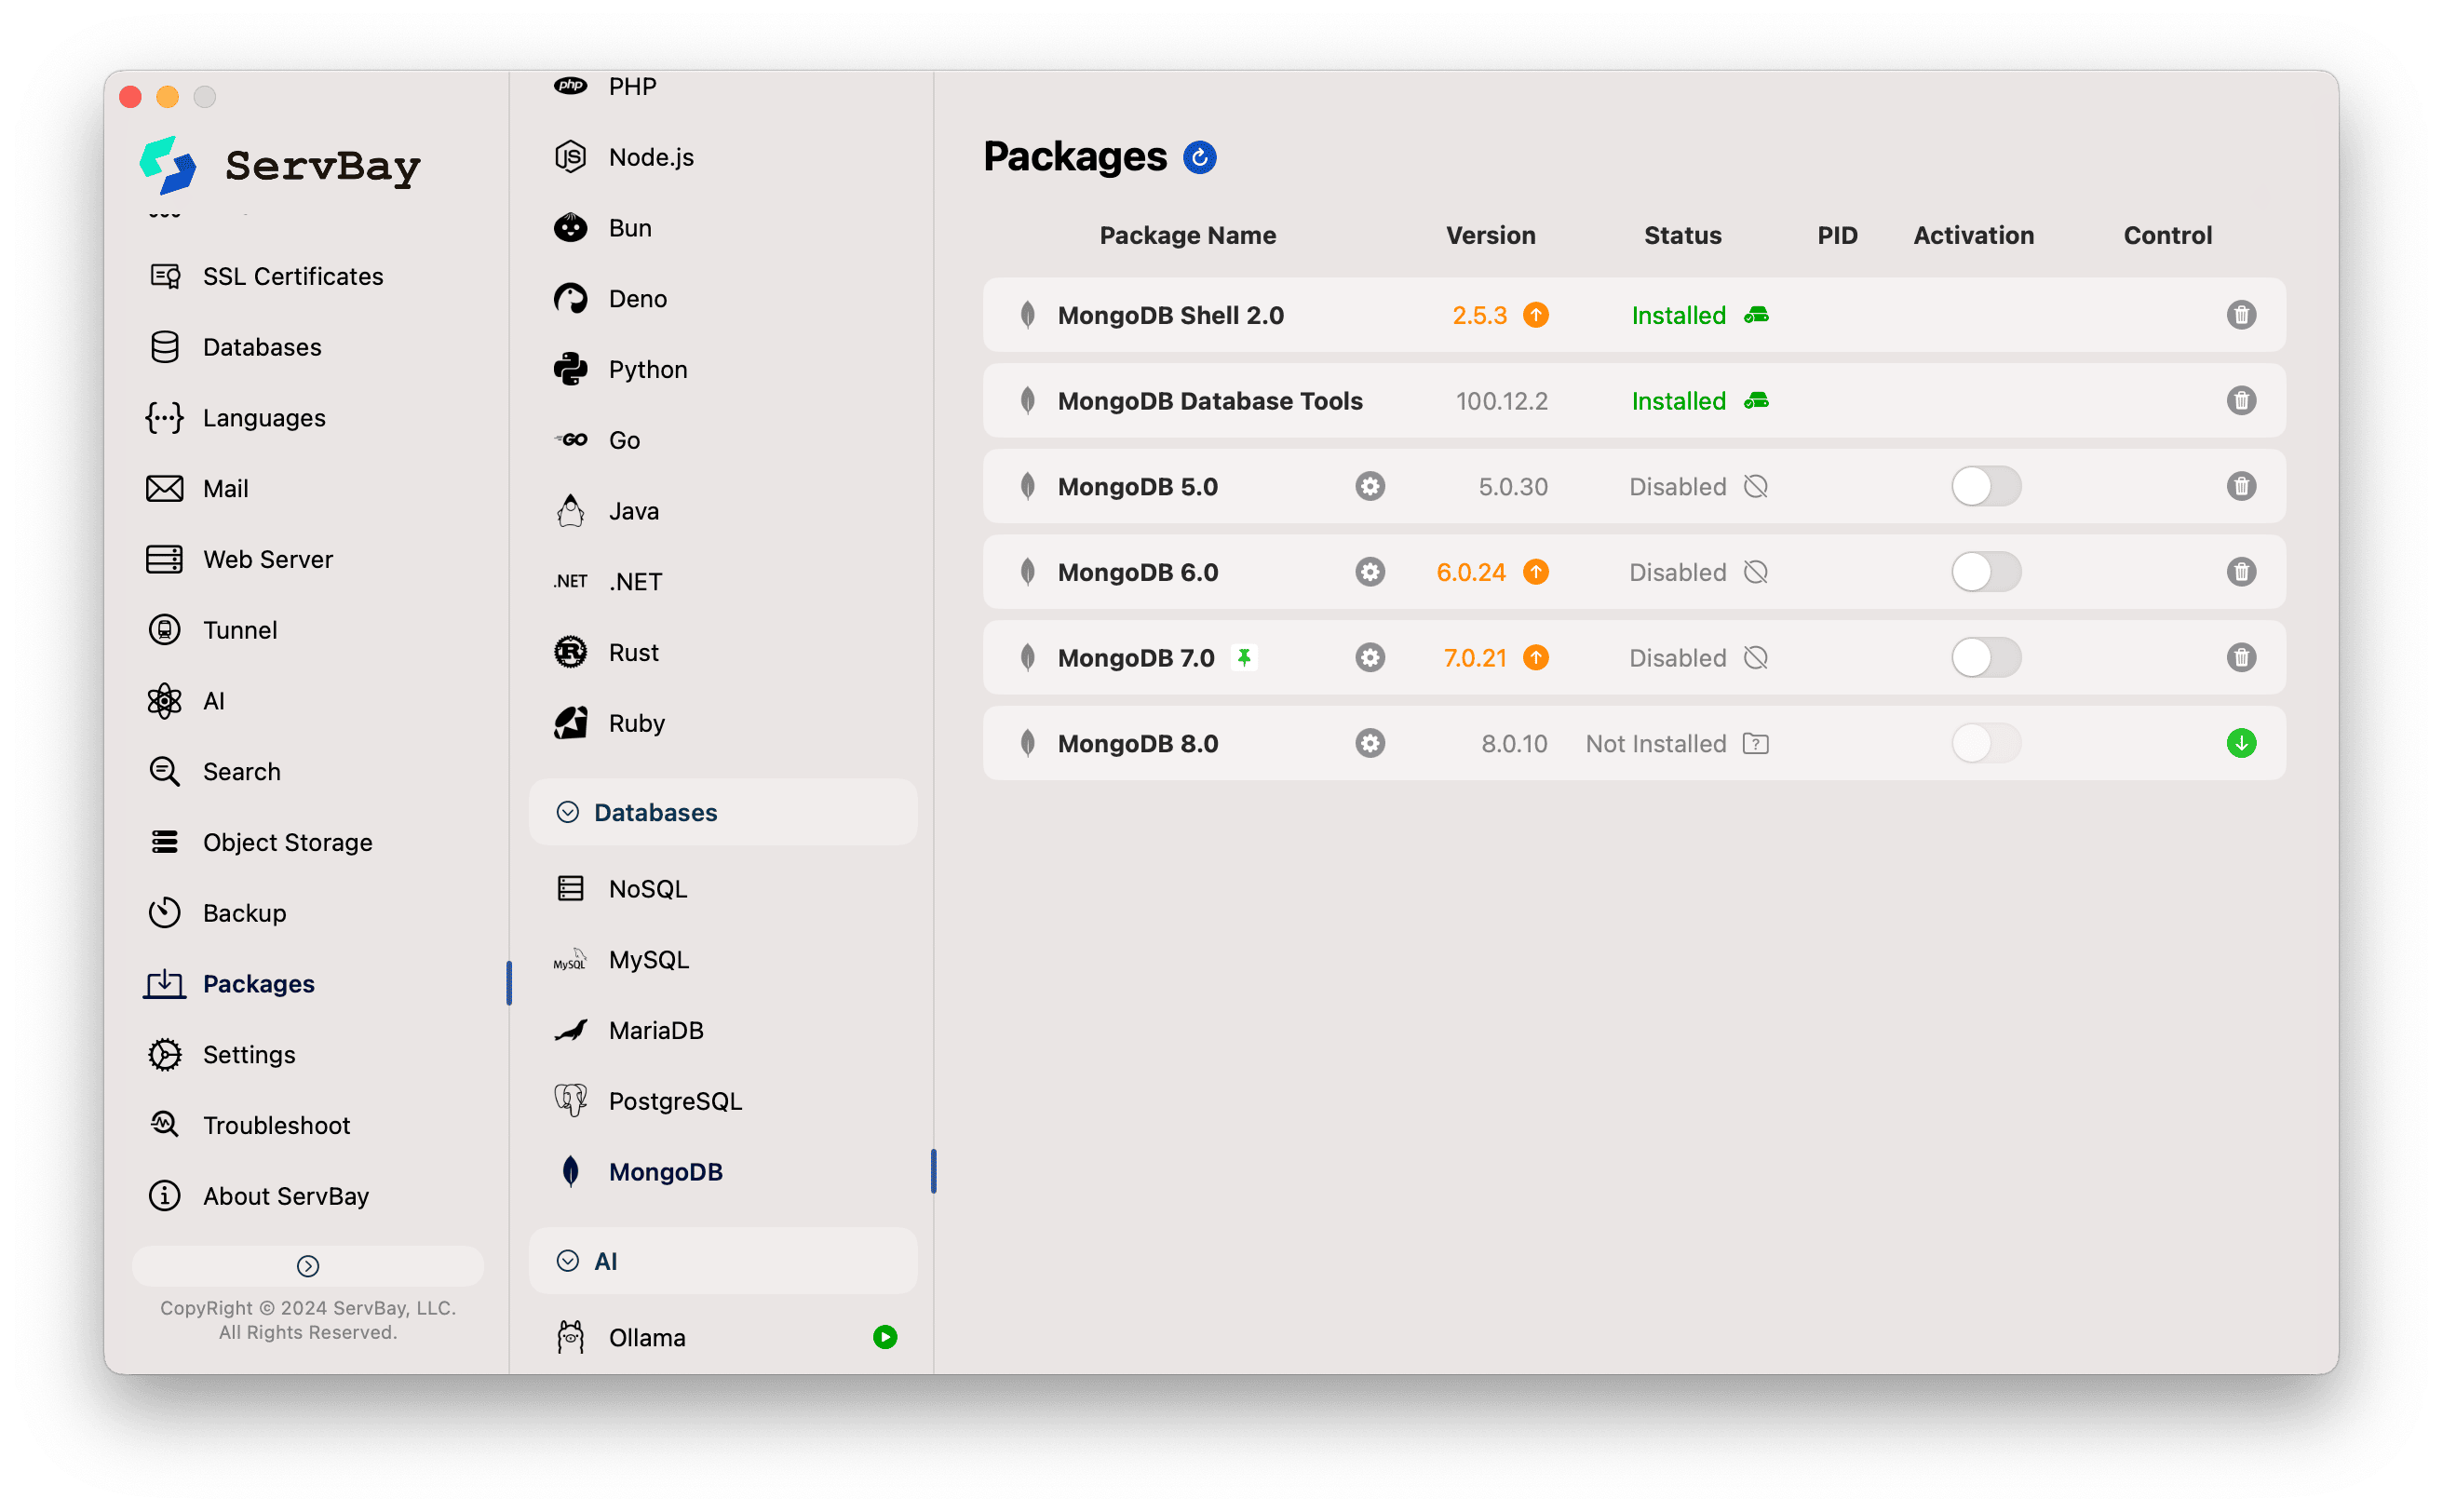
Step 2: Fine-tune MongoDB Service Configuration
Once installed, you can configure the MongoDB service in detail.
In the left navigation bar, click Databases -> MongoDB -> the version you just installed (e.g.,
MongoDB 7.0).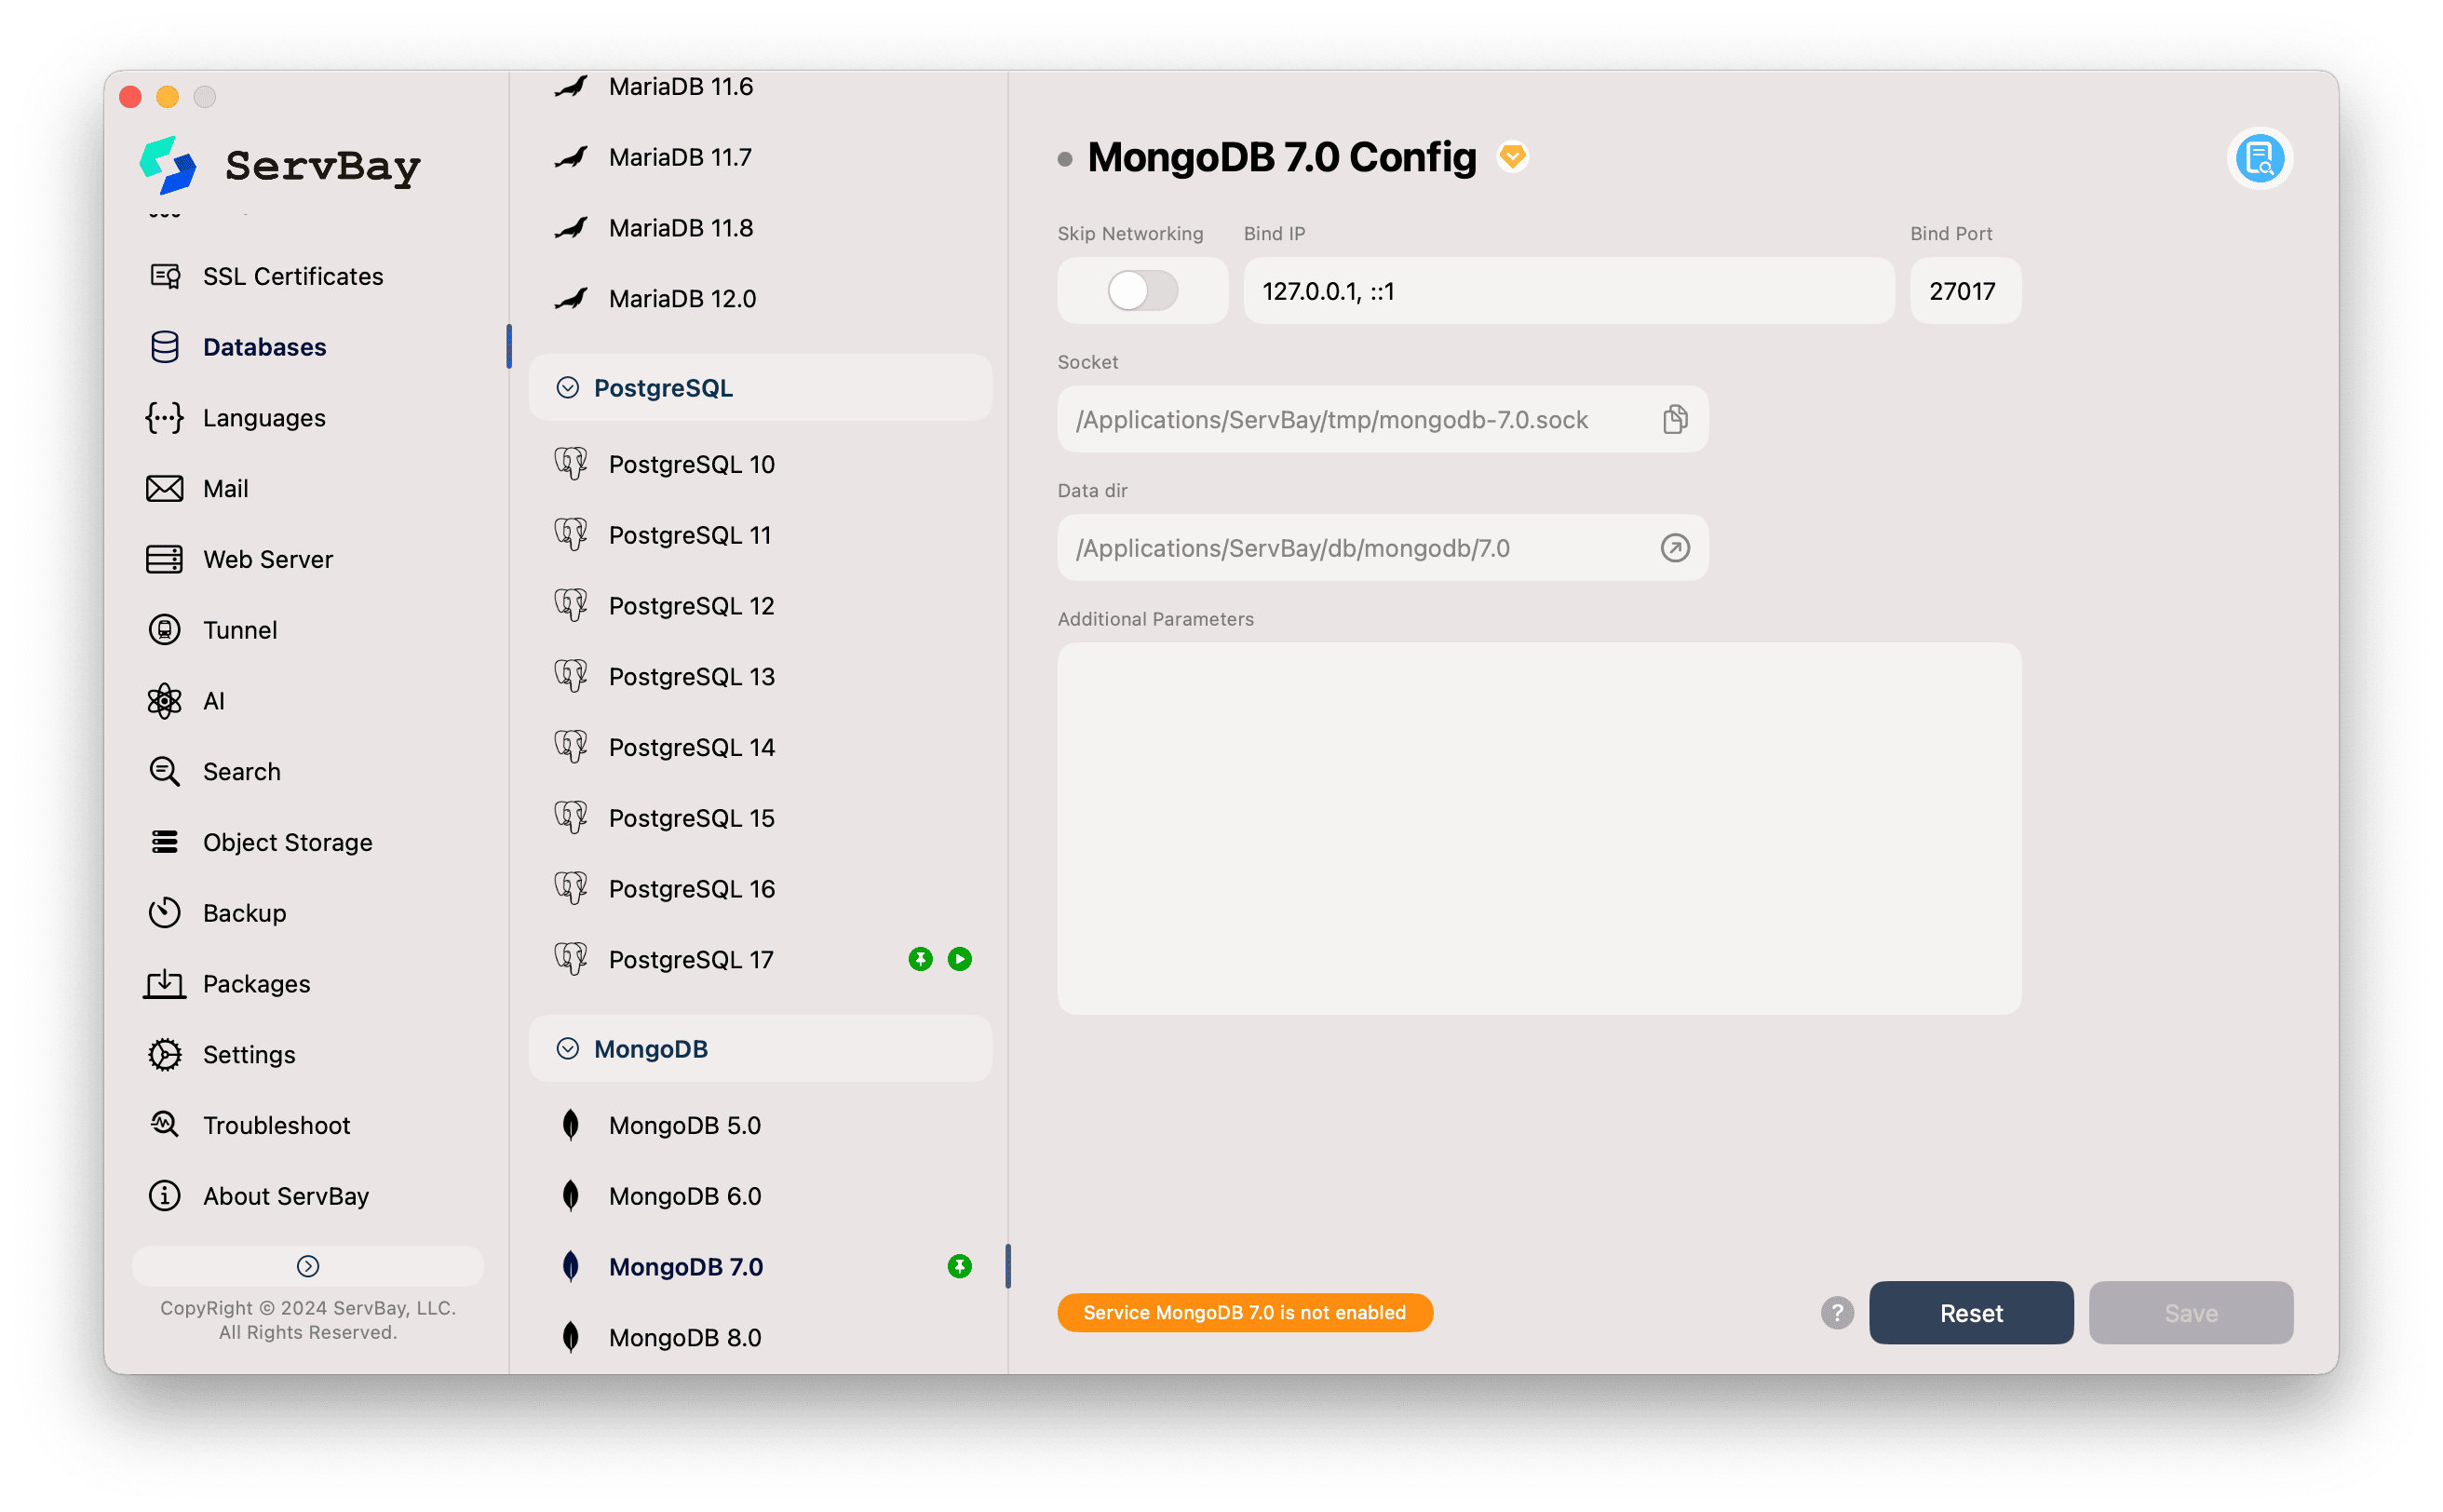
In this interface, you can customize the following core settings:
- Bind IP: This is the IP address MongoDB will listen for network requests on. The default
127.0.0.1, ::1is the safest local development setting, meaning only applications on your own machine can connect to the database. - Bind Port: The connection port for the database. The default MongoDB port is
27017; unless you have special requirements, it's recommended to keep this setting. - Socket: The path to the Unix socket file. For local connections, using a socket is more efficient than the TCP/IP stack as it bypasses the network layer.
- Data dir: This is the local disk path where MongoDB stores all database files (including collections, indexes, etc.). ServBay will set a sensible default for you. Click the folder icon on the right to quickly locate this directory in Finder.
- Additional Parameters: An advanced configuration area. You can enter additional MongoDB startup parameters here. For example, to enable access control, you might add
--auth.
- Bind IP: This is the IP address MongoDB will listen for network requests on. The default
Step 3: Start the MongoDB Service
- After configuring, make sure to click the Save button in the bottom right.
- Go back to the Packages page, find the MongoDB version you just configured, and toggle the switch on its right to start the service.
- When the switch turns green and the status indicator lights up, your MongoDB instance is running and ready to accept connections.
2. Interactive Management: Mastering MongoDB Shell (mongosh)
mongosh is MongoDB’s modern official command-line interface, offering syntax highlighting, intelligent autocompletion, command history, and scripting capabilities. It’s the go-to tool for database interaction.
Installing MongoDB Shell
ServBay provides mongosh as a standalone package, which you can install as needed.
- On the Packages page, find
MongoDB Shell. - Click the install button on the right. After installation, the
mongoshcommand will be globally available in terminals managed by ServBay.
How to Use mongosh
You can use mongosh in any terminal that supports the ServBay environment (such as macOS Terminal or iTerm2).
Basic Connection: Open the terminal and connect to your local MongoDB instance on port
27017with the simplest command:bashmongoshOr use a complete, explicit connection string:
bashmongosh "mongodb://127.0.0.1:27017"Rich Interactive Operations (CRUD Example): Once connected, you'll be in a powerful interactive JavaScript environment. Here’s a full sample walkthrough.
Step 1: Select or Create a Database
javascript// This command switches to the servbay-demo database. If it doesn't exist, it will be created automatically on first write. use servbay-demoStep 2: Create Collection and Insert Data (Create)
javascript// Insert a single user document db.users.insertOne({ _id: 1, name: "Alice", email: "alice@servbay.demo", age: 30, tags: ["developer", "php", "backend"], joined_date: new Date("2023-01-15") }) // Insert multiple user documents to enable richer queries db.users.insertMany([ { _id: 2, name: "Bob", email: "bob@servbay.demo", age: 25, tags: ["designer", "ui", "frontend"] }, { _id: 3, name: "Charlie", email: "charlie@servbay.demo", age: 35, tags: ["developer", "python", "data"] }, { _id: 4, name: "Diana", email: "diana@servbay.demo", age: 29, tags: ["developer", "nodejs", "backend"] } ])Step 3: Query Data (Read)
javascript// Query all documents in the collection and pretty print output db.users.find().pretty() // Conditional query: find all developers older than 28 db.users.find({ age: { $gt: 28 }, tags: "developer" }) // Return only specified fields: only get names and emails db.users.find({}, { name: 1, email: 1, _id: 0 })Step 4: Update Data (Update)
javascript// Update a document: add a 'lead' tag to Alice and update her age db.users.updateOne( { name: "Alice" }, { $set: { age: 31 }, $addToSet: { tags: "lead" } } // $addToSet ensures tags aren't duplicated ) // Update multiple documents: mark all 'backend' developers as 'active' db.users.updateMany( { tags: "backend" }, { $set: { status: "active" } } )Step 5: Delete Data (Delete)
javascript// Delete a document db.users.deleteOne({ name: "Bob" }) // Verify the result after deletion db.users.find({ name: "Bob" }).count() // Should return 0
3. Real-Time Monitoring & Management: Mastering MongoDB Database Tools
ServBay also integrates the MongoDB Database Tools package, which includes important tools for advanced administration and operations such as mongostat, mongotop, mongodump, and mongorestore.
Installing MongoDB Database Tools
- On the Packages page, find
MongoDB Database Tools. - Click the install button on the right.
3.1 Using mongostat for Real-Time Instance Monitoring
mongostat is like MongoDB’s “heartbeat monitor”, showing high-frequency snapshots of core metrics in your database instance. It's your tool of choice for diagnosing performance bottlenecks and tracking operational load.
Basic Usage: Open a new terminal and run the command below; it refreshes data every second:
bashmongostatYou’ll see an output sample like this, where each line is a snapshot in time:
insert query update delete getmore command dirty used flushes vsize res qrw arw net_in net_out conn time *0 *0 *0 *0 0 1|0 0.0% 23.2% 0 1.29G 84.0M 0|0 1|0 103b 501b 4 Nov 26 15:30:00.001 *0 *0 *0 *0 0 1|0 0.0% 23.2% 0 1.29G 84.0M 0|0 1|0 71b 501b 4 Nov 26 15:30:01.001Key Column Explanations:
insert,query,update,delete: Number of each operation per second.dirty: Percentage of “dirty” data in cache (modified but not yet written to disk).used: Percentage of cache in use by the storage engine.vsize,res: Virtual and resident memory usage.qrw,arw: Number of clients waiting for read/write in the queue.net_in,net_out: Network input/output traffic.conn: Current number of connections.
In Practice: Observing High-Concurrency Write Load
- Open a terminal (Terminal A), connect using
mongosh, and run a simulated log writing script:javascript// Run in mongosh use log_system print("Starting high-frequency log insertion...") while (true) { db.app_logs.insertOne({ level: "INFO", message: "User activity detected.", timestamp: new Date() }); sleep(50); // Insert once every 50 ms (20 times/sec) } - Open another terminal (Terminal B), run
mongostatwith a 2-second refresh interval for summarized data:bashmongostat 2 - Observe Terminal B’s output: You’ll see the
insertcolumn at around*40(20 insertions/sec × 2 seconds), indicating write operations are the current main load.
- Open a terminal (Terminal A), connect using
3.2 Using mongotop to Track Collection Read/Write Time
If mongostat shows that “the database is busy”, mongotop tells you “what’s making it busy.” It breaks down the time spent on read and write operations per collection, helping you quickly pinpoint performance hot spots.
Basic Usage: In the terminal, run
mongotop. By default, it refreshes every second.bashmongotopOutput Sample:
ns total read write time local.oplog.rs 1101ms 155ms 946ms Nov 26 15:35:00.000 servbay-app.sessions 210ms 1ms 209ms Nov 26 15:35:00.000 servbay-app.articles 15ms 15ms 0ms Nov 26 15:35:00.000Key Column Explanations:
ns: Namespace (database.collection).total: Total read/write time on that collection.read: Time spent on read operations.write: Time spent on write operations.
In Practice: Identifying Hot Collections in an App
- In Terminal A (
mongosh) simulate an application that frequently updates user sessions and occasionally reads articles:javascript// Run in mongosh use servbay_app print("Simulating application load...") // Frequently update sessions setInterval(() => { db.sessions.updateOne({ sid: "session_abc" }, { $set: { data: Math.random() } }, { upsert: true }); }, 50); // Update every 50 ms // Less frequently read articles setInterval(() => { db.articles.find({ tags: "featured" }).limit(5).toArray(); }, 500); // Read every 500 ms - In Terminal B, run
mongotopand set a 5-second refresh interval for steadier observation:bashmongotop 5 - Check Terminal B’s output: You’ll notice the
writeandtotalcolumns forservbay_app.sessionsare very high, whilereadtime forservbay_app.articlesis much lower. This immediately reveals that the main performance bottleneck could be the frequent writes to thesessionscollection—suggesting you may want to optimize your session management strategy.
- In Terminal A (
3.3 Using mongodump for Data Backup
mongodump is a robust tool for creating binary (BSON) backups of your MongoDB data.
- Backup a Single Database:bash
mongodump --db servbay-demo --out /Applications/ServBay/backup/mongodb/servbay-demo-backup-$(date +%F) - Backup a Single Collection:bash
mongodump --db servbay-demo --collection users --out /Applications/ServBay/backup/mongodb/users-backup - Backup the Entire MongoDB Instance (All Databases):bash
mongodump --out /Applications/ServBay/backup/mongodb/full-instance-backup
3.4 Using mongorestore for Data Restore
mongorestore imports data backed up by mongodump into your MongoDB instance.
- Restore a Single Database:bash
# The --drop option will clear collections of the same name before restoring for a clean slate mongorestore --drop --db servbay-demo /Applications/ServBay/backup/mongodb/servbay-demo-backup-2023-11-26/servbay-demo/ - Restore a Single Collection from Backup as a New Collection:bash
mongorestore --db servbay-demo --collection users_restored /Applications/ServBay/backup/mongodb/users-backup/users.bson
4. Connecting GUI Tools
In addition to the command line, you can also use any mainstream MongoDB graphical management tool to connect to and manage databases running in ServBay. This is especially convenient for data browsing and aggregation pipeline building. Recommended tools include MongoDB Compass, TablePlus, or Studio 3T.
When connecting, configure the following in your GUI tool:
- Host:
127.0.0.1 - Port:
27017 - Authentication: Leave this empty unless you have enabled authentication (
--auth) via additional parameters and created a user.
Summary
ServBay perfectly combines the power of MongoDB with the elegant experience of macOS, providing developers with an unrivaled local development environment. With this guide, you've not only learned how to quickly set up and run MongoDB, but also mastered fine-grained management with mongosh, professional performance monitoring with mongostat and mongotop, and reliable data backup and restore through mongodump and mongorestore. You’re now fully prepared to confidently leverage MongoDB in your next project.
